exist Stock Photo In the first chapter, the img2img method is introduced. In addition to solving the problems of Stock Photo, this method is also suitable for multiple scenarios.
This chapter will focus on the avatar prompt generated using this method. And starting from this chapter, we will gradually enrich our prompt structure to make it more complete.
Precautions
Before introducing the application of img2img, I would like to emphasize:
- Don't be on Discord Midjourney Upload your own photos to the public group! This way your photos will be visible to everyone in the public group. It is recommended to use Midjourney Bot.
- In addition, for non-pro paid members, the generated pictures will be visible to other members. But you can delete the generated pictures after generating the avatar. If you still don't know how to use Bot and delete photos, please see the basic operation section.
- I won't go into too much detail about the operation of img2img. If you are still not sure, you can read the basic operation and the Stock Photo article.
3D Cartoon Avatar
The first thing I want to share is the cartoon avatar. First of all, I want to emphasize:
- I have basically read and tried all the tutorials on generating avatars both at home and abroad, and also communicated with people in the Midjourney community. My understanding is that with the current capabilities of V5, no matter how you adjust the prompt, if you want to use the img2img method to generate an image that is very similar to the original image, it basically depends on luck. Even if you use the seven methods introduced above, it only increases the probability. If you have a method to make the avatar very similar, you might as well share it with me through Issue. I will sign your name and share it with everyone.
- During the learning process, if you find that the generated image does not look like the original image, don't be discouraged. This is normal.
- You can use the method I shared to generate a cartoon avatar with the original image's spirit. Please note that it will definitely not look exactly like the original image.
Add the original image link to the prompt (it is recommended to use a photo with a ID or a photo with a simple background, so the success rate will be higher), and then use the framework I mentioned earlier to design a prompt:
|
|
explain |
|
|
What is the type? |
Portraits / Avatar |
If your original image is an ID photo, you can add the word "portrait" or "Avatar" in the prompt. |
|
What is the subject? |
smiling cute boy, undercut hairstyle |
This is optional. You can leave this description blank and just fill in the rest of the prompts. If the generated picture doesn't look like you, then add some words to describe your avatar, usually gender, appearance, hairstyle, accessories (such as glasses, earrings, etc.), expression, etc. Note that you should try to input the parts with strong features. If the features are correct, the generated picture will basically look like you. |
|
What is the background? |
white background |
I have kept the white background of the ID photo here, you can add some real-life scene backgrounds, such as a restaurant. |
|
What is the composition like? |
null |
Because we uploaded the picture in advance, the picture is a ID photo, so there is no need to fill it in |
|
What lens to use? |
soft focus |
Soft focus refers to the effect of using a soft focus lens in photography, which makes the image both clear and soft. It is usually used when taking portraits. I added this in the prompt to make the photo softer. You can also choose not to add it. |
|
What style? |
3d render,Pixar style |
Because the goal is to generate 3D photos, I added 3D rendering here, as well as my favorite Pixar style. |
|
parameter |
—iw 2 |
iw is a text and img weight parameter. The larger the value, the more similar it is to the original image. For an introduction to this value, see the Advanced Parameters section. |
Finally, three more tips:
- If the photo you generated does not look like the preset photo, you can pick a more similar one from the four pictures, then click V (Variation) to let the model continue generating, then pick another more similar photo, and then continue generating new photos until a more similar one appears.
- The second one is amazing. If you have tried the first two methods and your generated image still doesn’t look like the original image, then add “wear glasses” in the prompt. It’s really amazing. As long as I add “wear glasses”, it looks a lot like the original image. If you are wearing glasses in the original image, try adding —no glasses in the parameters, and you will get a picture that looks even less like you.
- Finally, we can use one more parameter. This method will be discussed in detail in Tip 8.
At the end of this chapter, there is an example of my ID photo.
Tip 7: Use multiple parameters simultaneously
When using the img2img method to generate avatars, I found that the problem was that the weight of text was higher than that of the image, which caused the generated image to look different from the original image. The iw parameter in V5 can only increase the image weight to 2 at most, so I was wondering if it is possible to further reduce the weight of text.
Then I tried the s parameter and found that it was indeed much better.
If the generated image still doesn't look like the original, you can add another parameter -s 200 based on -iw 2. Note that there should be no comma in between when using both parameters. I found that adding the s parameter does make the image look a lot more like the original. I personally guess that using s and iw together will further weaken the weight of the text.
s controls the stylization of the generated image. In simple terms, the lower the value, the more it will match the description of the text prompt. The higher the value, the stronger the artistic quality, but the less relevant it will be to the text prompt. So if the generated image still doesn't look like the text prompt, increase this value, for example, to 500.
I want to tell you through this case that using multiple parameters together may form a synergy and further amplify the model's capabilities. In the future, when there are new parameter capabilities, why not think about whether it is possible to use them together?
Anime style avatar
As with the 3D cartoon avatar, the main changes are in the image style:
|
|
Prompt |
explain |
|
What is the type? |
Portraits / Avatar |
Continue using the same description |
|
What is the subject? |
smiling cute boy, undercut hairstyle |
Continue using the same description |
|
What is the background? |
white background |
Continue using the same description |
|
What is the composition like? |
null |
Continue using the same description |
|
What lens to use? |
null |
Because it is a comic style, no soft light lens is used |
|
What style? |
anime, Studio Ghibli |
The goal is to make an anime-style avatar, so here I added anime (anime), and then added Ghibli style |
|
parameter |
—iw 2 —s 500 |
Note that when using two parameters at the same time, there should be no comma in between. |
Cyberpunk avatar
This is one of my favorite styles, and it only requires changing the style and background:
|
|
Prompt |
explain |
|
What is the subject? |
cyberpunk robot face, holographic VR glasses, holographic cyberpunk clothing |
Added facial modifications, put on VR glasses, and wore cyberpunk-style clothes |
|
What is the background? |
neon-lit cityscape background |
In order to make the picture more cyberpunk, a neon city background was added to make it look more cyberpunk. |
|
What style? |
Cyberpunk, by Josan Gonzalez |
Added a cyberpunk style, and my favorite cyberpunk painter Josan Gonzalez |

Tip 8: Use the Seed parameter to modify the graph again
Note: I personally think this technique has great potential in the future, but the current implementation effect of Midjourney is still relatively general and the effect cannot be guaranteed. The official community help document also mentioned that this function is very unstable in V5. For details, you can refer to the Midjourney official FAQ chapter that I compiled.
You may encounter a scenario similar to this:
- You enter a prompt and the machine generates 4 pictures
- You look at the four photos and find that one is okay, but you are not satisfied with the others. Then you change the prompt and the machine generates some more.
- But you are not satisfied with the photos generated this time, and you are very upset about why this happened.
- Then you're like, why can't you make changes to the first generated graph?
Theoretically, I think it is possible to modify the prompt a second time based on the result of a certain generation. Taking the cyberpunk avatar as an example, I first generated four pictures using the above prompt, then clicked the emoji button in the upper right corner of the message (Figure 1 below), then entered envelope in the input box (Figure 2 below), and then clicked the envelope emoji (Figure 3 below), and then the bot will send you the seed number.
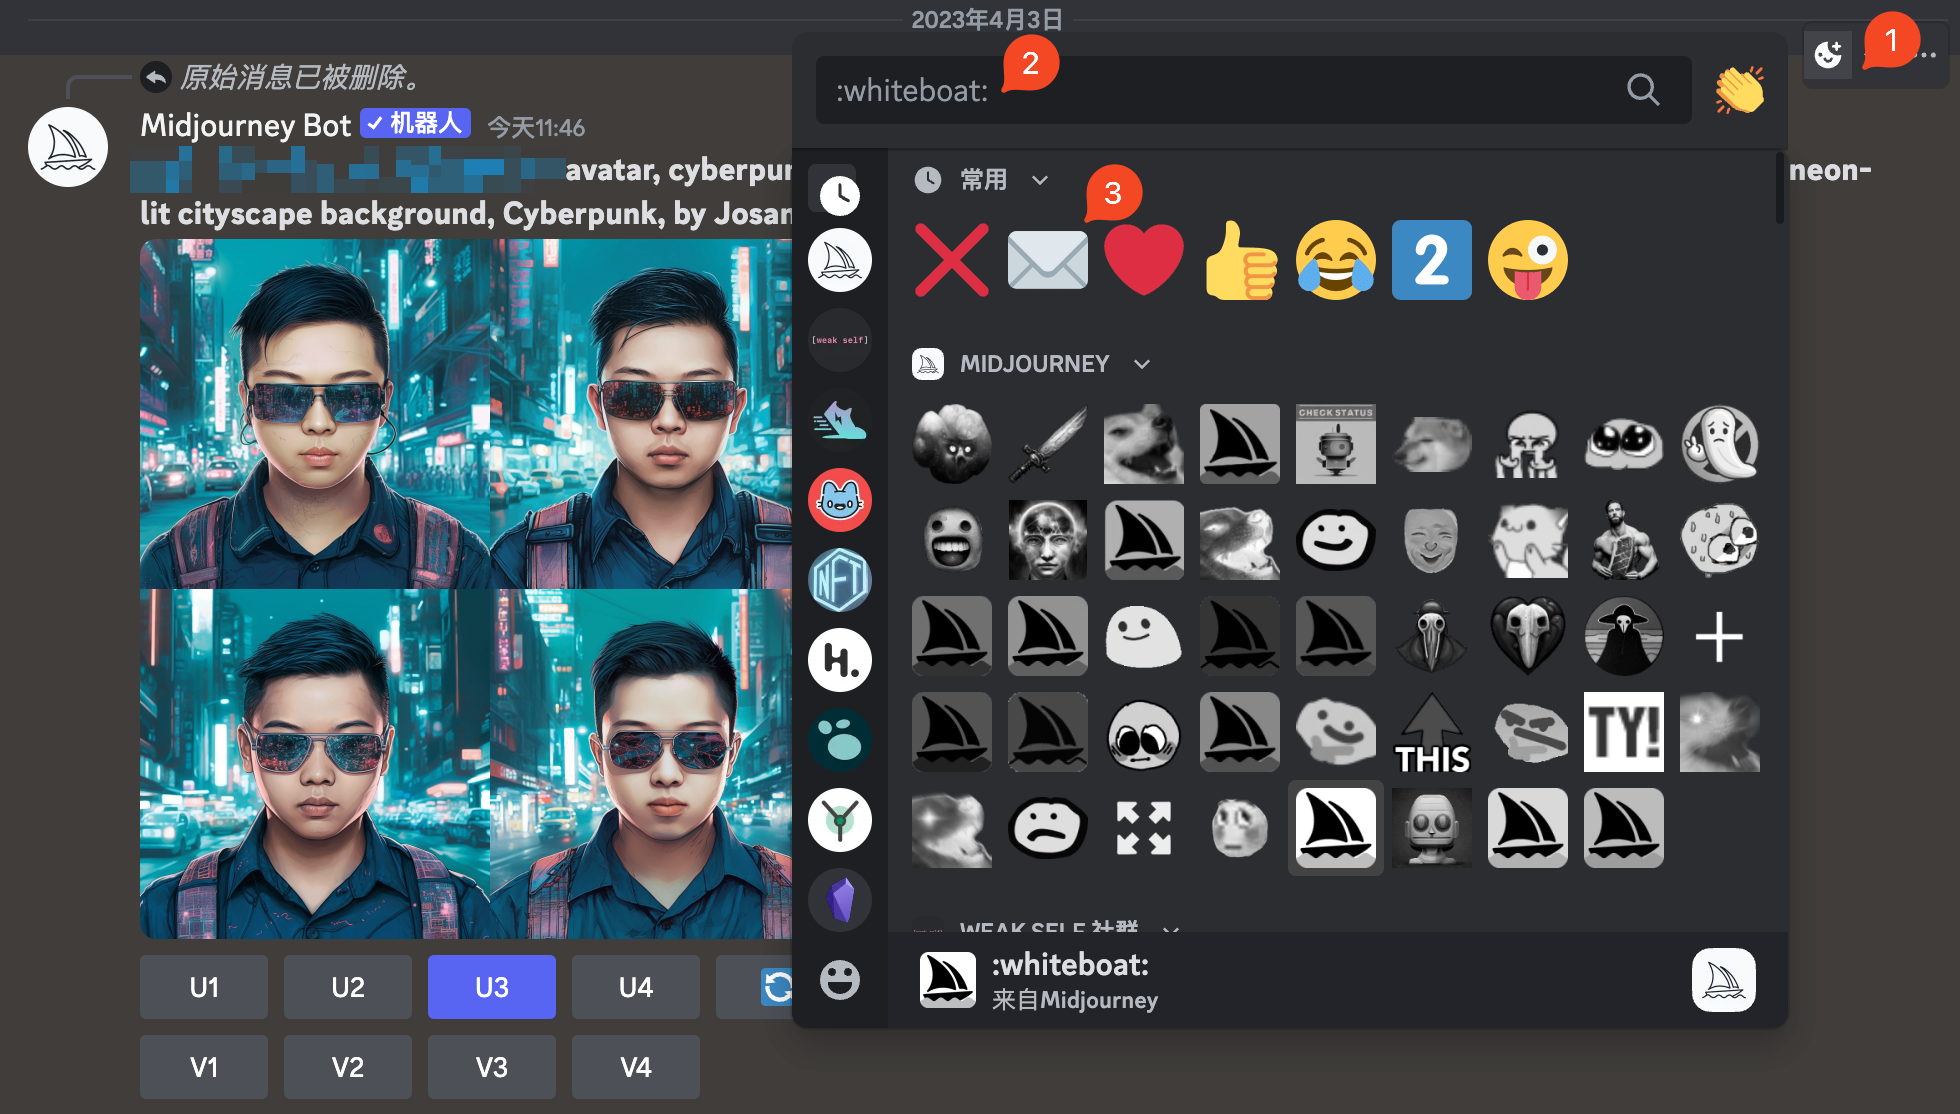
Then I modified the prompt of the cyberpunk avatar above and changed its background to China Town. At this time, please note:
- The new prompt doesn't just change the background, you need to keep the previous prompt.
- prompt only modifies the background part.
- Finally, add the seed parameter.
Here is my case:
Original prompt:
{img url} avatar, cyberpunk robot face, holographic VR glasses,holographic cyberpunk clothing, neon-lit cityscape background, Cyberpunk, by Josan Gonzalez --s 500 --iw 1
New prompt (the seed code is just an example, you need to fill in your own seed):
{img url} avatar, cyberpunk robot face, holographic VR glasses,holographic cyberpunk clothing, China Town background, Cyberpunk, by Josan Gonzalez --s 500 --iw 1 --seed 758242567
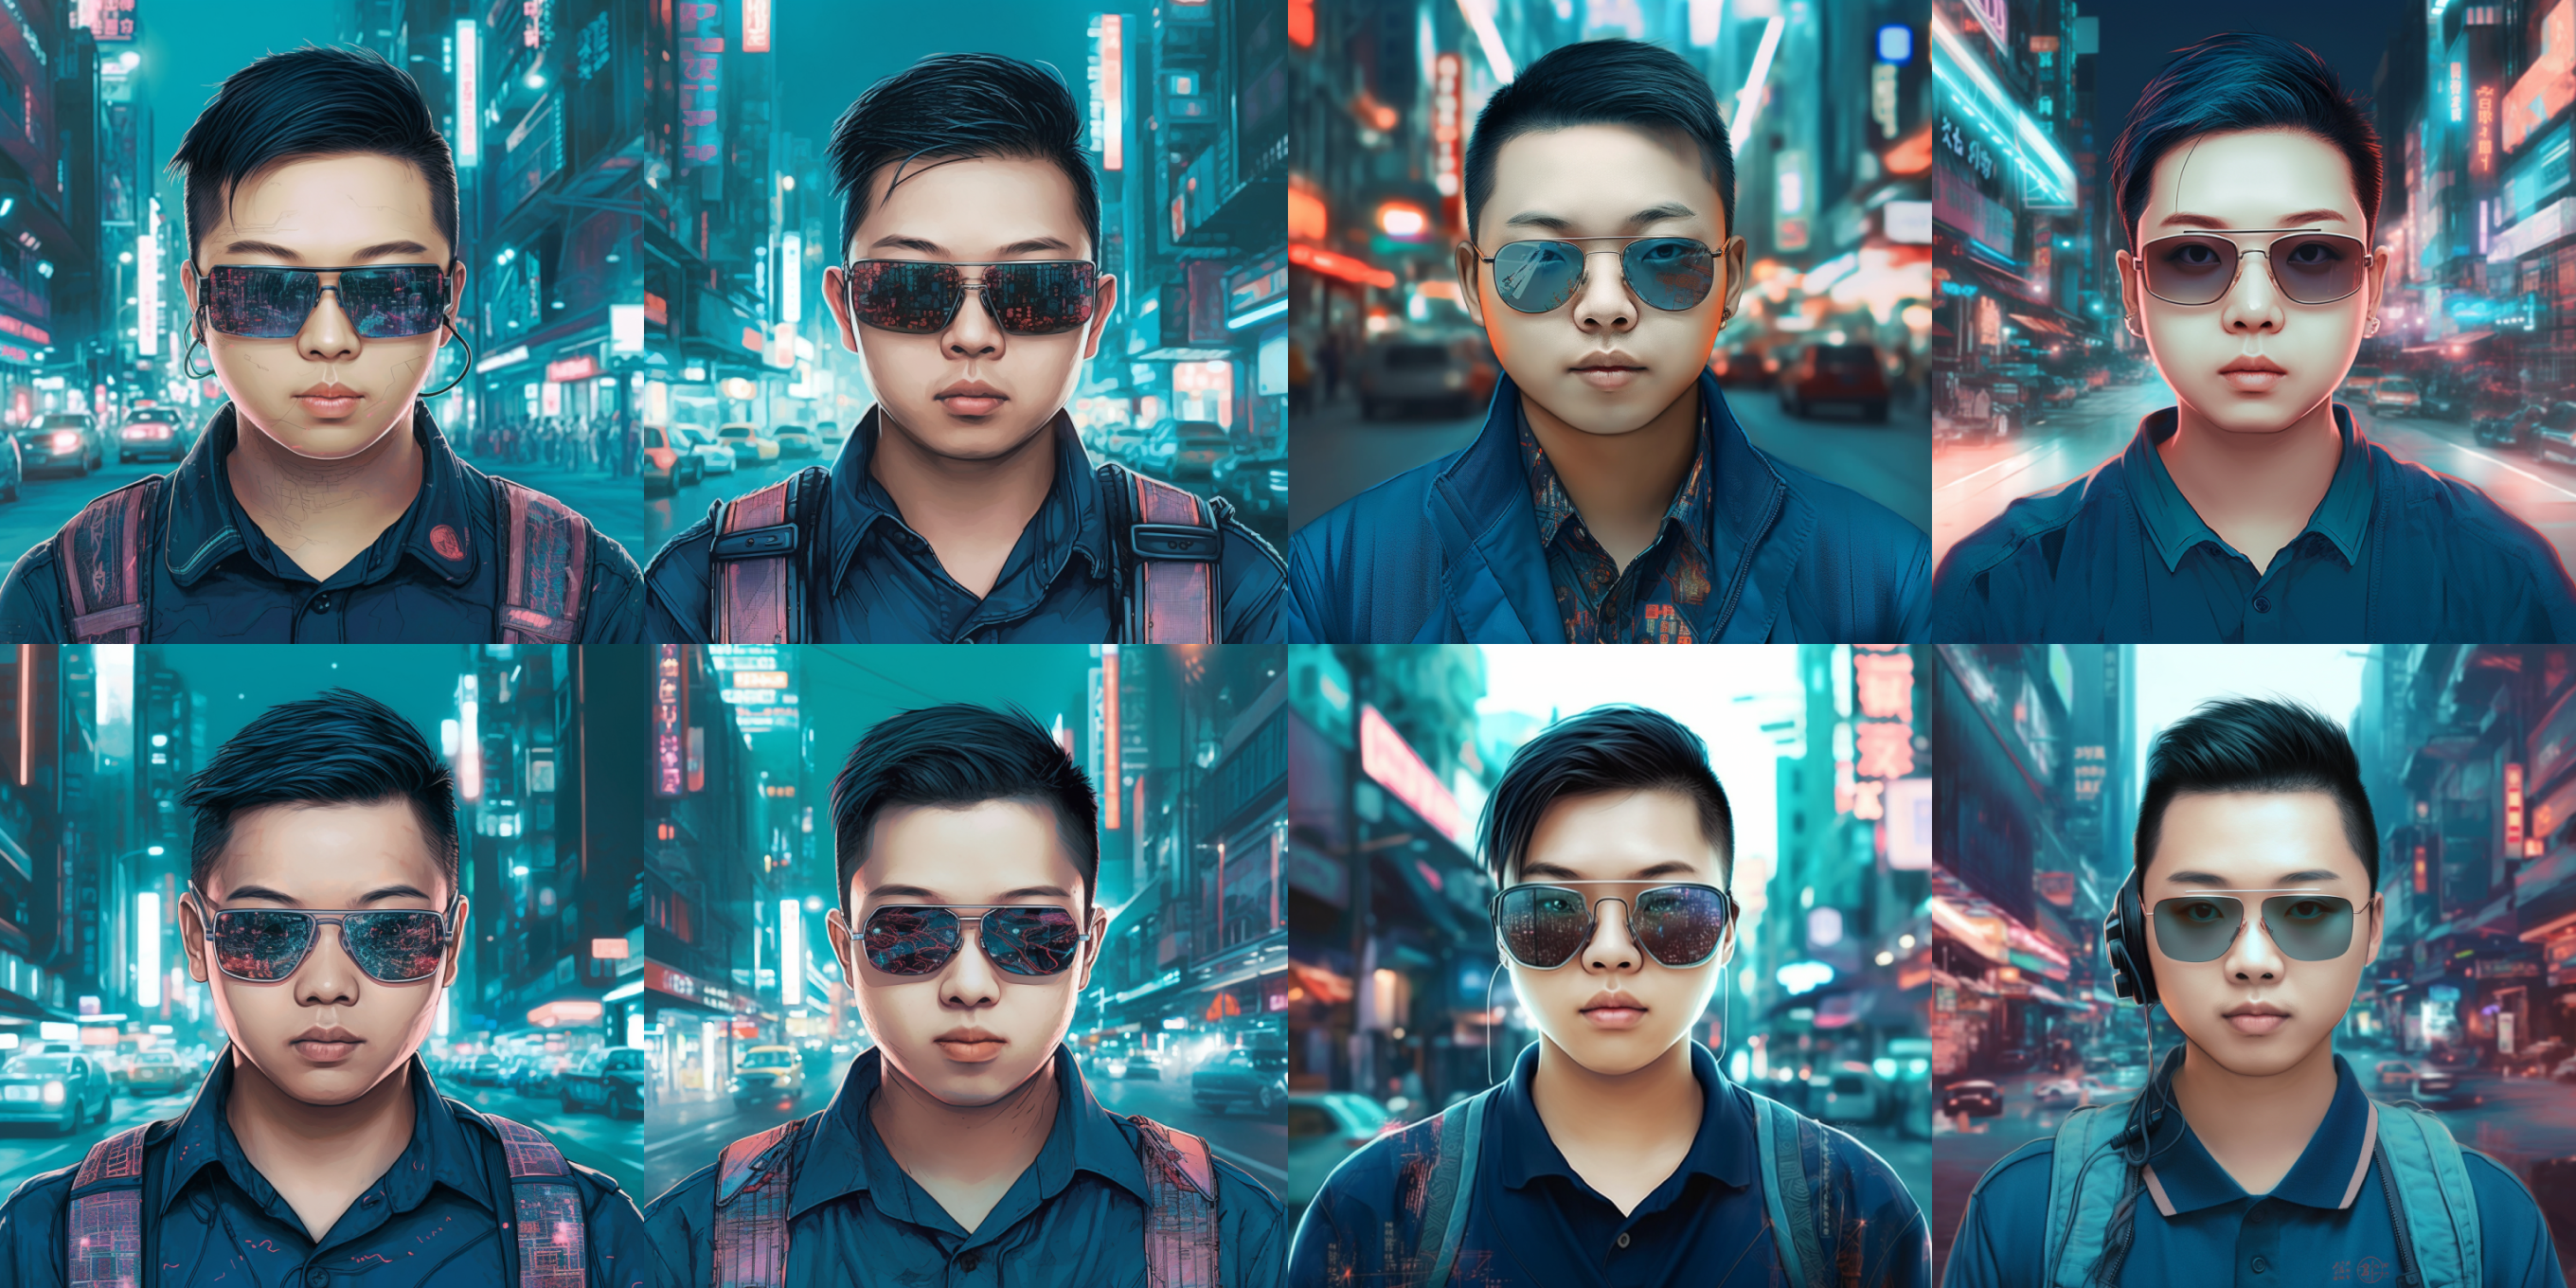
The following is the generated effect (the left picture is the original picture, and the right picture is the picture generated after using the seed). You can see that the background has indeed changed, but the appearance of the person has also changed a little
The effect is not very good, but I think it is worth exploring, which can improve the success rate of progressive optimization:
Tip 9: The mysterious blend function
To be honest, I don’t think this technique can be called a skill, but it is a very important feature of Midjourney, so I will focus on it here.
This feature is very simple to use. In the Discord input box, type /blend and then click this menu:

Your input box will then look like this:
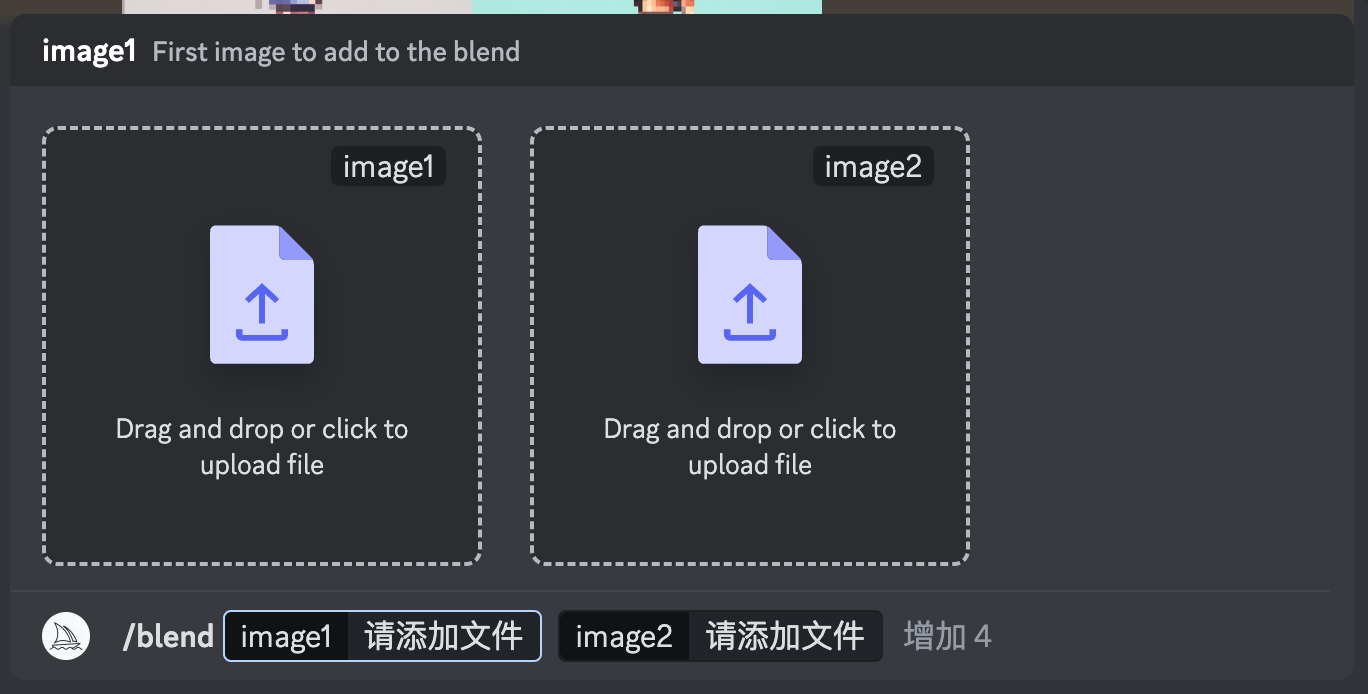
Then you can click on these two boxes and select the photos on your computer. After adding them, hit enter:
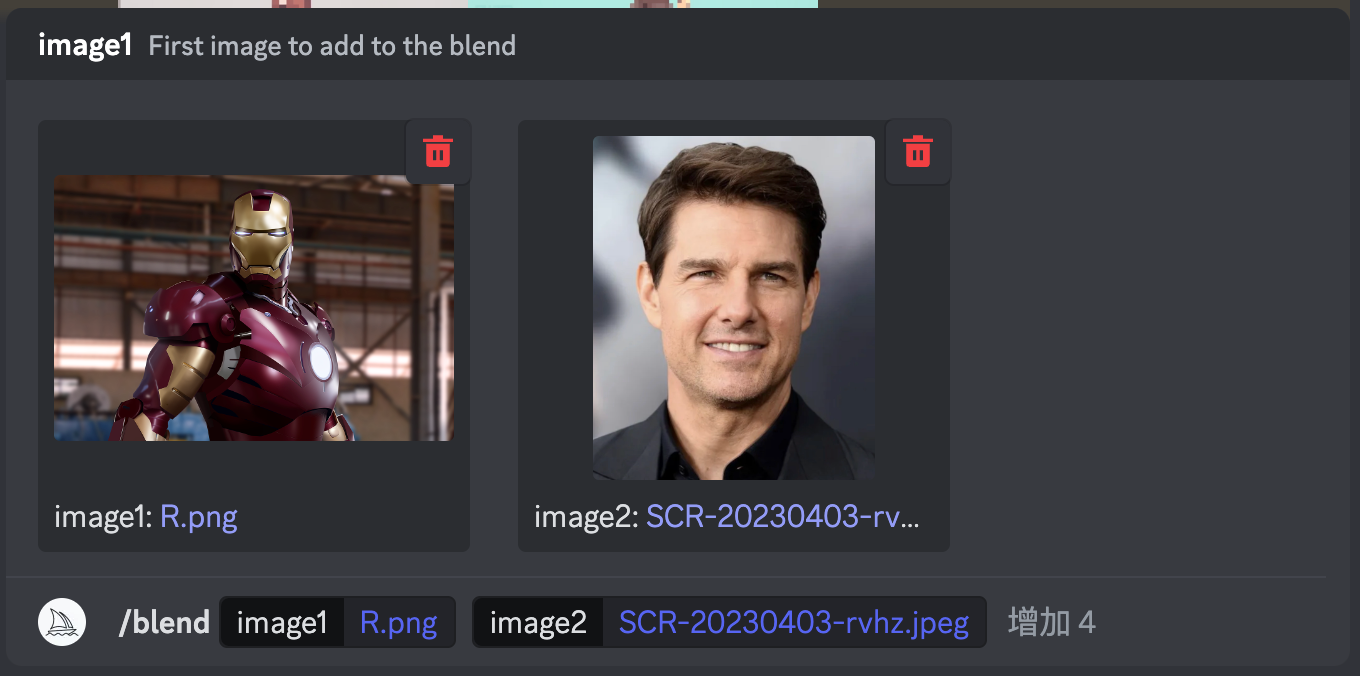
Then Midjourney will generate this awesome result, with Iron Man fused on the left and Buzz Lightyear fused on the right:
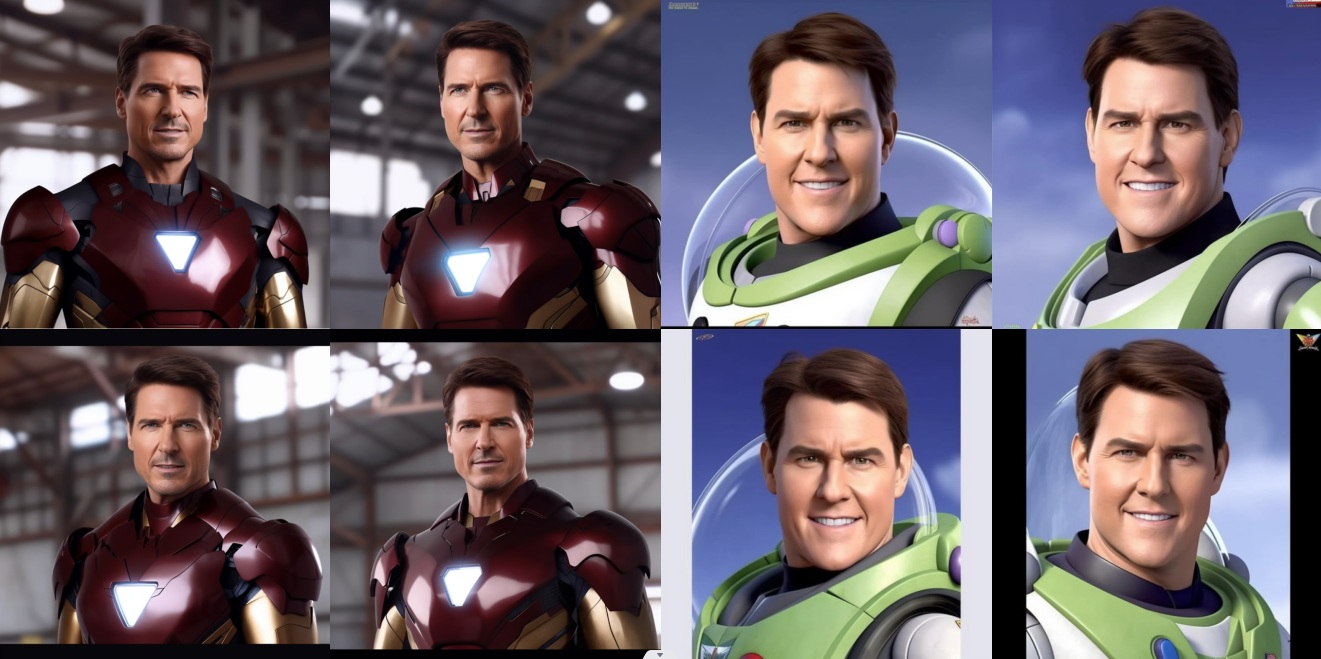
When I first saw this feature, I was very shocked. I thought it was the same effect as the "fusion card" used by the protagonists in Yu-Gi-Oh when I was a kid. Unfortunately, it is not. This feature is very unstable and can only achieve the above effect when multiple unknown conditions are met.
I originally planned to use this method to generate avatars, but I found that the effect was not very good when using my own photos or integrating photos of other styles. So far, the best effect is celebrity avatars. I feel that this is because Midjourney has fed a lot of celebrity avatars to the model, so the fusion effect is very good.
But I think it is really suitable for making avatars. By combining your avatar with another picture, you can generate a good picture. It is convenient and fast. Unfortunately, this function does not seem to be very easy to use at present.
Of course, this function is not limited to this. It also has many usage scenarios, which will be introduced to you later.