Starting from the second half of 2023,AI PaintingA new star appeared in the world——ComfyUIThis tool has quickly become popular among creators for its fast and smooth image generation capabilities, as well as its friendliness to low-configuration devices. One of the highlights of ComfyUI is the ability to load a large number of workflows with one click, allowing users to easily achieve functions such as portrait generation, background replacement, and picture animation.
If you are like many people,Web UIIf you are starting your stable diffusion journey, then you might be curious about the rise of ComfyUI. This tool is rapidly rising in popularity and has become the first choice for many AI painting enthusiasts. In this article, I will take you to learn about ComfyUI, an application that is changing the rules of the AI painting game.

#-ComfyUl Basic Introduction
ComfyUI is a node-based graphical user interface (GUI) designed specifically for Stable Diffusion. It enables users to build complex image generation workflows by linking different blocks (called nodes). These nodes can include various tasks such as loading checkpoint models, input prompts, specifying samplers, etc.
It is actually a more professional Stable Diffusion operating interface, but it is node-based. This node-based interface is actually widely used in various professional productivity tools, such as Blender, Unreal Engine, Da Vinci, etc.
Official introduction: https://github.com/comfyanonymous/ComfyUI?tab=readme-ov-file

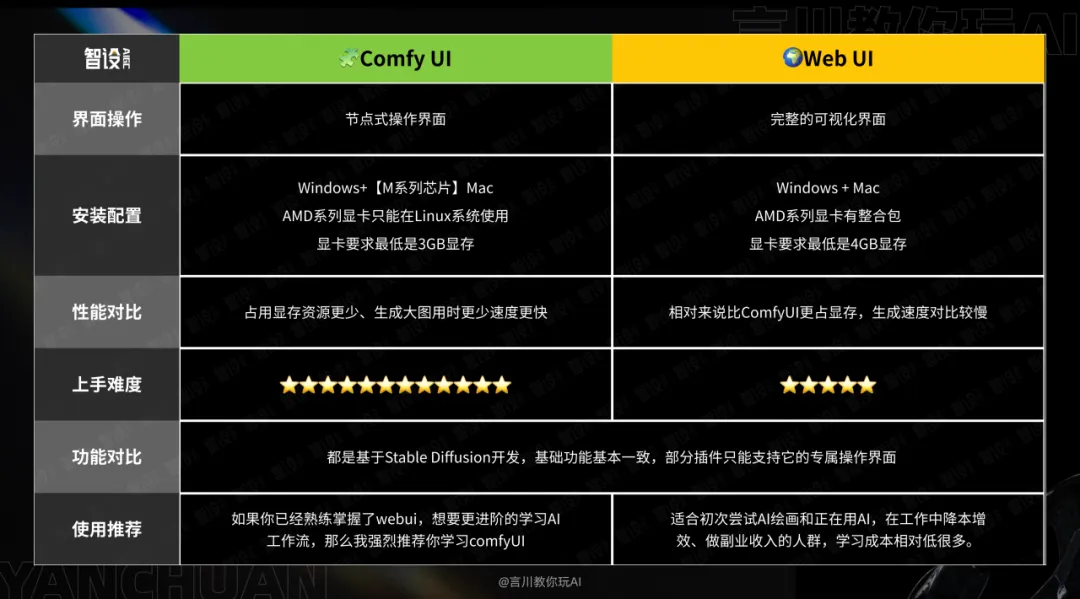
Comparison between WebUI and ComfyUI
ComfyUI provides extremely high degrees of freedom and flexibility, supports a high degree of customization and workflow reuse, has low requirements for system configuration, and can speed up the generation of original images. However, due to its numerous plug-in nodes and relatively complex operation processes, it is relatively difficult to learn.
On the other hand, WebUI features a fixed operating interface, which makes it easy to learn and get started quickly. After more than a year of development, it has established a mature and stable open source ecosystem. However, compared with ComfyUI, it may be slightly inferior in performance and has limitations in workflow replication, and users need to manually set it up each time they operate.
Therefore, it is recommended that beginners start with WebUI, and then consider switching to ComfyUI after becoming familiar with it, so as to make full use of the AI workflow and maximize efficiency.
User groups/scenario
So who is ComfyUI suitable for and what are its usage scenarios? Here are 6 categories:
Image Generation and Editing: Digital artists, designers, and photographers can use ComfyUI for complex image generation and in-depth editing.
- AI Research and Experimentation: AI researchers and developers can use ComfyUI to build and test image generation models and algorithms.
- Personalized content creation: Video makers, bloggers, and social media influencers can quickly generate personalized visual content.
- Education and Training: Educators can use ComfyUI to help students understand the basic concepts of image processing and generation.
- Game Development and Animation Production: Game and animation producers can use ComfyUI to generate game assets and character designs.
- Product design and simulation: Product designers can use ComfyUI to quickly generate design prototypes and visual renderings.
#-ComfyUl installation method
There are currently two common installation methods, one is to use the official integrated package and the other is to use the one-key launcher of Qiuye. Both installation methods are very simple and the installation methods are almost the same.
If you are worried that various strange errors will occur when using the official integration package, you can install a one-click launcher, which can avoid some errors.
Qiuye's launcher will have some built-in plug-ins and models, and has an exclusive graphical interface. It is convenient to update versions and install plug-ins later. Below I will demonstrate both installation methods. You can choose one installation method to complete the local deployment of comfyUI.
Official integration package installation
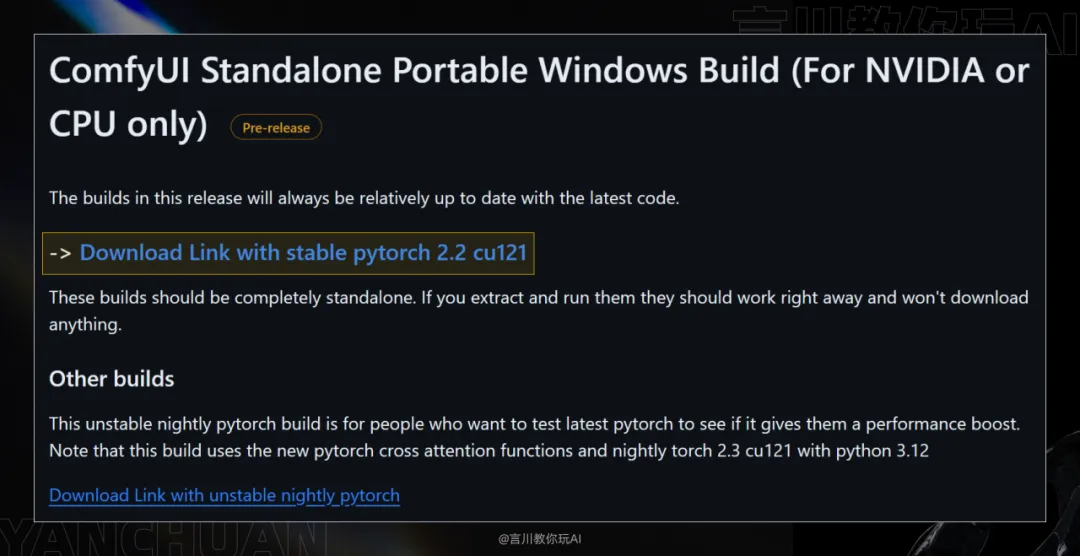
Go to the official Github address to download or download through the Baidu network disk link we prepared for you (homepage contact me):
ComfyUI official download address: https://github.com/comfyanonymous/ComfyUI/releases
After the download is complete, we click on the folder to enter, and you will see these folders. The [comfyui] folder is the root directory for running the program. The [update] folder is the version upgrade folder. The following [run_cpu.bat] file refers to running ComfyUI with the CPU, and [run_nvidia_gpu.bat] is to run the ComfyUI interface with the GPU. Don't worry about other files. We only need to know the functions of these folders:
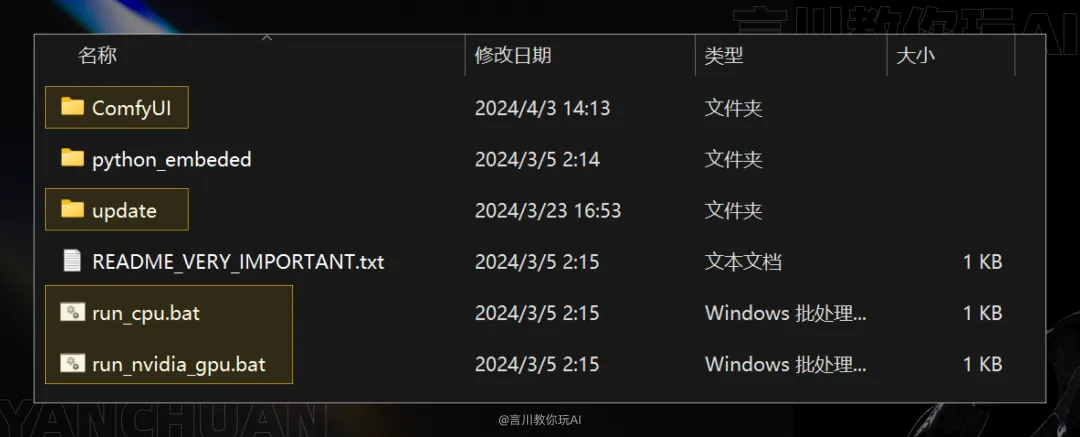
So after downloading the installation package, we can run ComfyUI directly. Double-click [run_nvidia_gpu.bat] to start it.
One-click launcher installation
Qiuye's one-key launcher is also relatively brainless. You can directly download the installation package (contact me on the homepage). Its advantage is that it can avoid the code errors that appear in the official integration package, and it is more convenient to download node plug-ins.
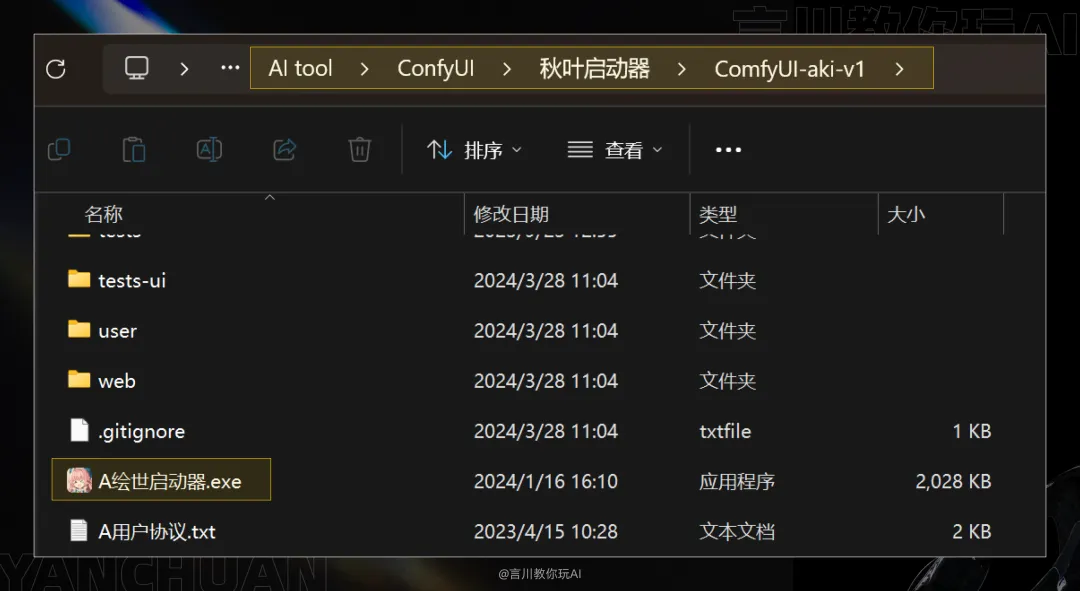
Open the root directory of ComfyUI, find the launcher file, and double-click it to start:
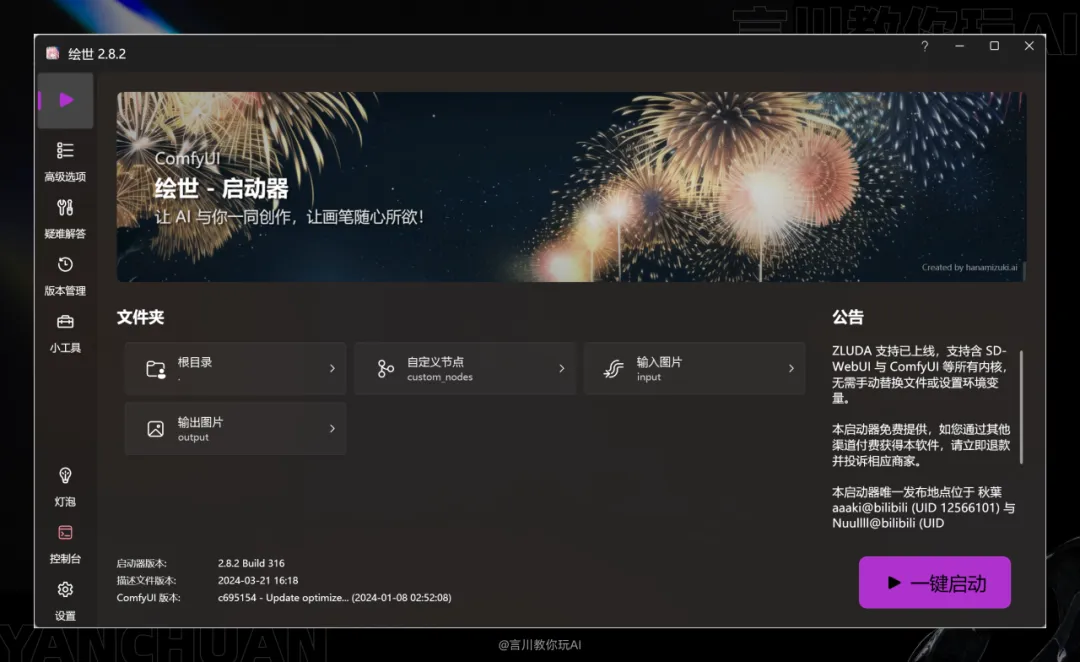
The UI interface of ComfyUI launcher is the same as that of WebUI launcher, but the functions are different. Therefore, I will not go into details about plug-in installation and version upgrade. Just click [One-click Start].
#-How to install various models
Note: The official integration package and the one-key launcher operate in the same way.
Standalone Model Installation
First, let's talk about how to install a series of models such as large models and Lora in ComfyUI. (Take the official integration package as an example)
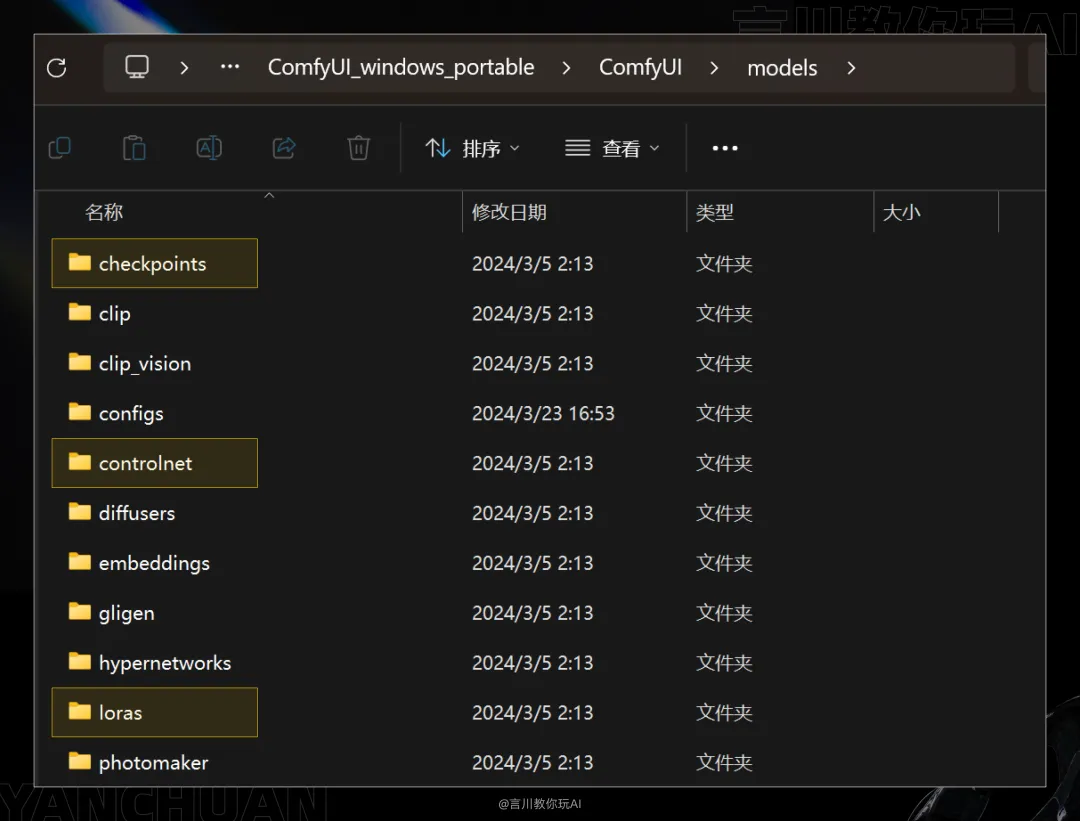
Go to the ComfyUI root directory, find the [Models] folder, and double-click it.
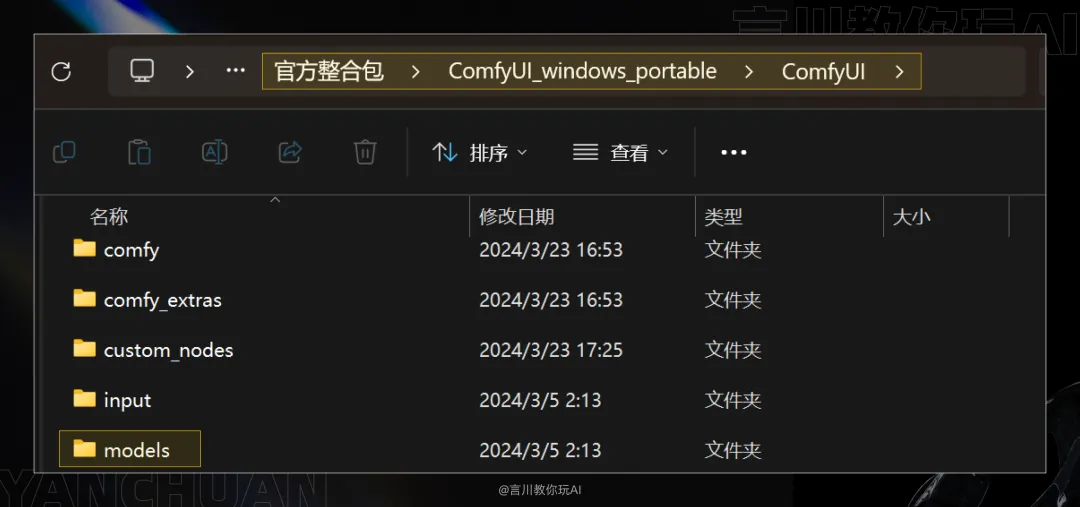
After entering, you will see folders named after the model, such as Checkpoints (large model), Loras, controlnet, etc. We just need to enter the corresponding folder and install the correct model.
Shared Model Settings
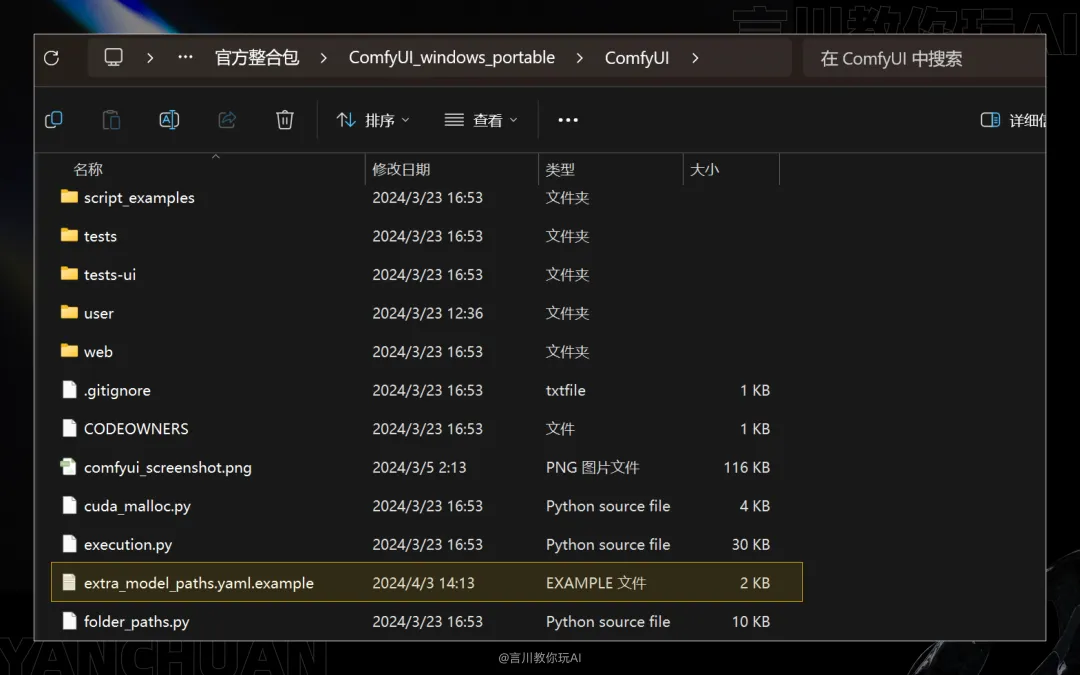
In addition to ComfyUI's independent installation of models, it also supports sharing the same model folder with webUI. The advantage is that you don't need to reinstall previously installed models, and it also avoids taking up hard disk space. Everyone should learn this operation.
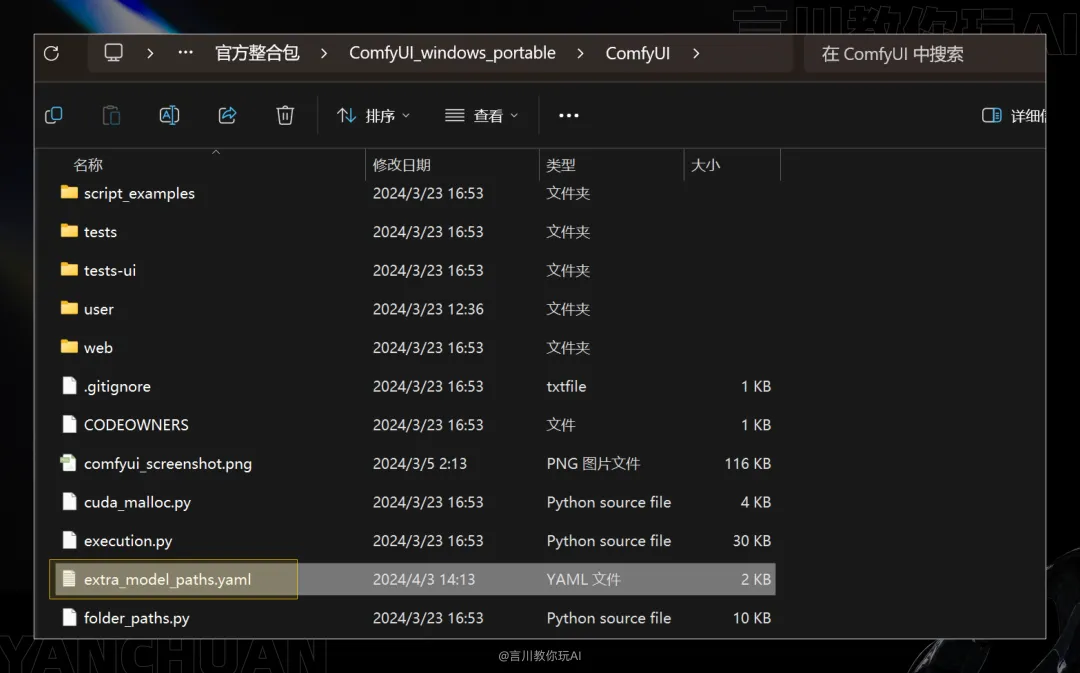
Similarly, we open the ComfyUI root directory and find the [extra_model_paths.yaml.example] folder:
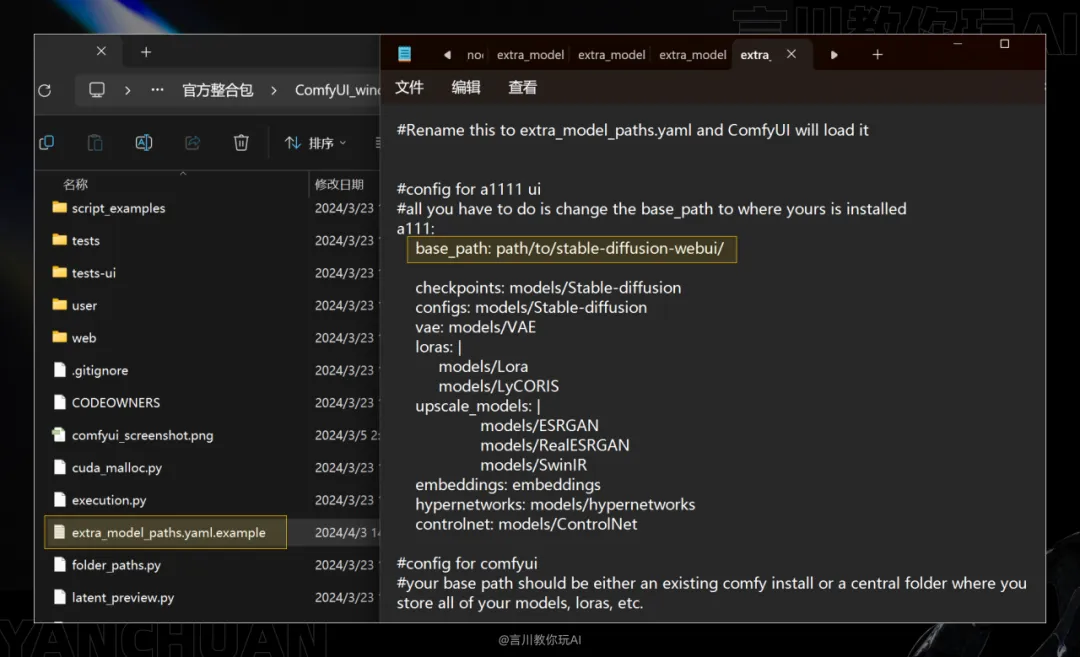
Open the file with Notepad, and then in Notepad, replace the path after [base_path] with the root directory of WebUI:
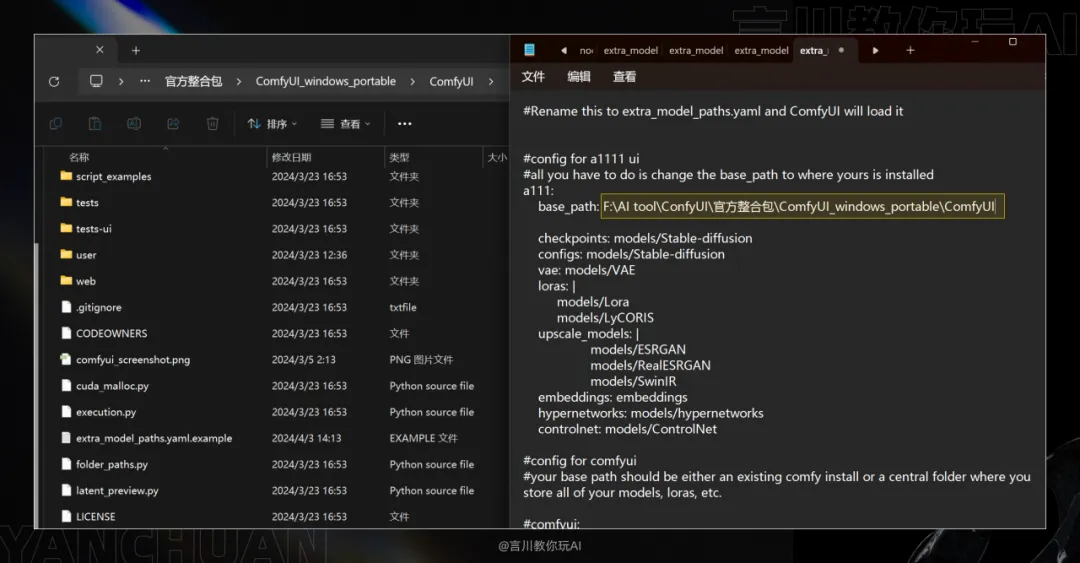
The correct file path is as follows, and then we just need to press [ctrl+s] to save the file.
It’s not over yet. We also need to change the name of the file [extra_model_paths.yaml.example] to [extra_model_paths.yaml]
That is, delete the .example suffix.
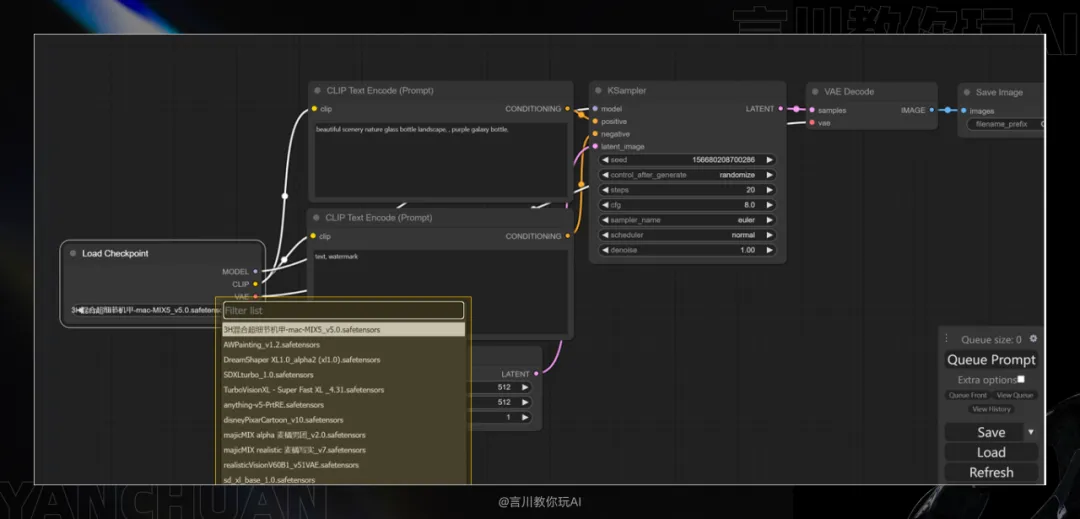
Then we start ComfyUI and go to the model node to check whether the model is synchronized. If you follow my operation process, then you should be able to synchronize the model successfully like me.
#-Nodes in ComfyUl
Nodes are the core components of ComfyUI workflow (similar to plugins in WebUI), and they represent different operations and functions. Nodes can be samplers, models, prompts, etc. By connecting nodes, we can build complex workflows. The configuration and connection method of nodes directly affect the final output.
There are two types of nodes: official native nodes and user-developed custom nodes. These nodes together constitute the node workflow of ComfyUI, allowing users to design and execute various complex processes based on Stable Diffusion. Next, I will introduce these two nodes in detail.
Native Node
Official native nodes are a series of basic nodes provided by the ComfyUI development team, which provide users with a wide range of functions and tools to support image generation and other related tasks. For example, sampler nodes, model nodes, prompt word nodes, VAE nodes, etc.
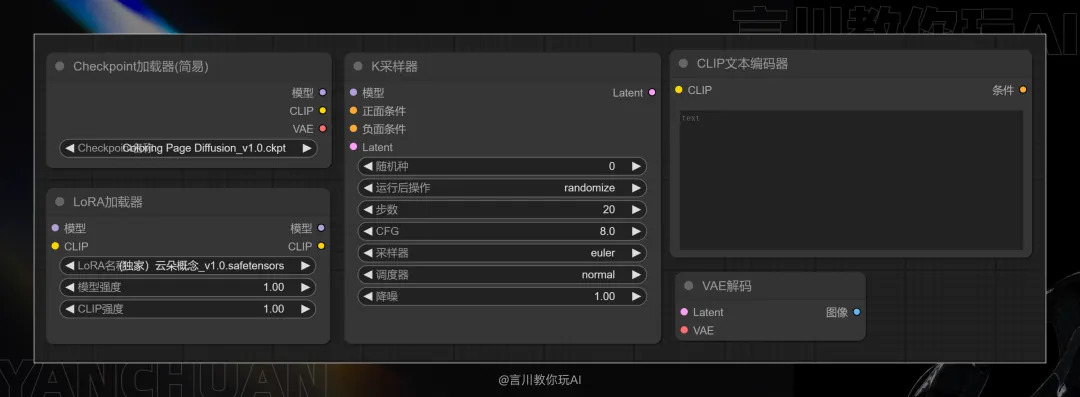
Simply put, the native node does not require us to perform a secondary installation. ComfyUI can be used directly after successful installation.
Custom Nodes
The power of ComfyUI lies in its extensibility. Users can develop custom nodes according to their needs. Currently, community members from all over the world have contributed more than 600 custom nodes (as of the known data of this tutorial), which greatly enriches the design and optimization options of workflows.
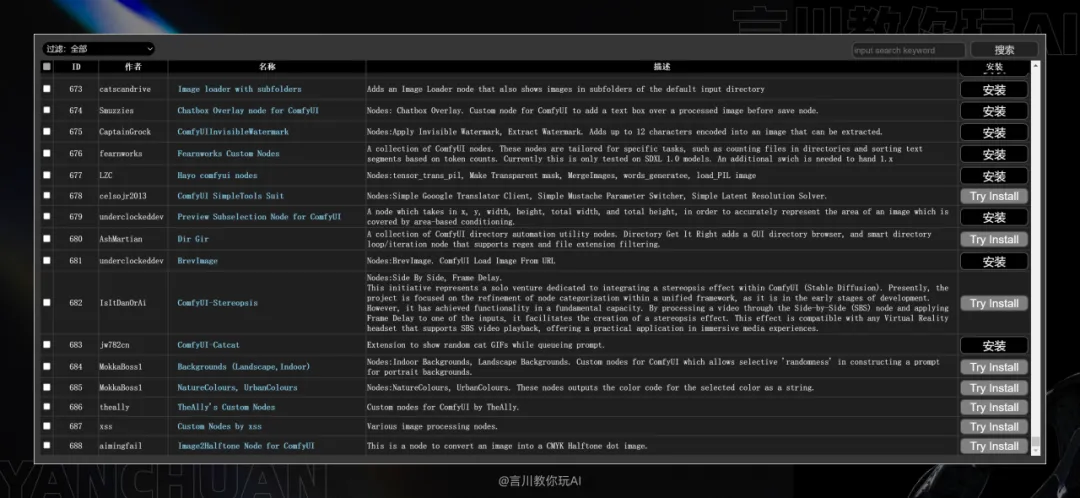
In addition, official native nodes and user-developed custom nodes can be used in combination to create highly customized workflows. Users can use official nodes to build basic processes, and then use custom nodes to add specific functions or optimize existing processes.
Note: Custom nodes are similar to plugins in WebUI, but unlike native nodes, they require manual installation before use. Below I will show you how to install custom nodes.
#-Custom Node Installation
There are three ways to install custom nodes: official installation, launcher installation, and node manager installation. I will summarize them directly:
Official version installation: There are many steps to install, which is troublesome and not recommended;
Launcher installation: simple and quick with few steps, but you need to shut down the background to install it, which can be used as an alternative installation solution;
Node Manager installation: No need to restart the background, it is ready to use after installation, which is very convenient.
Then I will introduce these three installation methods to you below. These methods are complementary to each other. You don’t have to use them but you need to understand them.
Note: Regardless of the installation method, custom node files are placed in the [custom_nodes] directory of ComfyUI.
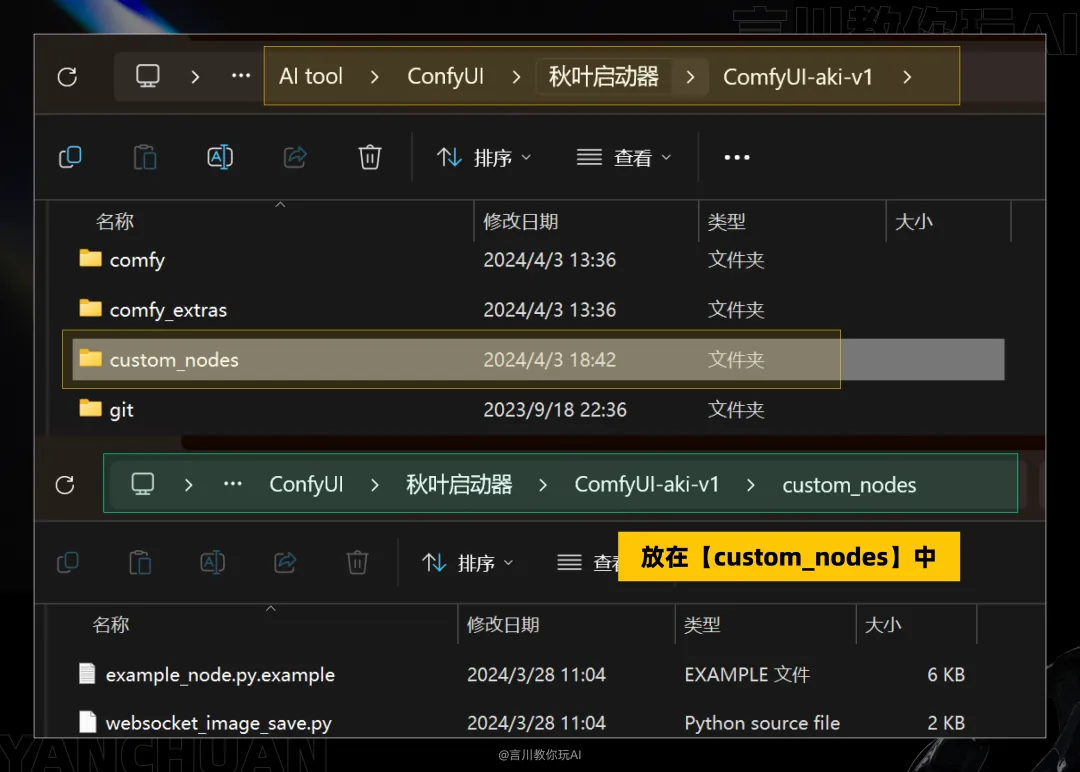
Official version installation
Online Installation
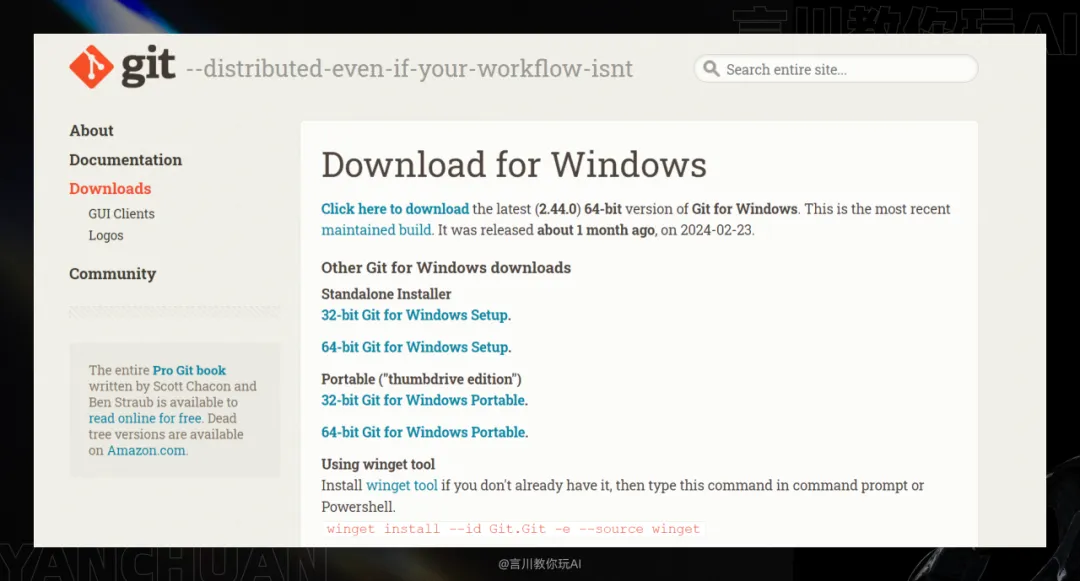
First, you need to download an application called Git Configuration Management. This is the official download address: https://git-scm.com/download/win
You can also download it through the network disk we prepared for you, and then install it.
After the installation is complete, enter the [custom_nodes] directory. Enter [CMD] in the file path to call out the command line, and enter the code repository address of "git clone+space+node" after the file path, such as [git clone https://github.com/ltdrdata/ComfyUI-Manager.git] as shown in the figure, then press Enter and wait for the download to complete (network required).
After the installation is complete, the installed node files will appear in your [custom_nodes] file, as shown in the figure:
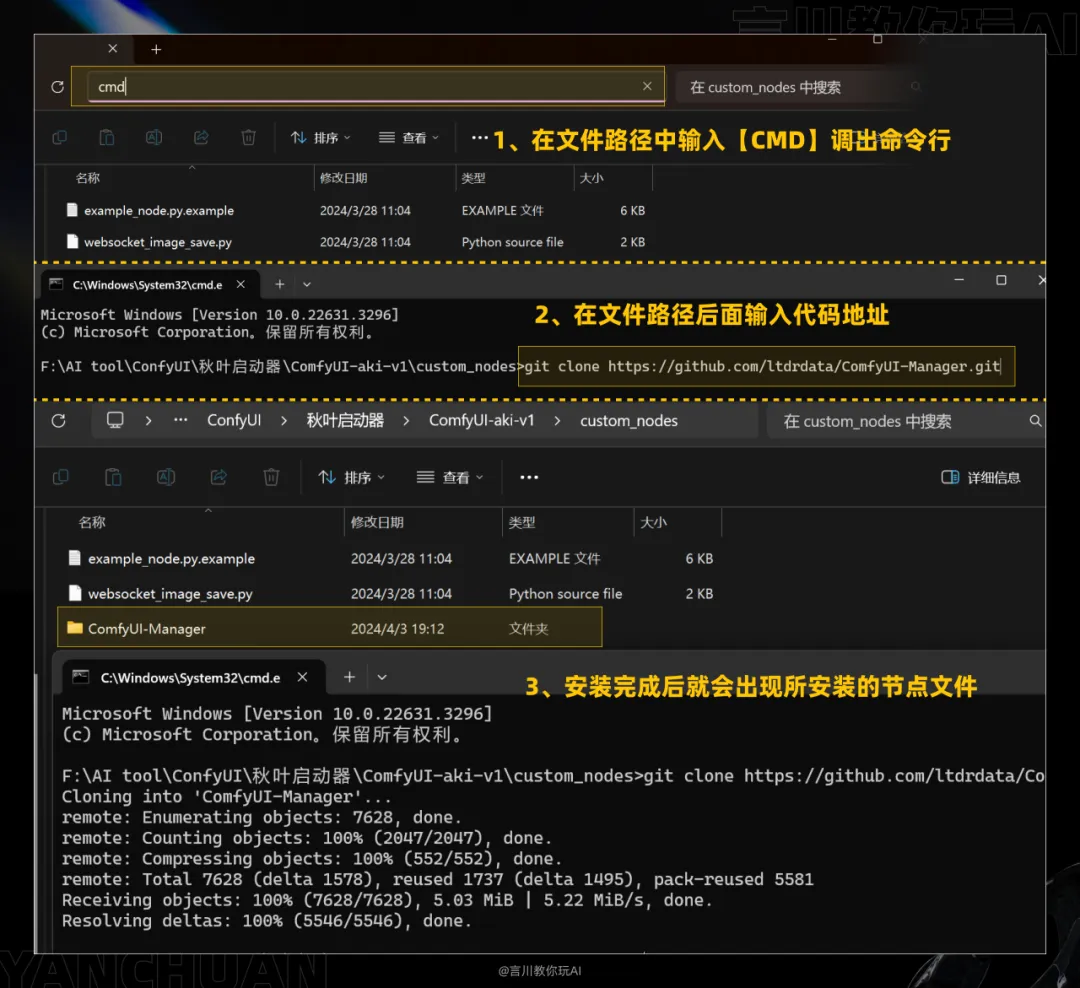
I don't know if you can accept this installation method. It is not difficult but troublesome. You may also encounter errors. If you encounter errors using this method, don't worry, you can also use the local installation method.
Local installation
We enter the node's code repository, download the compressed package, unzip it and put it in the [custom_nodes] directory. However, in this way, we cannot update the node through online update, so use it with caution.
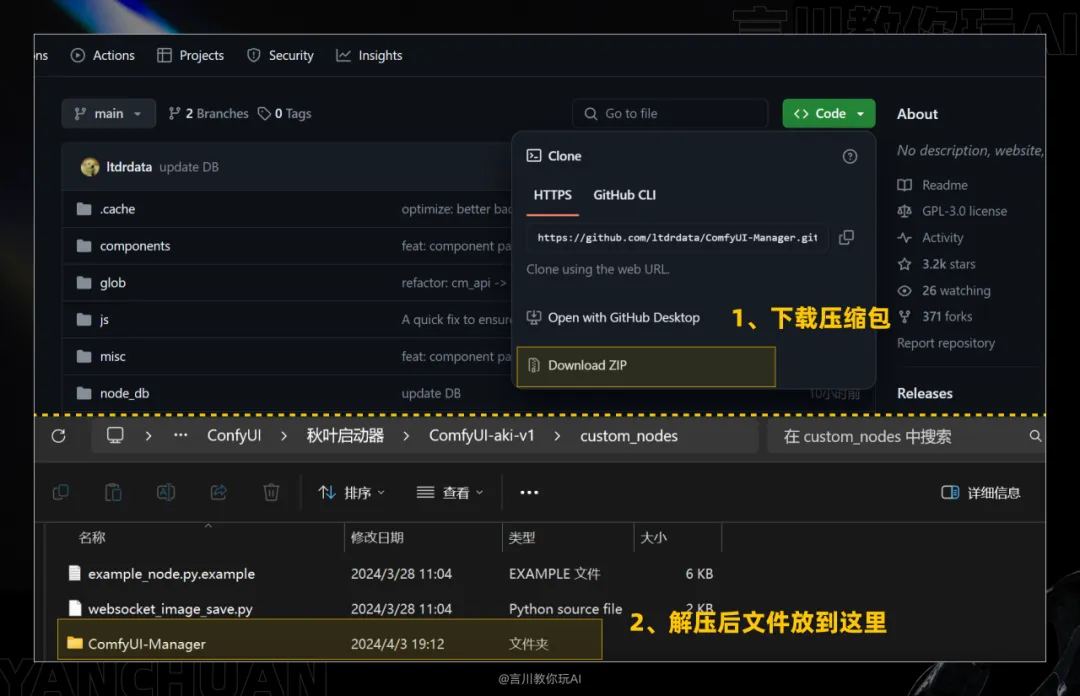
The above is the installation method of the official version. If you are a player of the official native integrated package, you can install it through the above two methods. But if you are using the Autumn Leaf Launcher, then you don’t need to be so troublesome.
Launcher Installation
The launcher installation is very simple and brainless. [Open the launcher - click Version Management - click Install New Extension - Search for the node name - Install] and it can be completed in a few simple steps.
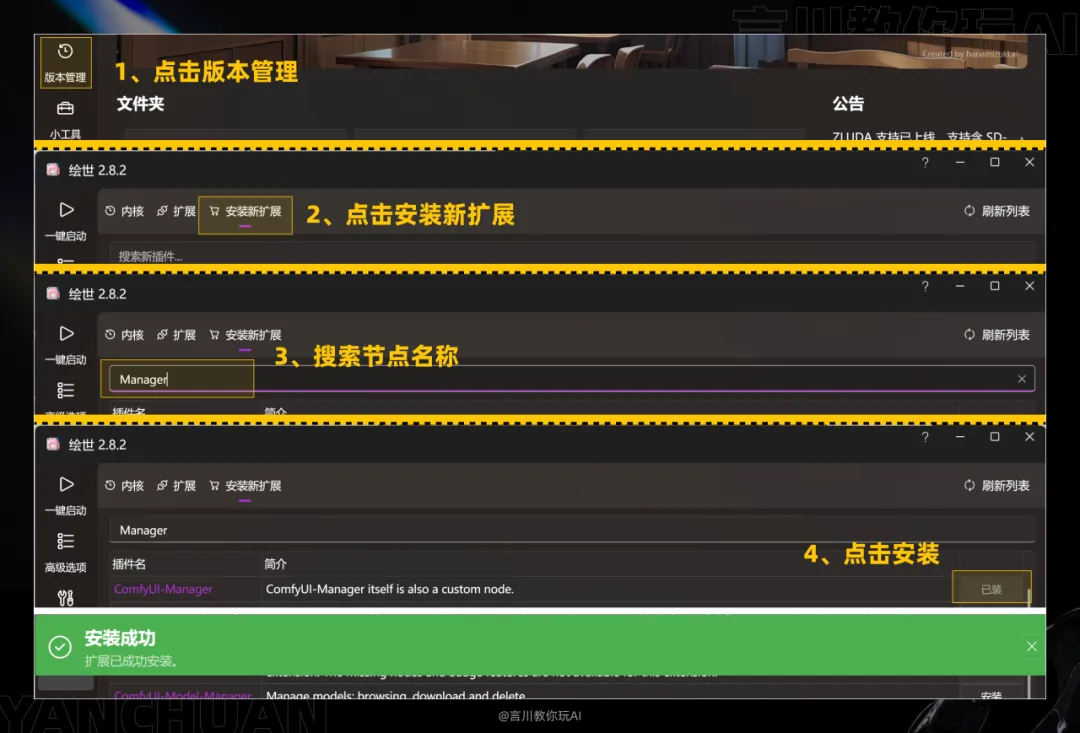
After the installation is complete, enter [Extension] to see the installed nodes. You can update the nodes with one click later, which is very convenient.

If you are a launcher player, then congratulations, the installation method of this node has been introduced. It is very simple, isn’t it? If you don’t want to waste time on boring and painful installation, running ComfyUI in the launcher is your best choice.
Node Manager
Next, it is the most important one. I put it last for two reasons:
1. It is a custom node and needs to be installed using any of the previous node installation methods.
2. After you install this node, the previous two ways of installing the node can be eliminated.
Then this node manager is [ComfyUI Manager]
ComfyUI Manager Introduction: ComfyUI Manager is a custom node tool that provides a series of management functions, including installing, removing, disabling and enabling various custom nodes of ComfyUI.
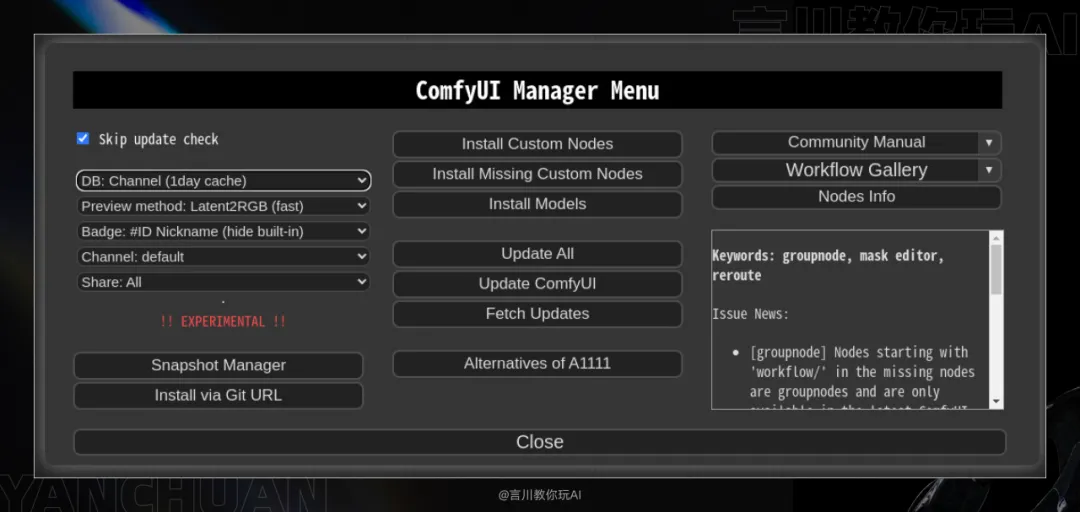
You can think of it as an [Extension] in webUI. After installing [ComfyUI Manager], you can install various custom plug-ins very conveniently, just like installing and managing plug-ins in webUI extensions. Whether you are using the "Official Integration Package" or the "Launcher", this is a necessary node.
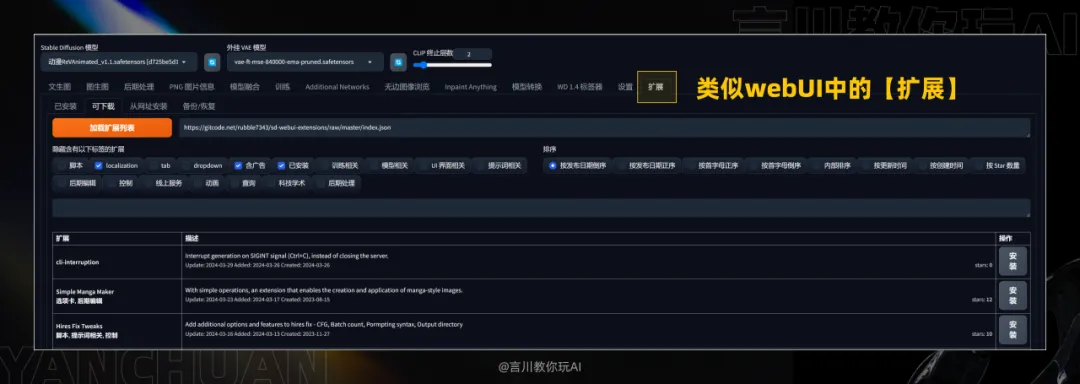
Note: For players who have installed the launcher, the launcher has already installed many commonly used plugins (including Manager), which means you do not need to install Manager again.
So how do you install this node? Think about it...
The cases demonstrated in the previous two installation methods are all this [ComfyUI Manager] custom node, so you can use any of the first two installation methods to install [ComfyUI Manager]. I will not repeat it here, just flip forward and install the plug-in.
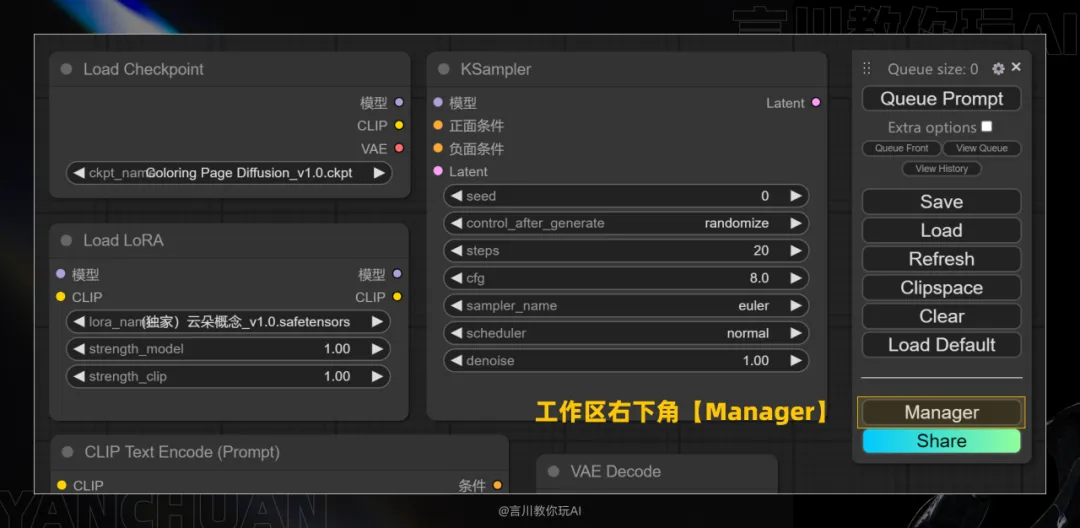
After the installation is complete, run ComfyUI and you can find the [Manager] location in the lower right corner of the workspace.
#-Chinese node installation
AIGODLIKE Introduction
AIGODLIKE-ComfyUI-Translation is a multi-language translation plugin designed for ComfyUI, which aims to localize the interface and functions of ComfyUI into different language environments. This plugin implements the translation of the resident menu bar, search bar, right-click context menu, nodes, etc.
Node official address: https://github.com/AIGODLIKE/AIGODLIKE-ComfyUI-Translation
Currently supported languages:
Simplified Chinese (zh-CN), Traditional Chinese (zh-TW), English, Japanese, Korean
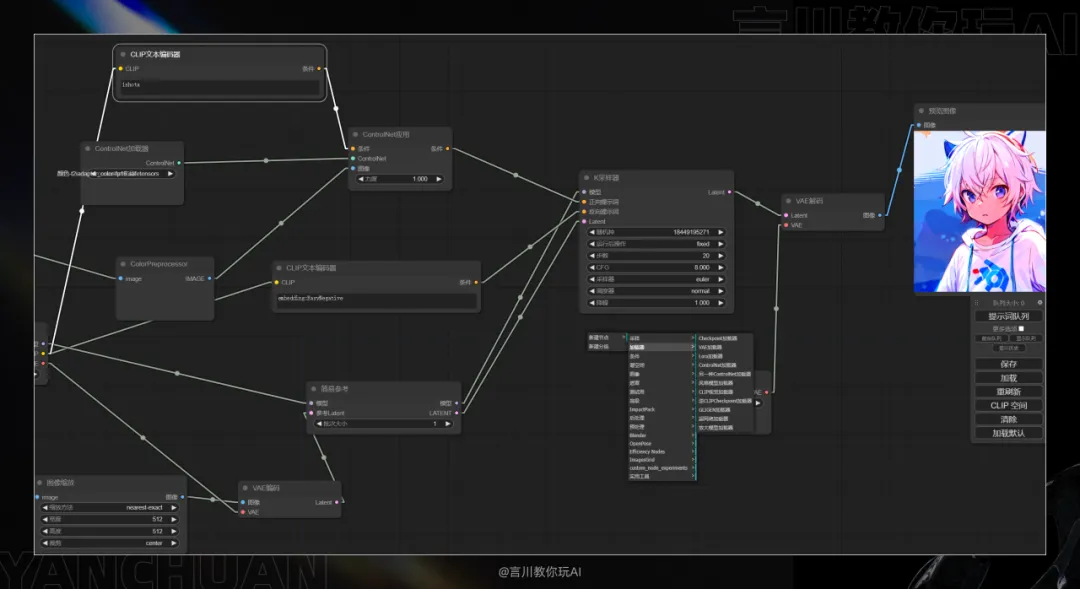
Chinese node installation
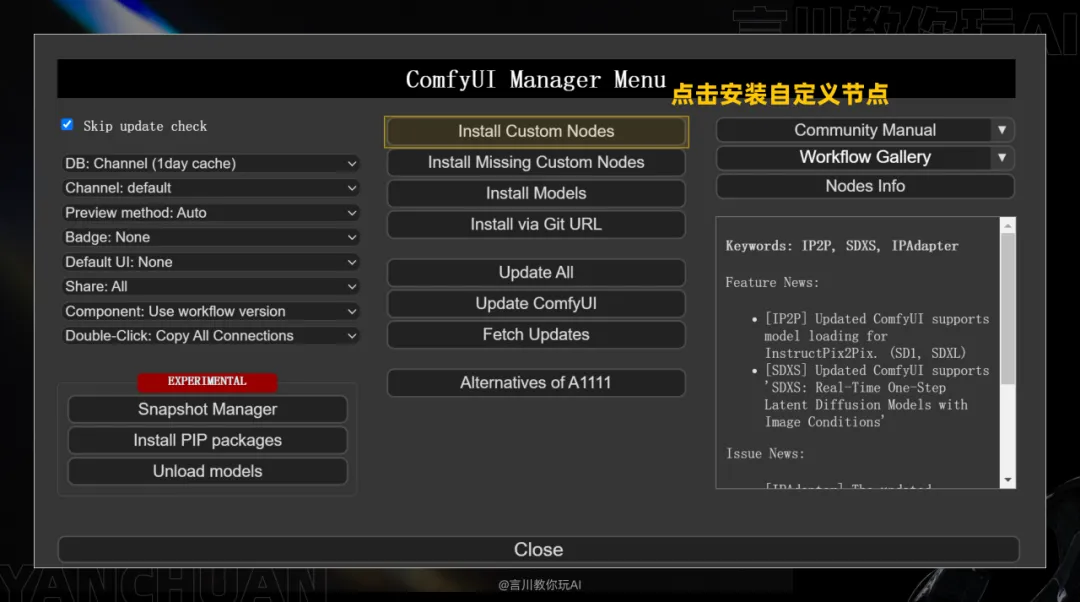
Open the manager interface, and you can install other nodes in it. It may look a bit confusing (it’s all in English), but it’s okay. Next, I will teach you how to use the [manager] to install Chinese plug-ins.
Click the [Install Custom Nodes] button, which translates to [Install custom nodes]:
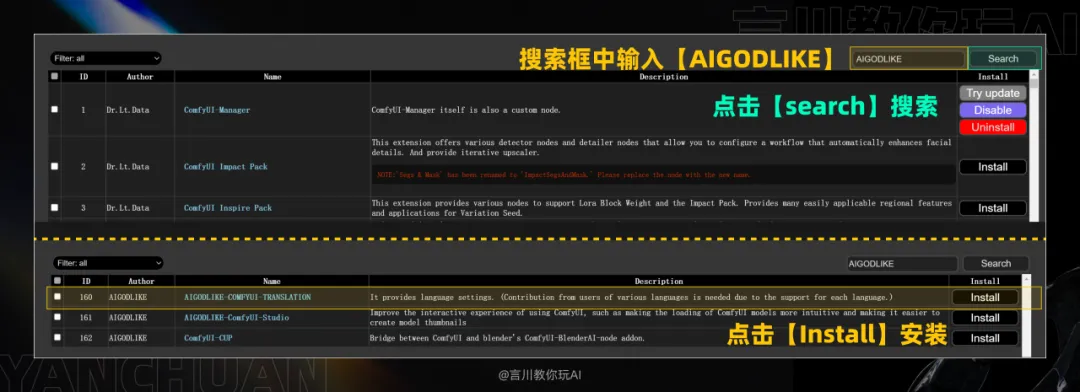
Enter [AIGODLIKE] in the search box in the upper right corner and click [search].
Three custom nodes will appear below. The first one [AIGODLIKE-COMFYUI-TRANSLATION] is the Chinese node we need to install. Click [Install] on the far right to install it (network required).
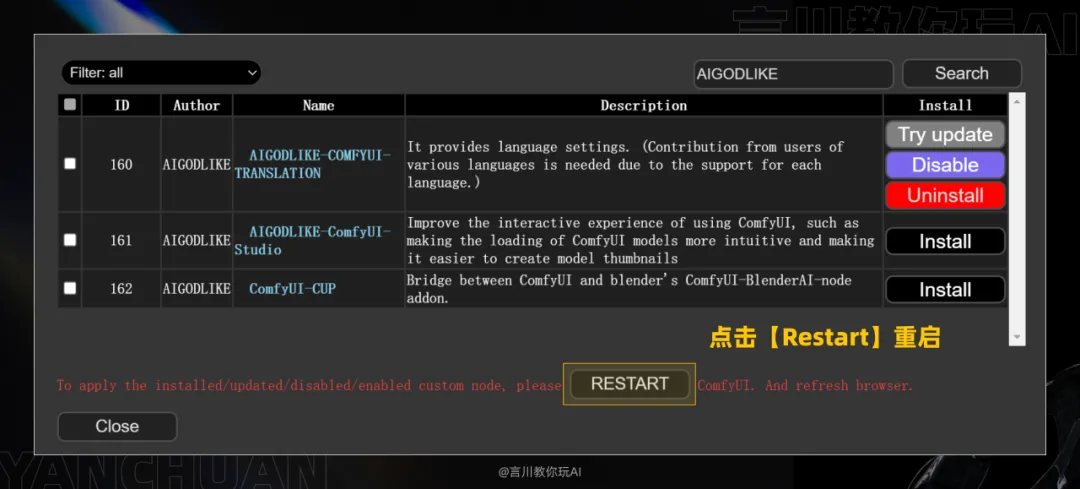
Then click [Restart] to restart ComfyUI. If you encounter installation failure, you need to check your network (whisper).
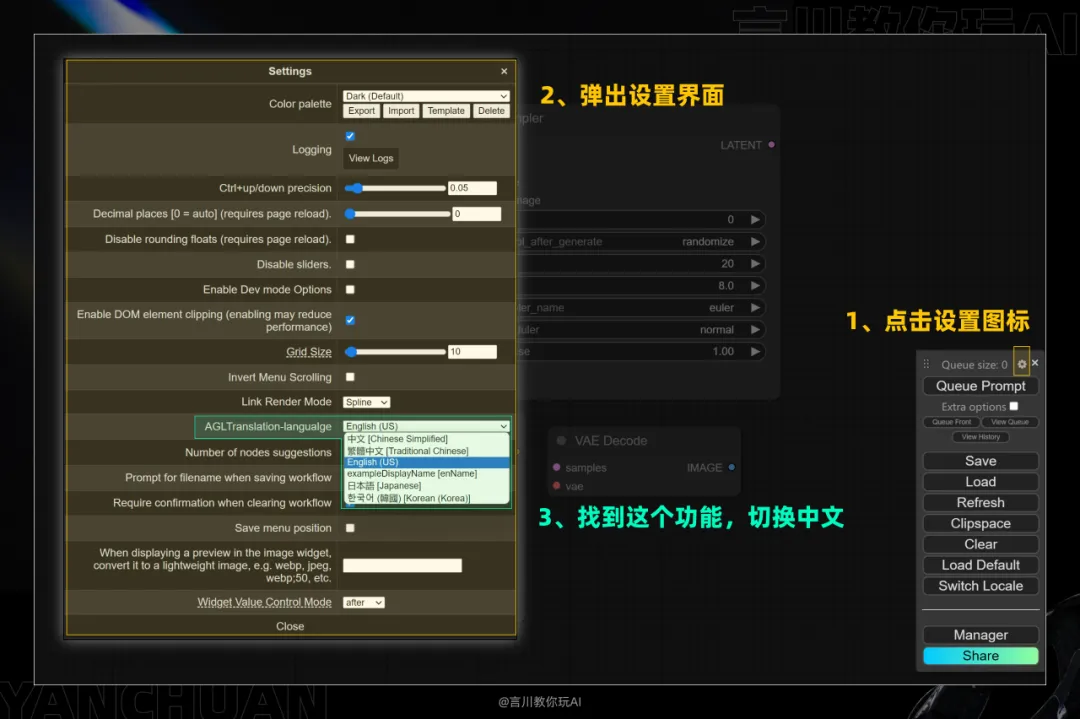
After installing the [AIGODLIKE] node, the first step is to click the settings icon in the lower right corner, the second step is to find the [langualge] function in the pop-up settings interface, and the third step is to switch to the Chinese interface. The interface can be localized without restarting.
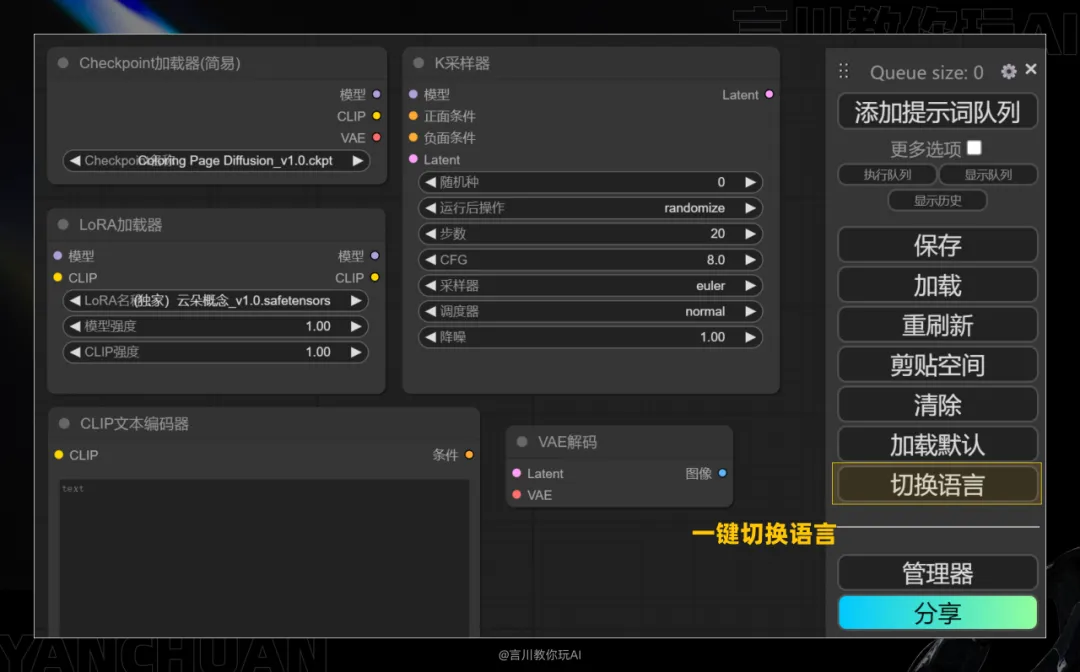
Quick language switching
The plugin also supports quick switching. For example, if we are currently using Simplified Chinese, click the switch language [Swich Locale] to switch to English with one click, and click again to switch to Chinese. Note: If you switched to Traditional Chinese/Korean last time, one-click switching will switch directly from Traditional Chinese/Korean to English.
After a detailed introduction to ComfyUI and the step-by-step completion of the Chinese node installation, everything is now ready.
Congratulations, you have officially entered the creative world of ComfyUI!
#-Building the Wenshengtu Workflow
Next, we will start to build the ComfyUI workflow. I will teach you how to complete the workflow of Wenshengtu step by step.
Before that, we need to first understand how to use shortcut keys in the ComfyUI interface to help us operate conveniently.
Shortcut Keys Introduction
Here we refer to the official shortcut keys, official address: https://github.com/comfyanonymous/ComfyUI?tab=readme-ov-file
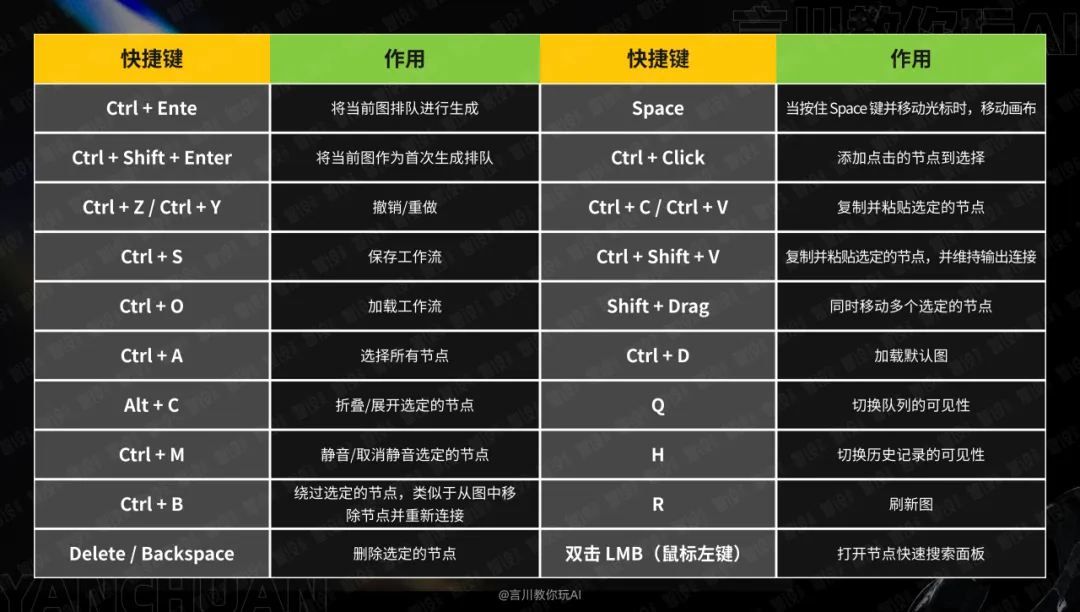
The above shortcut keys are the 20 shortcut keys officially provided (win). For macOS users, the Ctrl key can be replaced by the Cmd key. I will point out which shortcut keys will be used in actual operation in the following operations.
6-step document workflow construction
Next, I will show you how to build the workflow of Wenshengtu step by step in a practical way. You don’t need to take notes when you first get started and remember those boring functions, because I believe that only by actually operating them can you master those functions and understand the role of each function. This is also my consistent teaching thinking.
First of all, if you start the ComfyUI interface for the first time, there will be a default Wenshengtu workflow in your interface (of course, if you have used ComfyUI before, it will load the workflow you closed last time by default).
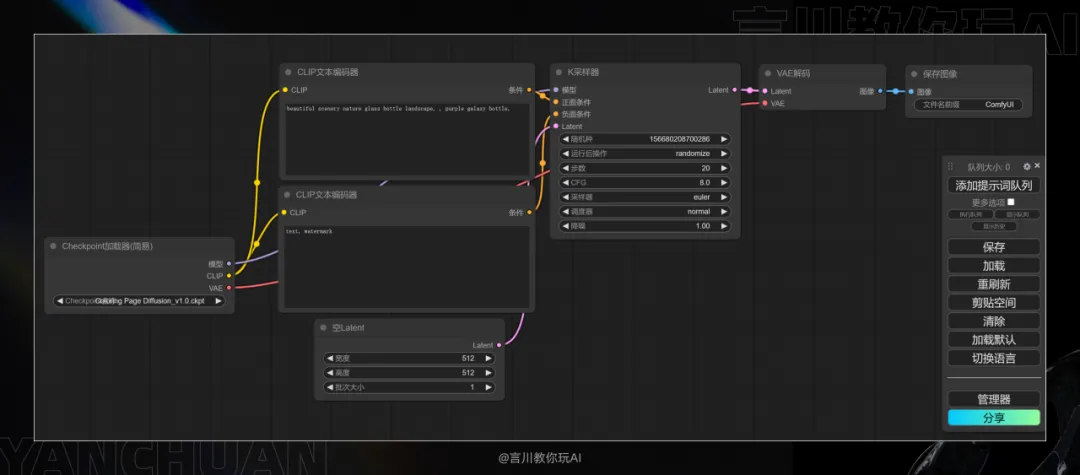
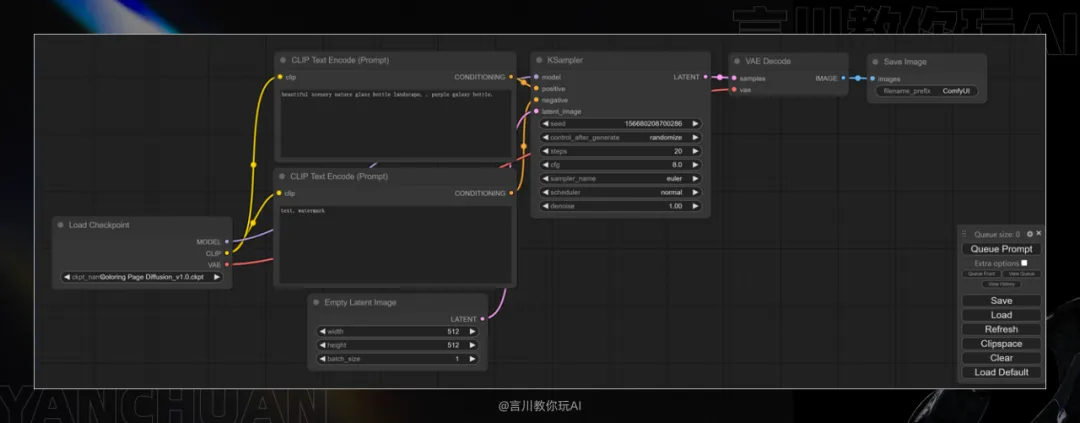
The workflow we are going to build next is this set of default Wensheng pictures. Its purpose is to let everyone build the workflow by themselves. You can take a look at it in advance.
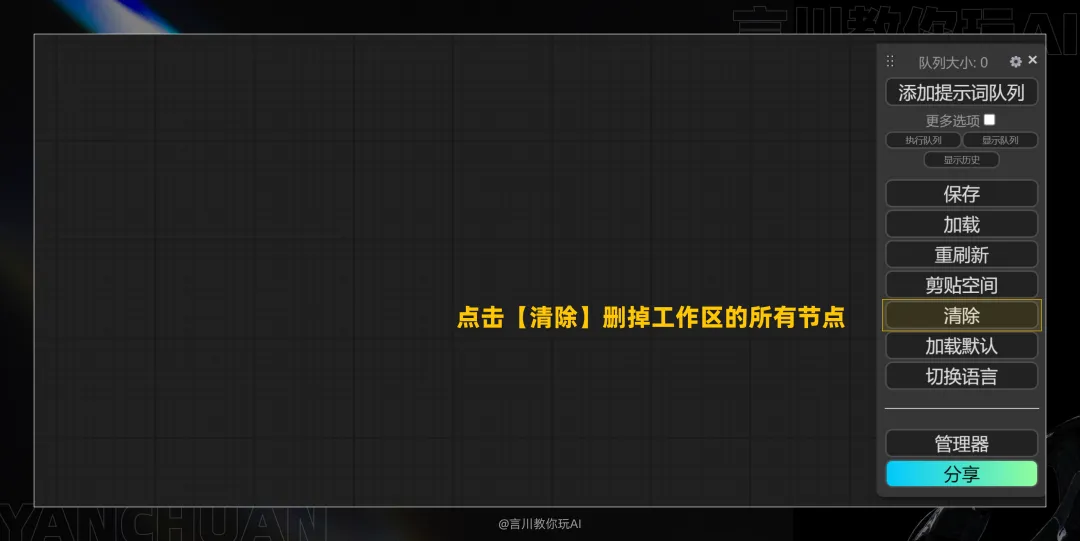
Then we click [Clear] in the function area in the lower left corner to delete the workflow node in the interface.
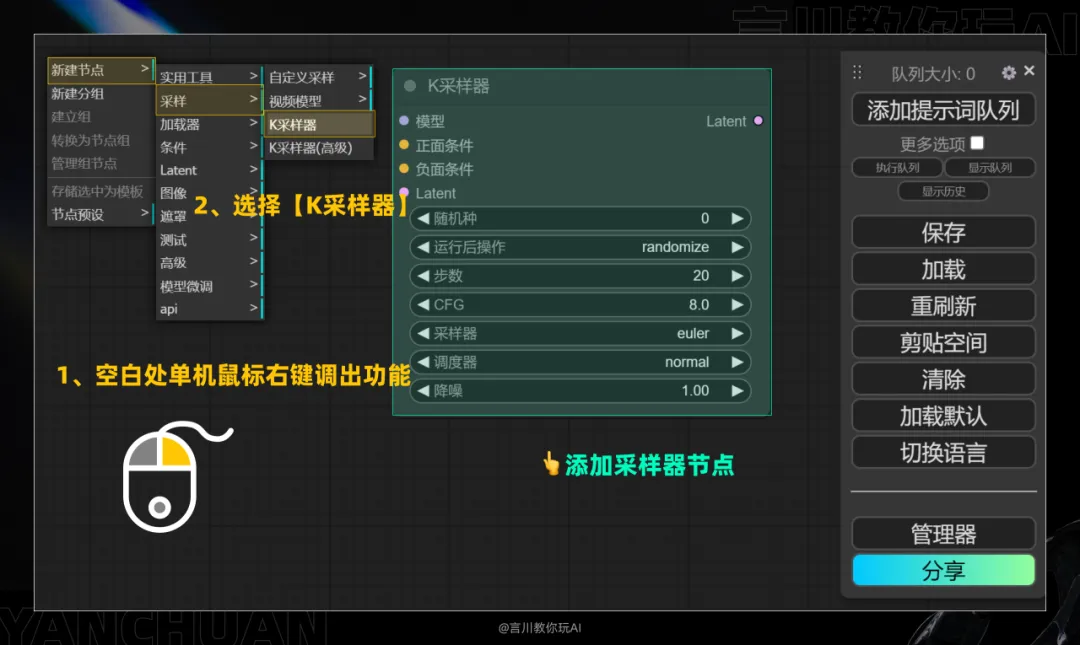
The first step is to add [K sampler]
In a blank area of the workspace, right-click to bring up the node function area, select Sampling - K Sampler, and a sampler node will be added to our workspace.
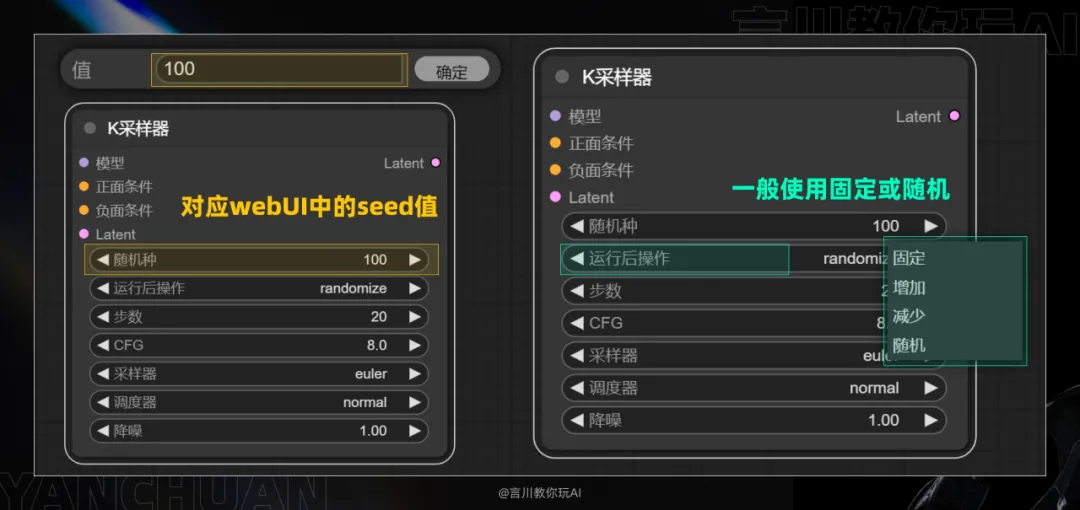
Let's first introduce several parameter settings in [K Sampler]:
The first random seed corresponds to the seed value in the webUI. The value of each generated image will be displayed. The default value is 0.
The second post-run operation has four options: fixed, increase, decrease, and random;
These two parameters are used together. Fixed means fixing the value of the image, increasing/decreasing to +1 or -1, and Random means a random value. Students who are familiar with webUI should be able to understand this easily. Generally, we just use Fixed or Random.
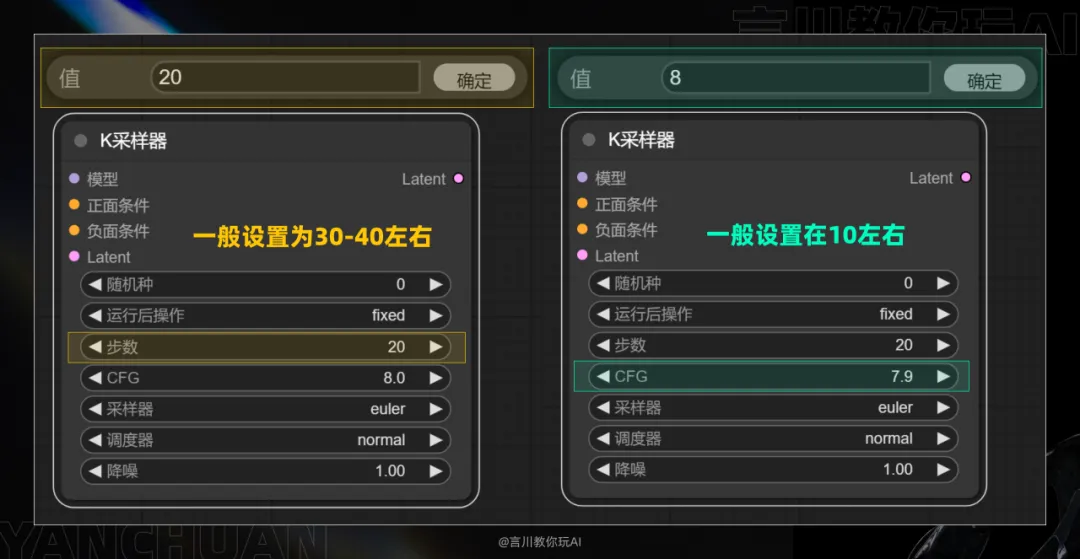
The number of steps refers to the number of iteration steps in the webUI, which is generally set to around 30-40;
CGF corresponds to the relevance of the prompt word in the webUI. The larger the parameter, the closer the image effect is to the prompt word. The smaller the parameter, the greater the space for AI to play, and the greater the difference between the image effect and the prompt word. Generally, it is best to set it around 10, and the default is 8.
The sampler is used in conjunction with the scheduler, corresponding to the sampling method in the webUI, such as the commonly used dpm++_2m Karras
The sampler generally uses the optimized/latest sampler: euler_ancestral (euler a for short), dpmpp_2m series, dpmpp_3m series
The scheduler generally uses normal or karras. If you are interested in their specific principles, you can GPT.
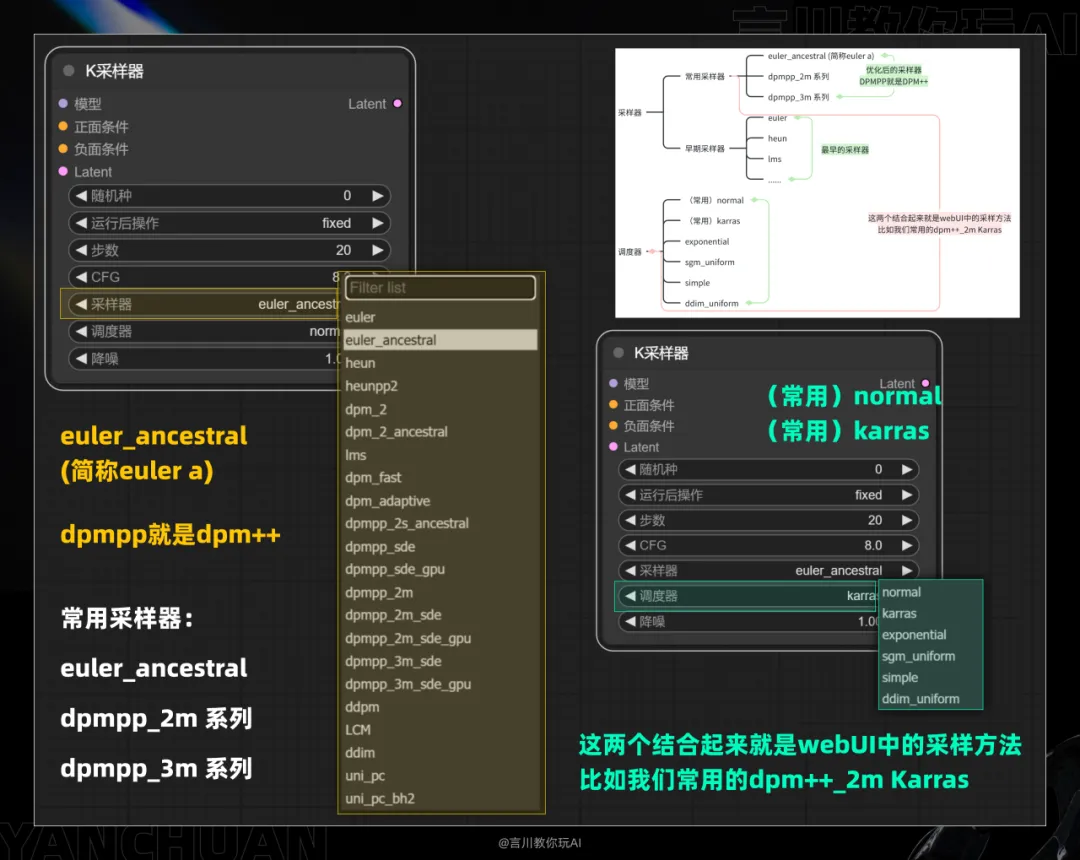
Basically, we don't need to change the noise reduction parameter. It corresponds to the number of iterations and the default setting is 1.
Step 2: Add [Load Large Model]
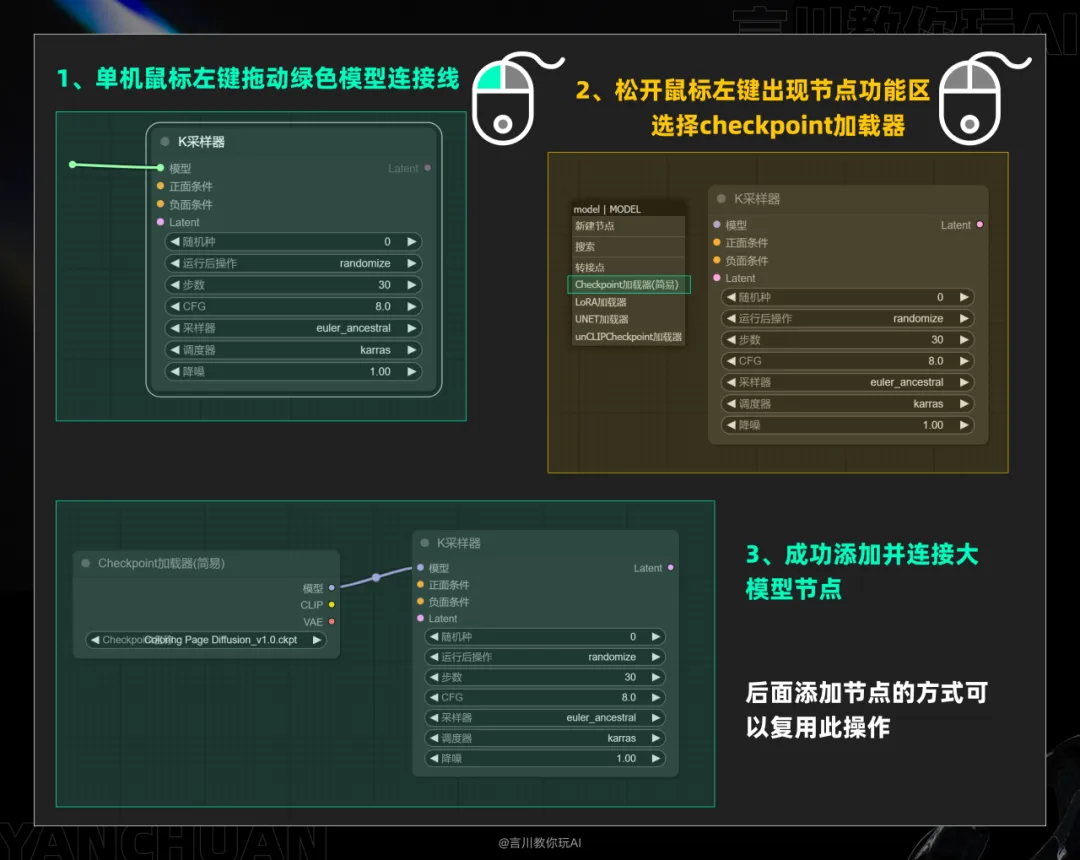
As shown in the figure, you can directly drag the model connection point to call out the function area and add the [Checkpoint Loader]. You can reuse this operation when adding nodes later, so I will not repeat the operation.
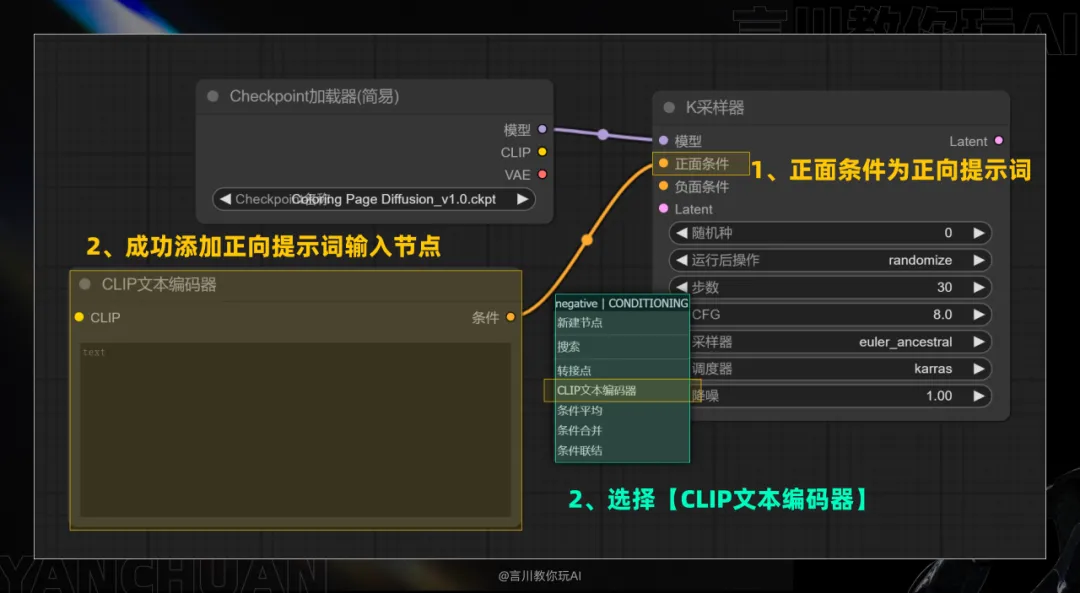
Step 3: Add [positive and negative prompt words]
Use the above method to add a positive prompt word input node, as shown in the figure:
The reverse prompt word input area can also be added in the same way, that is, drag the connection point of [Negative Condition].
However, here we will demonstrate the copy and paste method. Select the [CLIP Text Encoder] node, press Ctrl+C to copy, then press Ctrl+V to paste, and then connect the two color nodes:
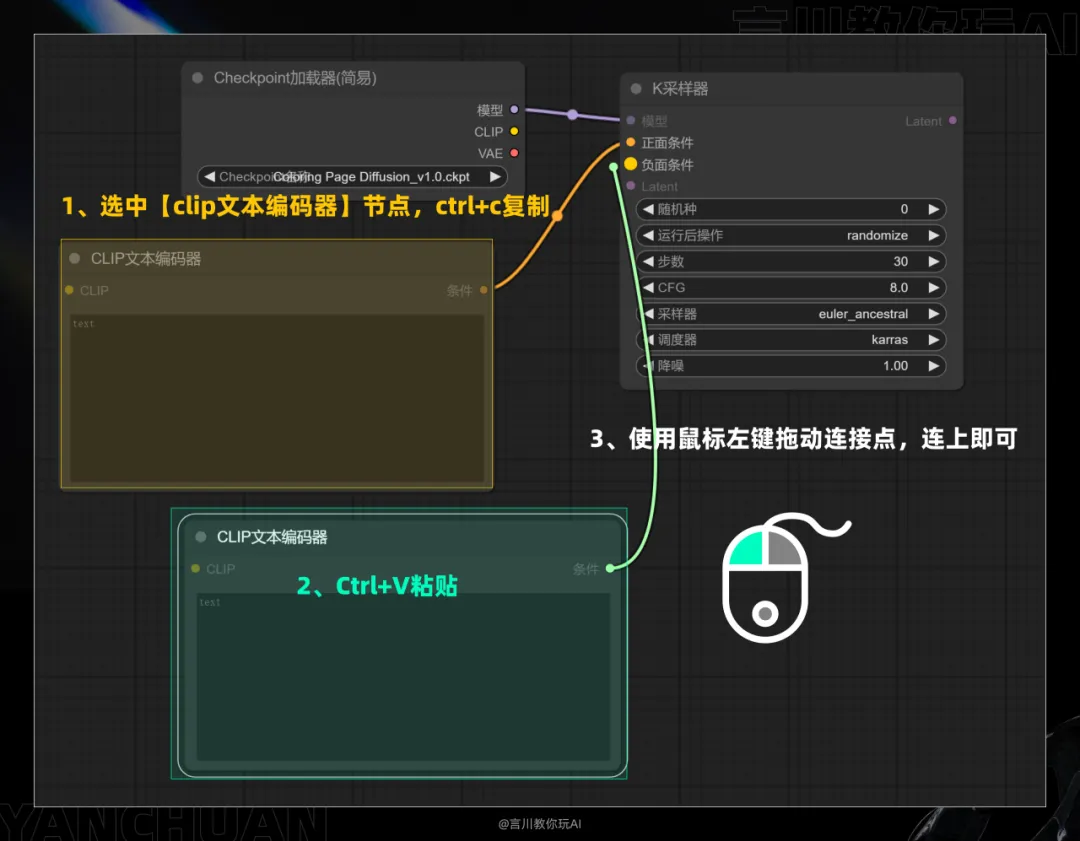
Alternatively, you can select the [CLIP Text Encoder] node, hold down alt on the keyboard and drag the left mouse button to copy a node. You can try it yourself.
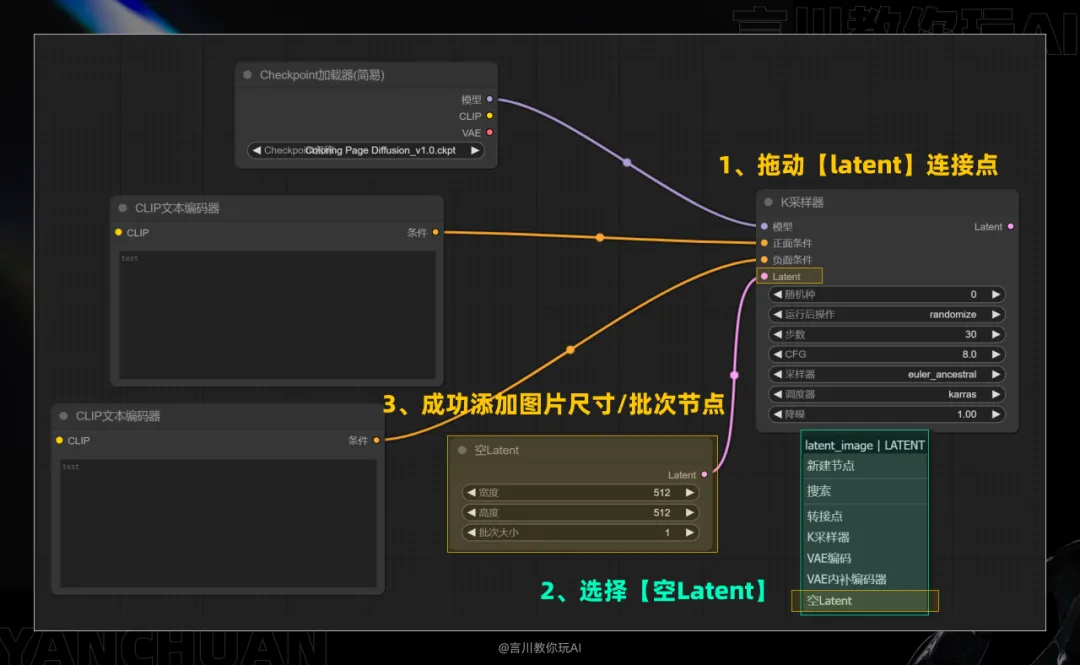
Step 4: Add [Image Size/Batch]
Drag the [Latent] connection point and select [Empty Latent] to add the [Image Size/Batch] node. This node has width, height and batch size parameters for adjustment. These parameters will not be explained, as you will understand them at a glance in the webUI.
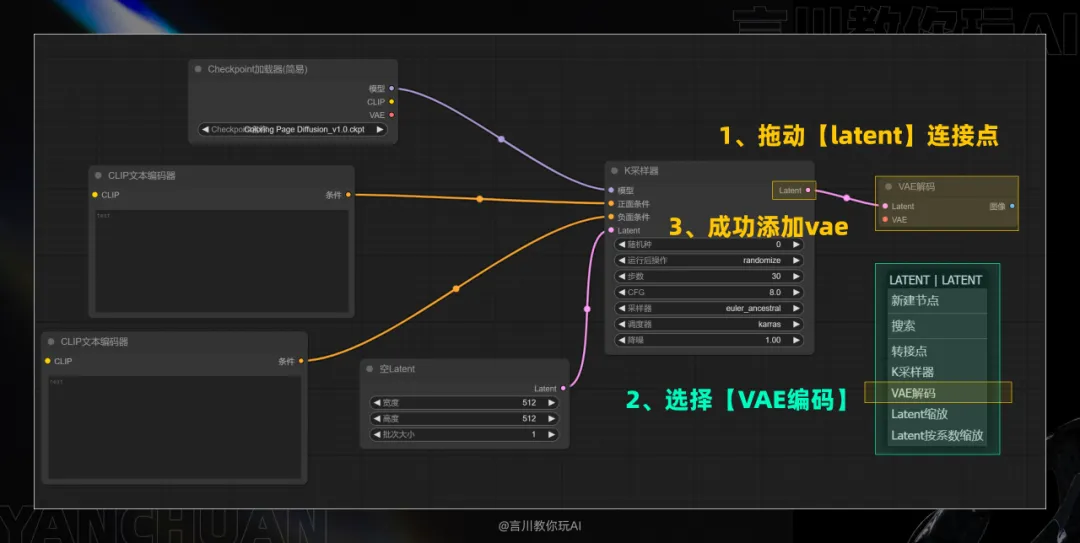
Step 5: Add [VAE decoder]
Drag the [Latent] connection point and select [VAE Encoding] to add VAE.
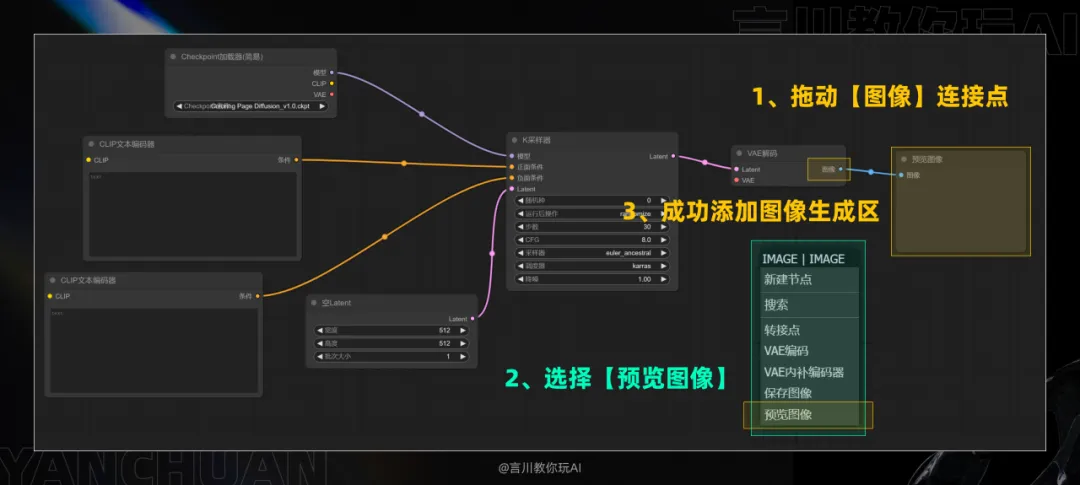
Step 6: Add [Image Generation Area]
Drag the [Image] connection point and select [Preview Image] to successfully add the image generation area.
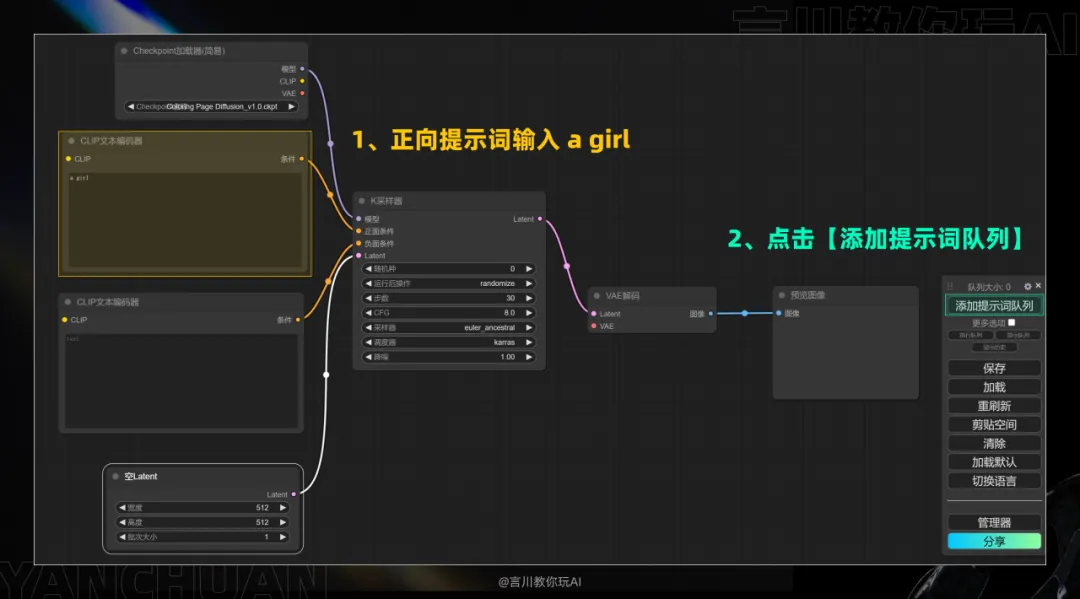
At this point, all the nodes required for the entire text graph have been successfully added. Now we can click [Add prompt word queue] to test the raw image. Before that, we enter a prompt word (such as a girl) in the positive prompt word.
Note: [Add prompt word queue] is the button for generating pictures.
If you click Generate like me, you will get an error like this, see the red box in the picture and the red mark on the node. This is because our red nodes are not connected.
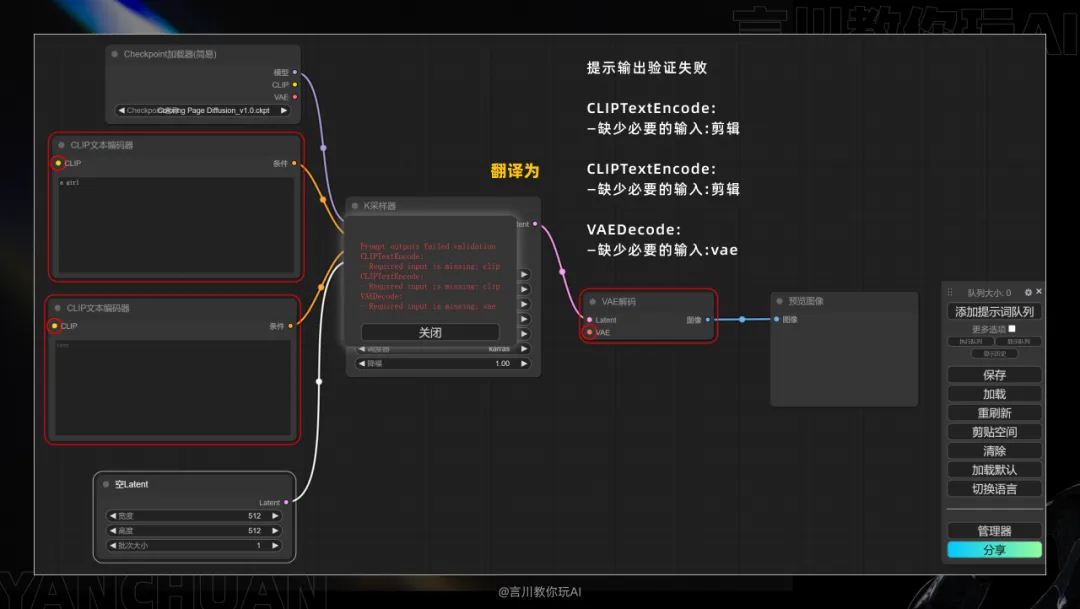
Then we need to correct these error nodes and connect all the nodes. Pay attention to the color of the connection point. If it is a yellow connection point, it needs to be connected to the corresponding yellow connection point (the name corresponds), as shown in the figure:
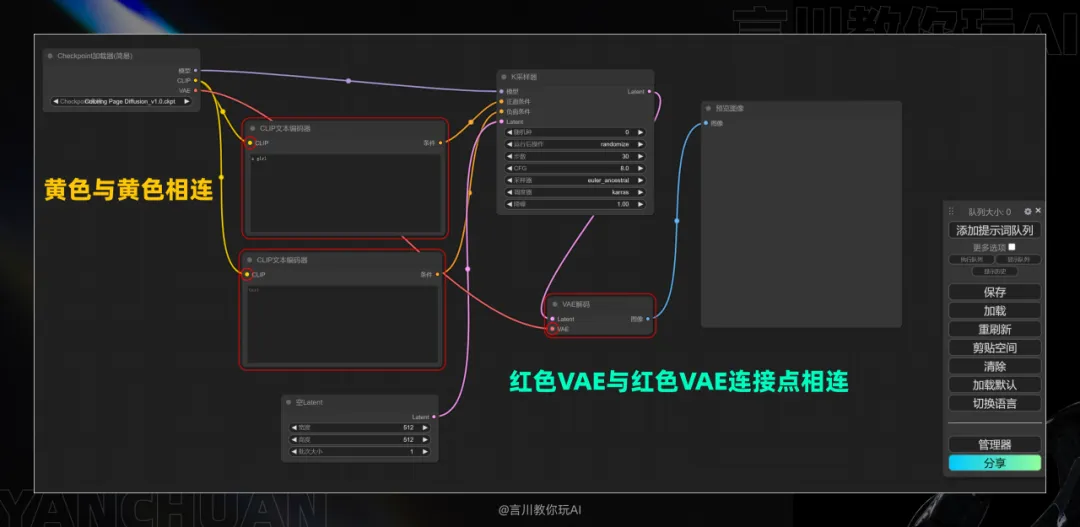
Then we click Generate again. Congratulations, this set of document image workflow has been successfully built.
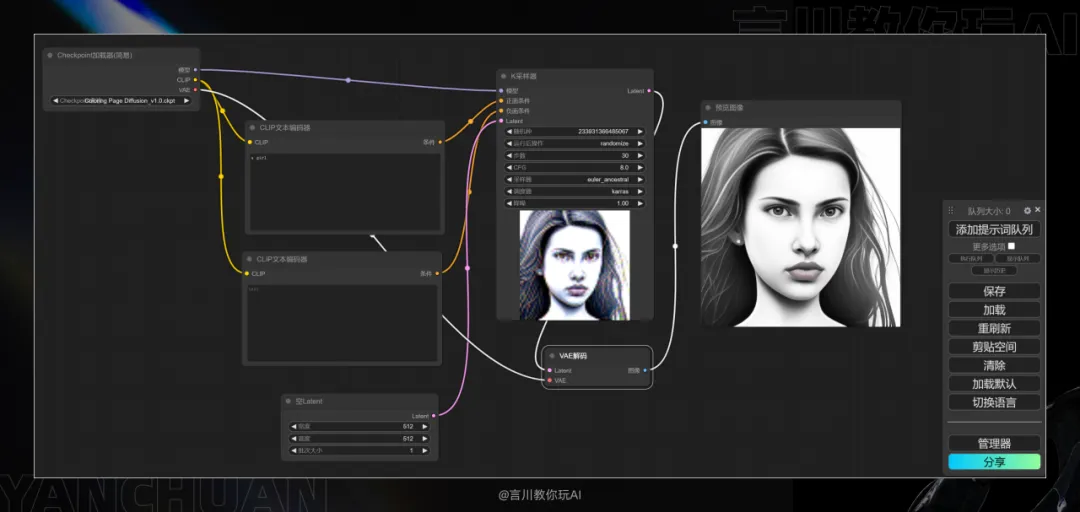
Here are a few more points to add:
1. The image generation area we added above selects the preview image. As the name implies, the generated image is in preview state and needs to be saved manually. Right-click on the image and select Save Image to download the image.
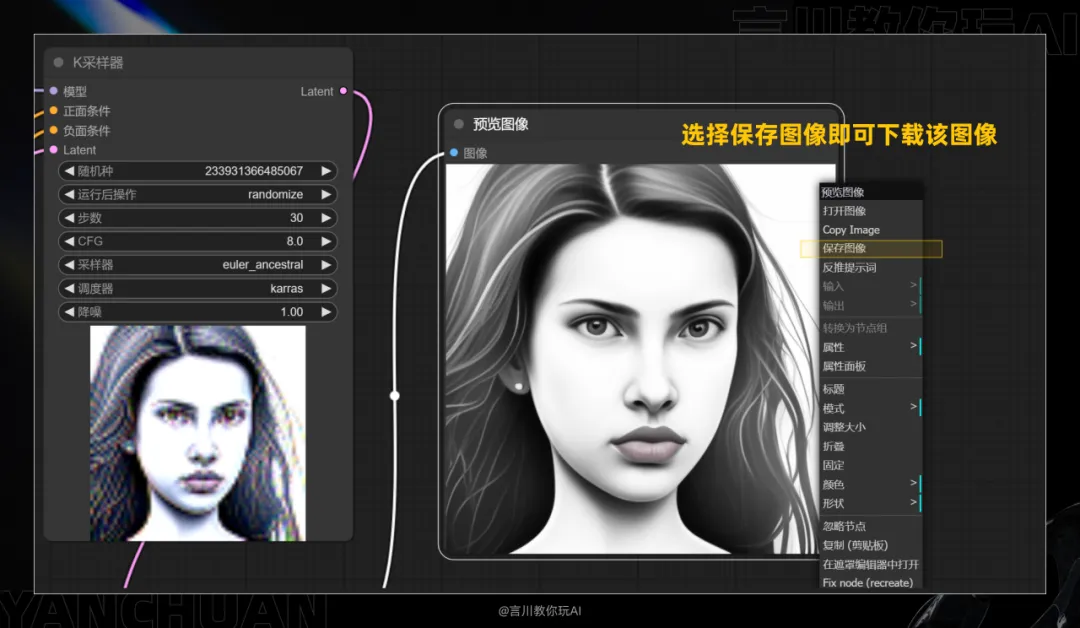
So is it possible to automatically save to a local folder like the raw images in the webui? Yes.
Delete the preview image, drag [Latent] again, and select the [Save Image] node.
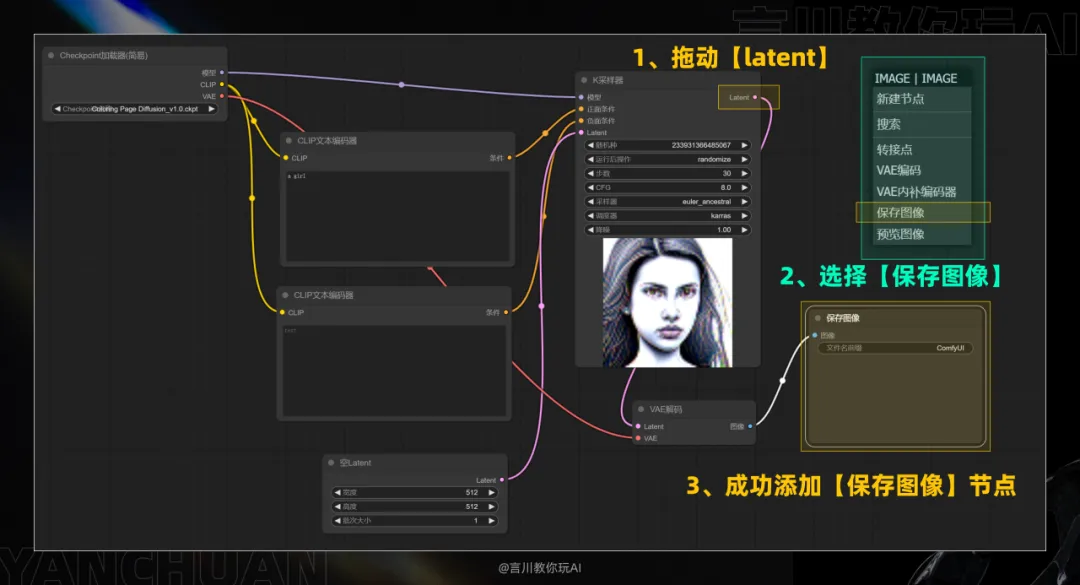
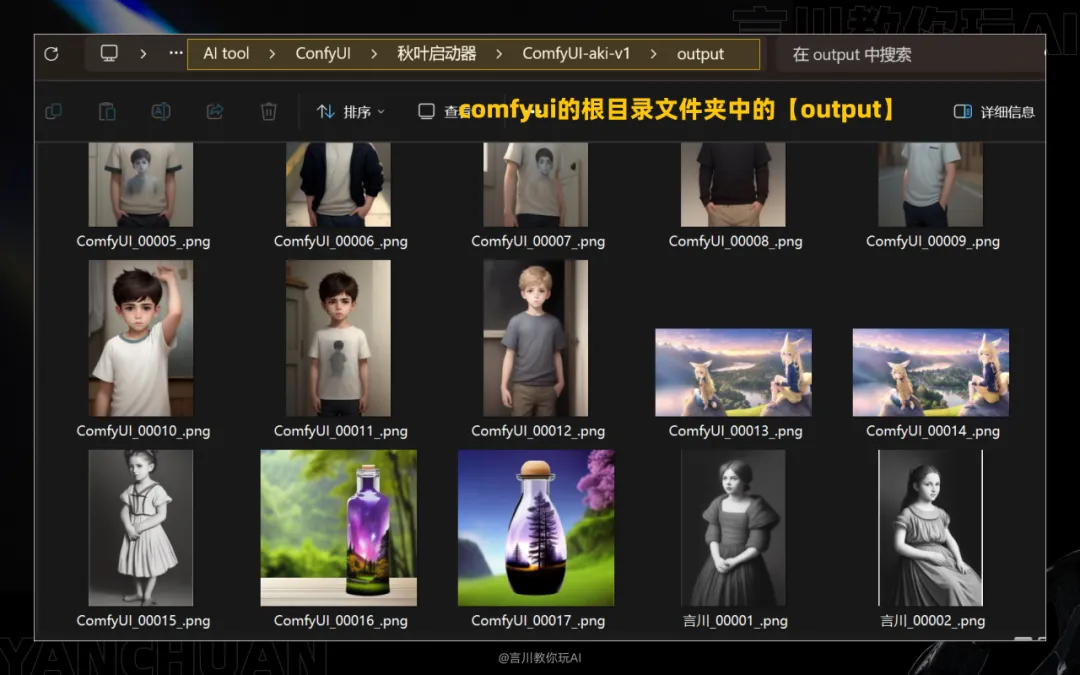
Then the pictures we generate again will be automatically saved locally. We can go to [output] in the root folder of ComfyUI to view it, as shown in the figure:
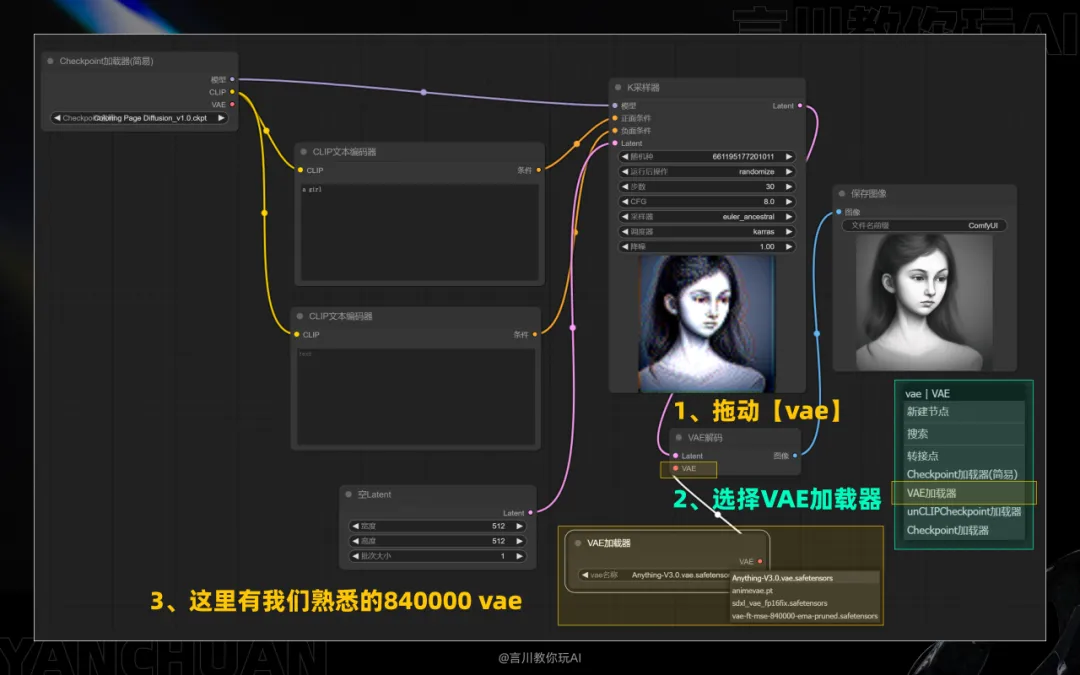
2. Currently, the VAE node we added is directly connected to the large model node. Some large models are automatically VAE while some are not. Can we manually add VAE as in the webUI? Yes, it is possible.
Delete the connection line connecting the large model, drag at the VAE connection point, select [VAE Loader], and you can see the familiar 840000 VAE.
#-Workflow Reuse
Now you have basically learned how to operate ComfyUI to produce images. Now let's use the skills we have learned to make a cool workflow in comfyUI, as shown in the figure:
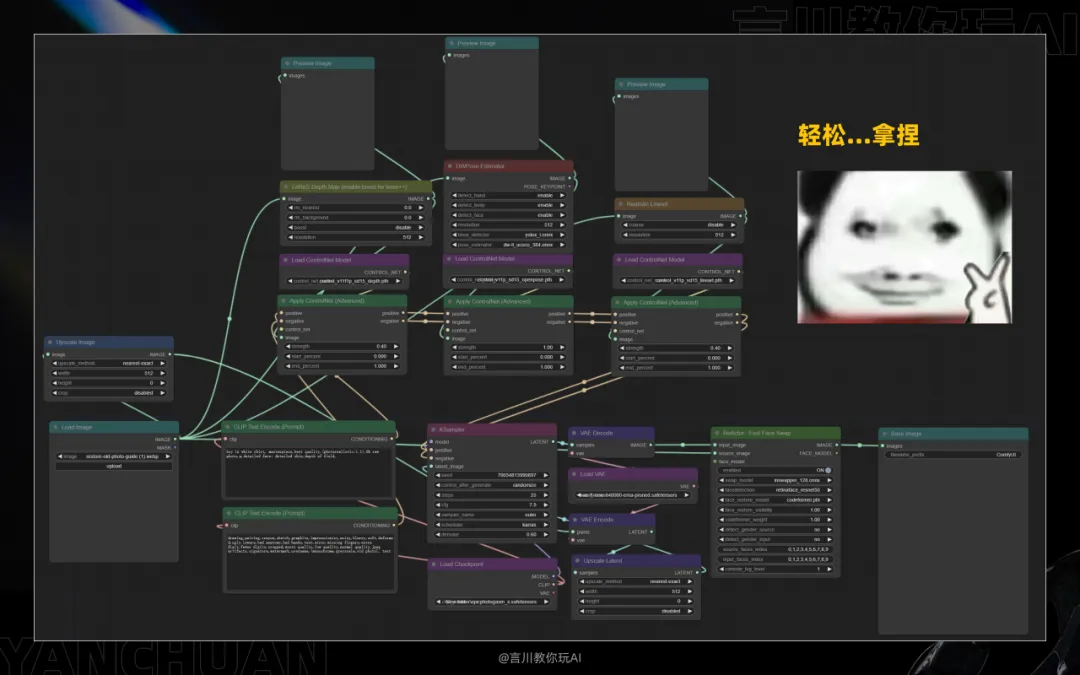
I wonder how you feel after reading this, do you want to uninstall ComfyUI? There are so many complex nodes, it's a headache to see them.
Don't panic, I didn't tell you to build this workflow yourself. In addition to its high degree of freedom and flexibility, ComfyUI also has the biggest feature of being able to directly reuse workflows shared by others. With just a small file or a picture, the above workflow can be directly reused in our interface.
So I will share with you how to do it below, read on:
Save Workflow
First, let's save the workflow we built.
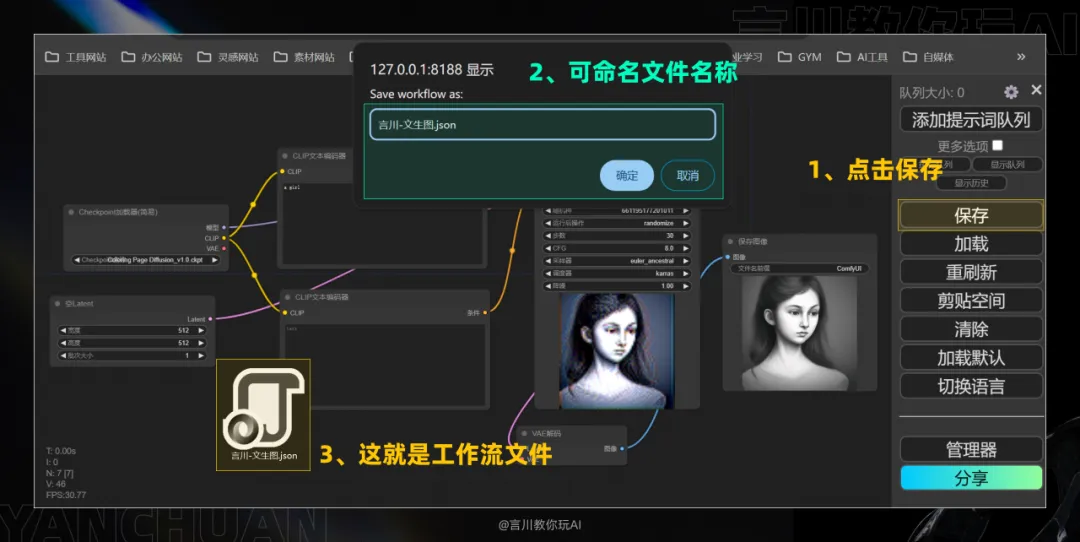
Taking the document-based workflow built earlier as an example, first click [Save] in the ribbon, then a pop-up window will appear in your browser where you can name the file. After clicking OK, the browser will download the file, which is the file with the "json" suffix. In this way, our workflow is packaged into one file.
Loading Workflow
So how do we load a workflow? Here are two common methods:
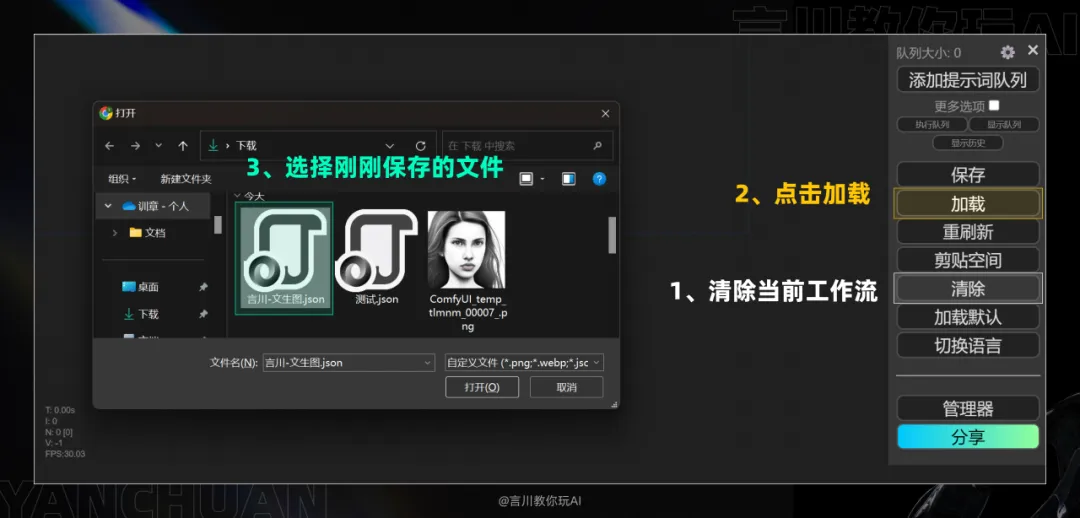
1. We click [Load] in the ribbon, then select the json file we saved and click Open, then the document workflow we saved will appear, which is very simple.
2. Image loading. We use images generated by ComfyUI, and the images will have the generated workflow. This means that we can load the work directly through the image.
There are two operation methods. The first method is the same as above. Click [Load], select the generated picture to open, and the workflow will appear.
Another way is to directly drag the generated graph into the workspace, then you can also load the workflow.
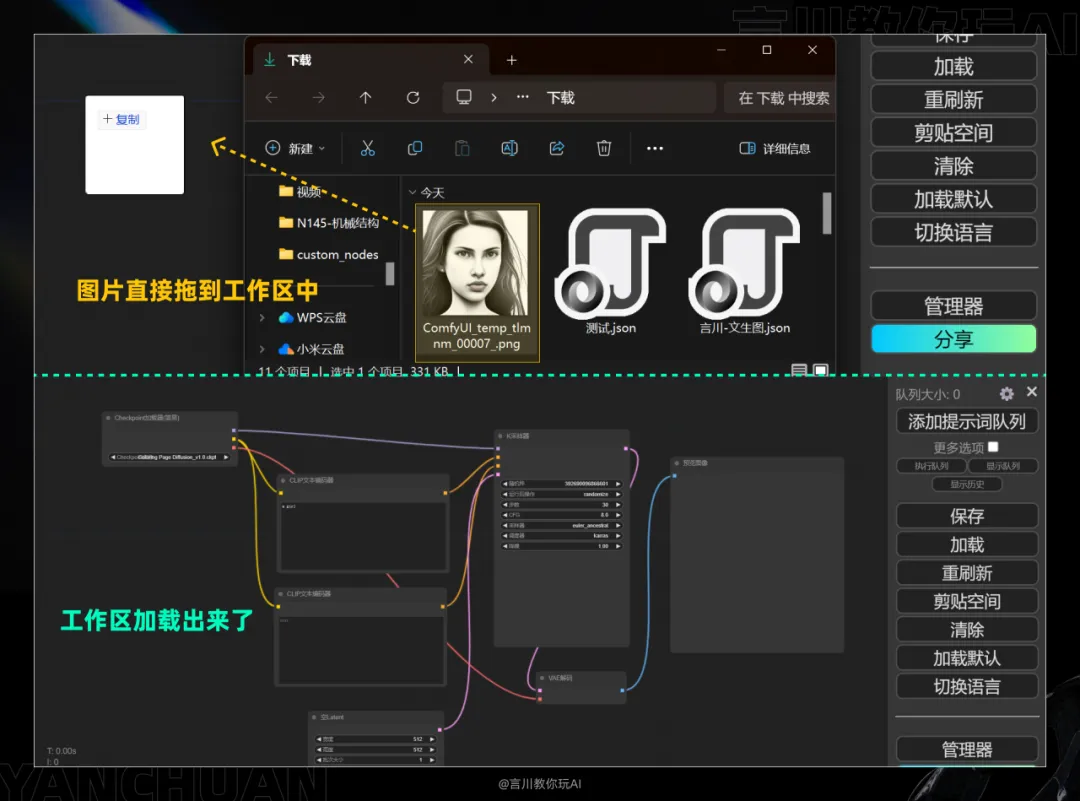
Please note that the image loading workflow must be generated by ComfyUI. Don't drag a selfie of yours.
The above are two commonly used loading methods. Of course, there are some other methods, which will not be expanded here. Aren’t these two methods enough for you?
Reuse other workflows
Now that you understand how to save/load workflows, do you know what I'm going to talk about next? Yes, ComfyUI (SD) is an open source software, and there are many big guys and developers who share plug-ins, nodes, etc., and of course, many workflows.
For example, the following website OpenArt Flow | Builder has many workflows, such as model changing clothes, style portrait, photo restoration, etc., and we only need to download its workflow and use it directly. I also have a collection of many workflow websites, which I can share with you. Please give me a triple link (contact me for you)
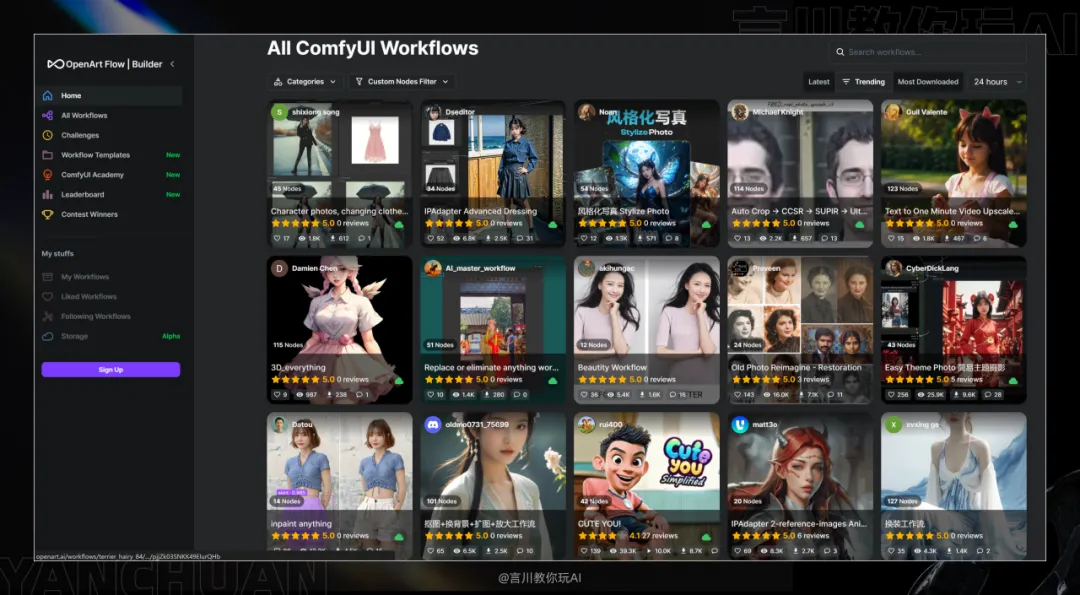
Next, we will download a workflow and load it. As shown in the figure, an error message appears. This problem occurs because of missing nodes.
Think about what was said before. Do nodes need to be downloaded and installed before they can be used? When we reuse other people's workflows, you may not have downloaded the nodes they use, because there are currently more than 600 nodes, and you can't download them all. So when we use other people's workflows in the future, you will often encounter such problems.
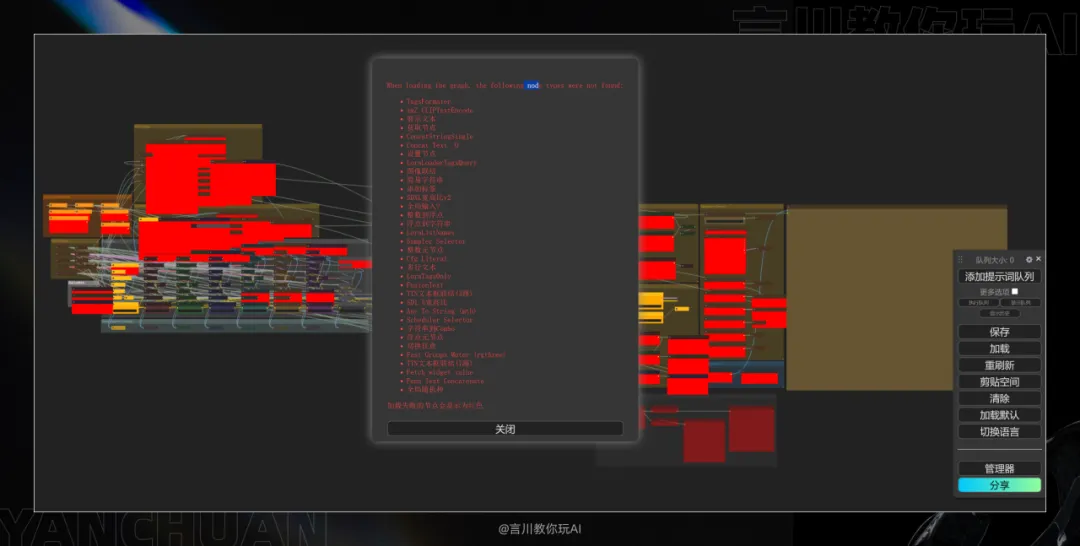
It's not a big problem, we have a solution. Remember the [ComfyUI Manager] node manager that I taught you to install earlier? With it, we can solve this problem very easily. Just follow me and follow the steps below.
Enable the manager, and then you will see an [Install Missing Node], which is what the name suggests.
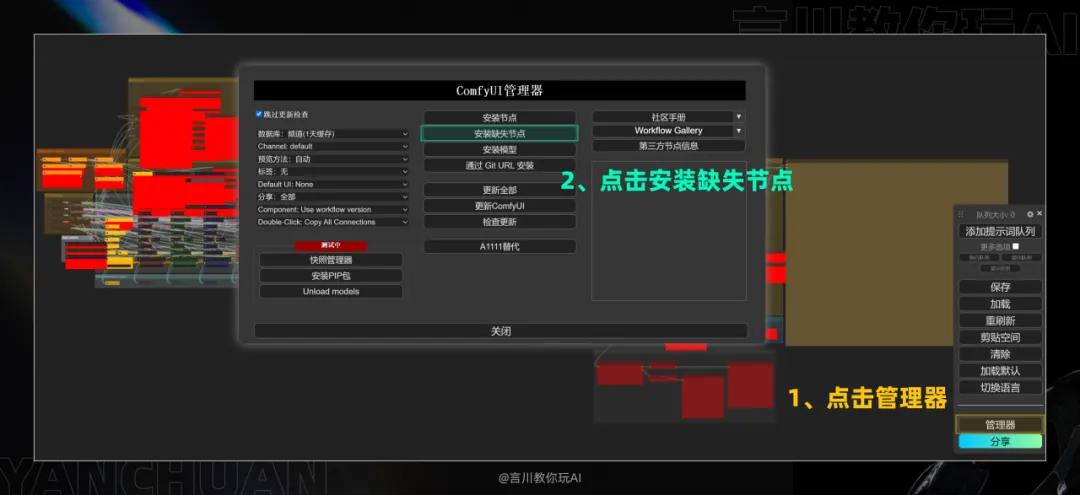
After clicking, you can see that I am missing 17 nodes, so I need to install all these nodes (you can select multiple nodes to install at the same time).
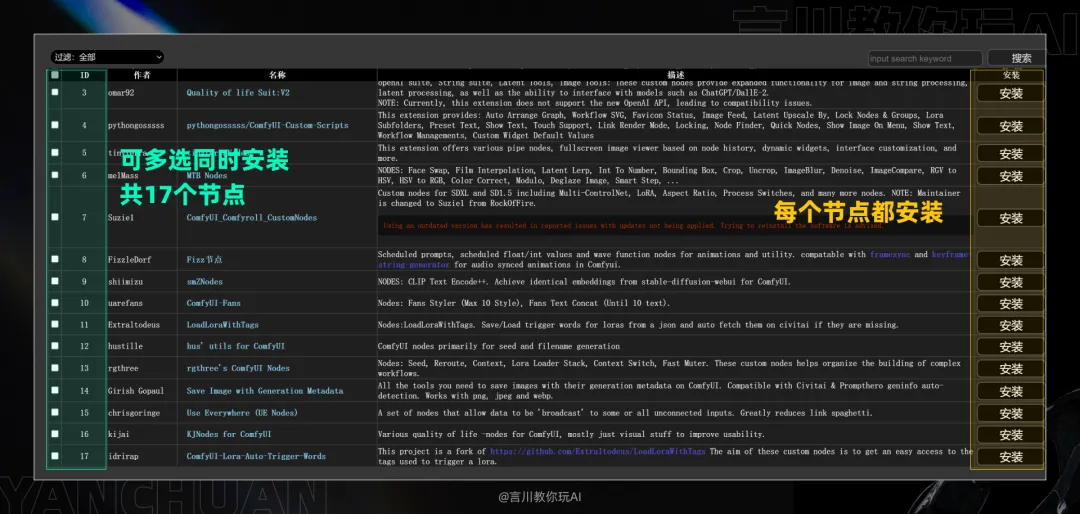
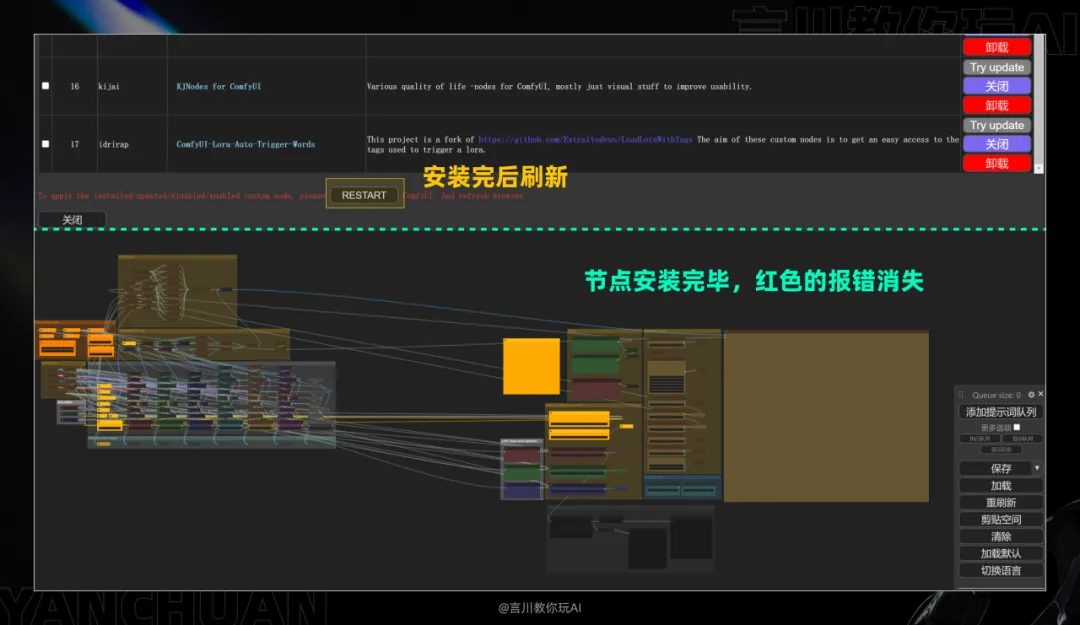
After installing 17 more nodes, click Refresh or restart the application background (if the node still reports an error), then we can use this workflow normally.
Then ComfyUI starts from 0Getting Started TutorialThat's all.
In this ComfyUI tutorial, we fully explored the power and flexibility of this node-based image generation tool.
From basic introduction to in-depth operation, we will guide you step by step on how to use ComfyUI efficiently, covering all key steps from installation, model loading to node configuration. At the same time, we also share how to implement a multi-language interface through the AIGODLIKE plug-in, and how to quickly save, load and reuse workflows. I believe you have a comprehensive understanding of ComfyUI.