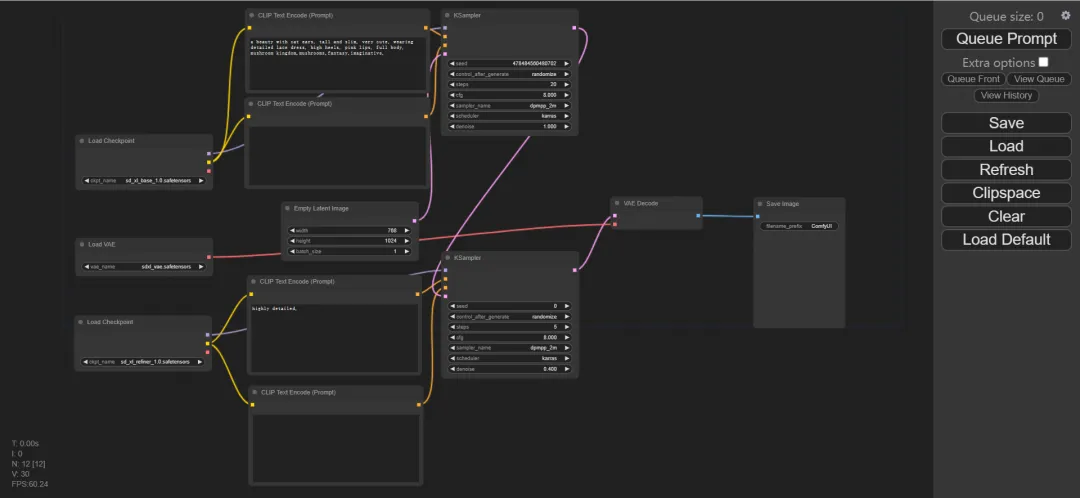
1. What is ComfyUI?
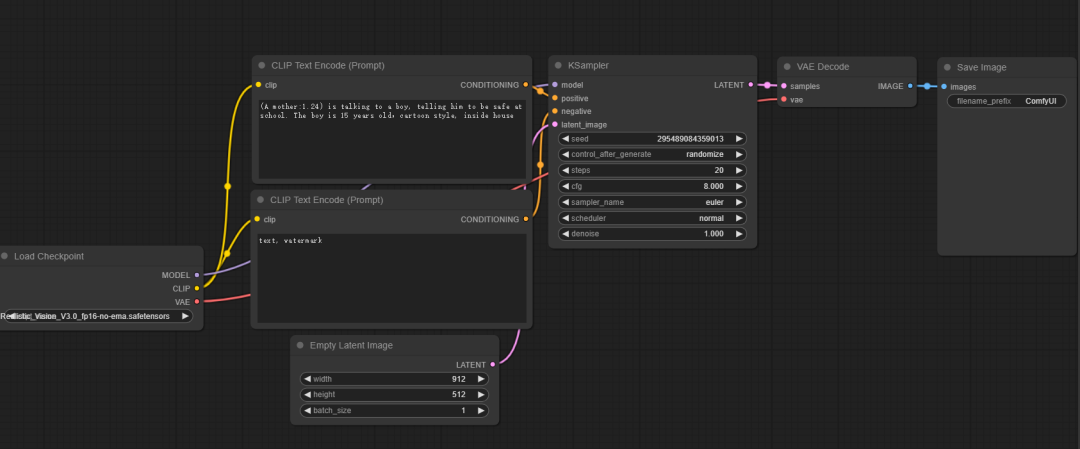
ComfyUI Is a modular stable diffusion graphical interface.
Such a description may make many people wonder, what exactly is modularity?
Let's take a simple example. It's like assembling a computer, which has components such as the motherboard, CPU, memory, and hard disk. Each component can be selected according to the user's needs, and then assembled into a complete computer host. This modular design allows users to customize it according to their own needs, and when they need to upgrade in the future, they can also easily replace specific components without replacing the entire computer.
In contrast, mobile phones are usually non-modular because the various components of the phone are fixed from the factory and cannot be easily replaced or upgraded. This means that when users buy a mobile phone, they can only choose the overall configuration, and cannot customize it according to their own needs like a computer, nor can they replace specific components for upgrading later.
ComfyUI adheres to the modular design concept, breaking down the complex AI drawing process into independent steps. Each step is defined as a module. Each module has specific functions and can be adjusted individually or freely linked with other modules according to rules, making the AI drawing process more flexible and diverse. However, this modular design also means that if you want to be proficient in using ComfyUI for drawing, you need to have a certain understanding of the working principle of stable diffusion. Therefore, compared with A1111, ComfyUI is slightly more difficult to get started.
2. Why do we need ComfyUI?
The original intention of the author to write ComfyUI code was to gain a deeper understanding of how stable diffusion works, and to have a powerful and concise tool for unlimited stable diffusion experiments.
If you are also interested in learning more about how stable diffusion works and are looking for a tool to create your own image generation process, then ComfyUI is definitely your best choice.The main reason for using ComfyUI is that it optimizes SDXL better, takes up less video memory and runs faster.
Many people may find it strange, isn't A1111 already good enough? Why use ComfyUI? Then let's talk about the difference between A1111 and ComfyAI.
①user interface. The user interface of A1111 is closer to our usage habits. For each setting, we only need to make a selection or adjustment. For example, when we need to perform image generation operations, we only need to click the Image Generation Label, upload the image, and then set the parameters. Finally, the model will complete the entire image generation process according to the internal setting process of A1111. But ComfyUI is different. If we need to perform image generation operations, we need to build the process ourselves, consider which modules (nodes) to add, and how these nodes are connected, etc., and then set the parameters. Finally, ComfyUI generates the final image according to the process we set. Therefore, if you know nothing about stable diffusion, then A1111 is a more suitable choice for you. When you have mastered a certain stable diffusion operation mechanism, ComfyUI will also be a very good substitute.
②Extended supportA1111 has stronger extension support than ComfyUI. Entering "ComfyUI" in the github search box only yields 22 pages of search results, while entering "stable diffusion webui" yields 100 pages of results. This means that more plugins support A1111, which means richer extension functions and stronger overall capabilities.
③Drawing speed. Recently, the sudden rise in popularity of ComfyUI is mainly due to its good support for SDXL. In A1111, using SDXL models often takes up a lot of memory, and the video memory usage is also high, which leads to slow image generation. ComfyUI, on the other hand, can complete the same content at a faster speed under the conditions of lower video memory and memory usage. For the SD v1 version, there is no obvious difference in the drawing speed between A1111 and ComfyUI, but using SDXL to draw, ComfyUI is almost twice as fast as A1111. Therefore, if you want to experience SDXL better even with low video memory, then ComfyUI is my current more recommended choice.
3. How to install ComfyUI?
The installation method is very simple, the steps are as follows:
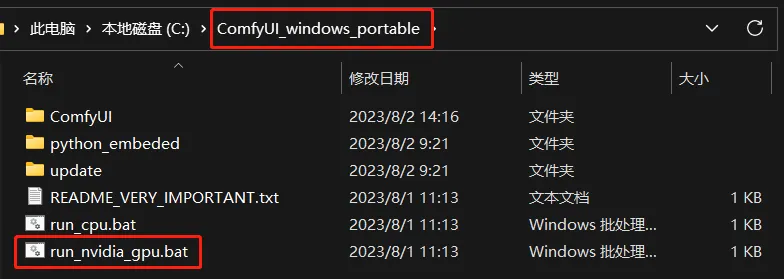
① Download this compressed file: https://github.com/comfyanonymous/ComfyUI/releases/download/latest/ComfyUI_windows_portable_nvidia_cu118_or_cpu.7z
② After decompression, enter the directory and click run_nvidia_gpu.bat to run. If you want to run on the CPU, open run_cpu.bat, but it is not recommended.
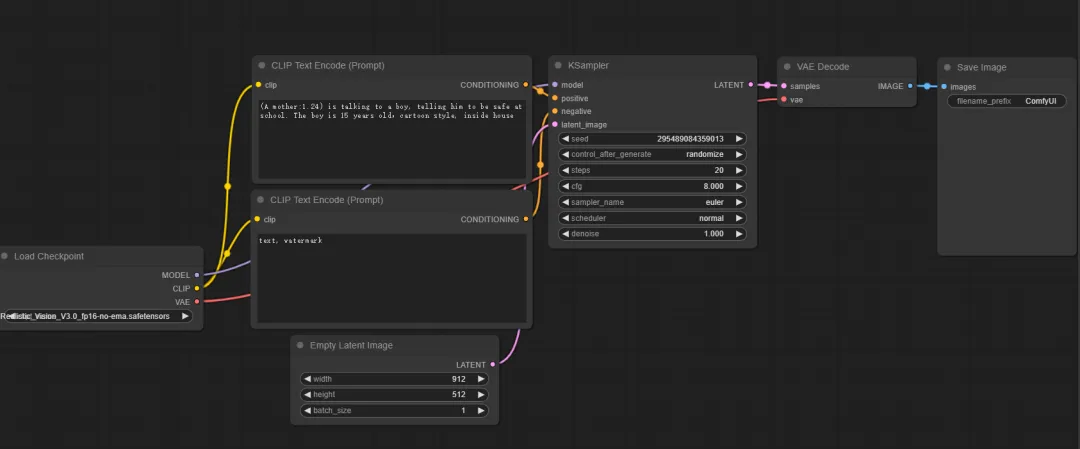
③ After successful running, the program automatically uses the default browser to open the UI address. The default interface is as follows.
④ Users who often use ComfyUI should have used A1111 before. If they need to copy a copy of the model file to ComfyUI, the storage usage will become very high. With a simple setting, ComfyUI can load all model files in the stable-diffusion-webui directory, including SD models, Lora and embedding, etc., without copying these files.
⑤ First, open the file named "extra_model_paths.yaml.example" in the path of \ComfyUI_windows_portable\ComfyUI, then open Notepad and drag the file to Notepad to open it, and change the path after base path to the path of the stable-diffusion-webui folder. For example, my storage path is C:\AI-stable-diffusion-webui. Finally, press ctrl+S to save.
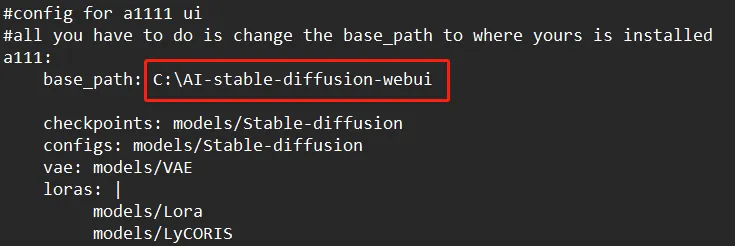
⑥ Rename the "extra_model_paths.yaml.example" file to "extra_model_paths.yaml". After restarting ComfyUI, you can load all the models in the webui directory.
4. Basic Usage
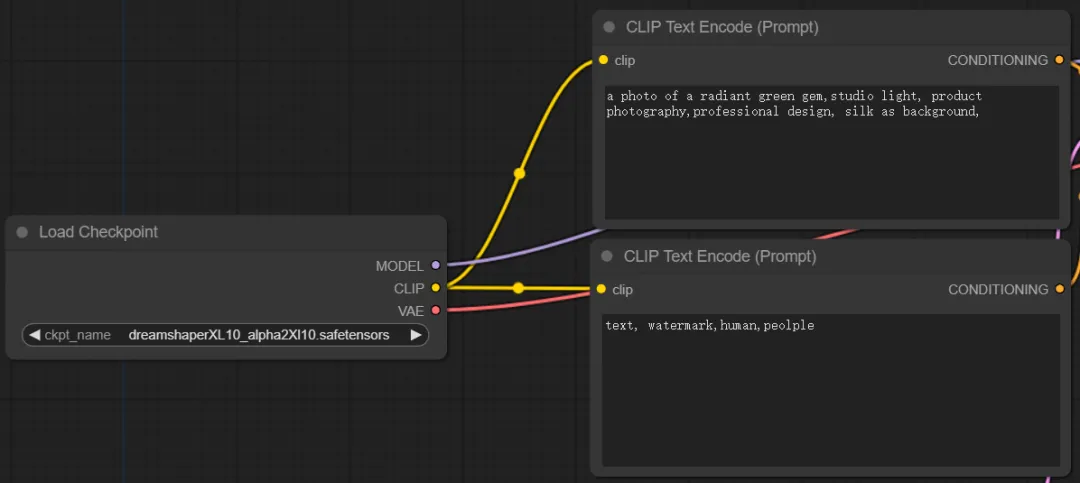
1. Once you enter the interface, you will see multiple independent boxes, which we call "Nodes", and these nodes can be moved freely. The leftmost node is "Load Checkpoint", as shown in the figure below. The function of the "Load Model" node is to load the model into memory and apply the model weights to the neural network. In short, the main function of this interface is to select different stable diffusion models. You will notice that the "Load Model" node has three outputs, namely "MODEL", "CLIP" and "VAE", which I will explain one by one below.

2. First, let's look at CLIP. The CLIP model is connected to the "CLIP Text Encode" node, as shown in the figure below. The role of the CLIP model is to encode the content we input so that it can guide the model to generate the content we specify. You will find that there are two CLIP text encoders, one of which encodes the positive prompt word and the other encodes the reverse prompt word. These two CLIP text encoder nodes are no different from the two prompt word input boxes in A1111, and their functions are exactly the same.
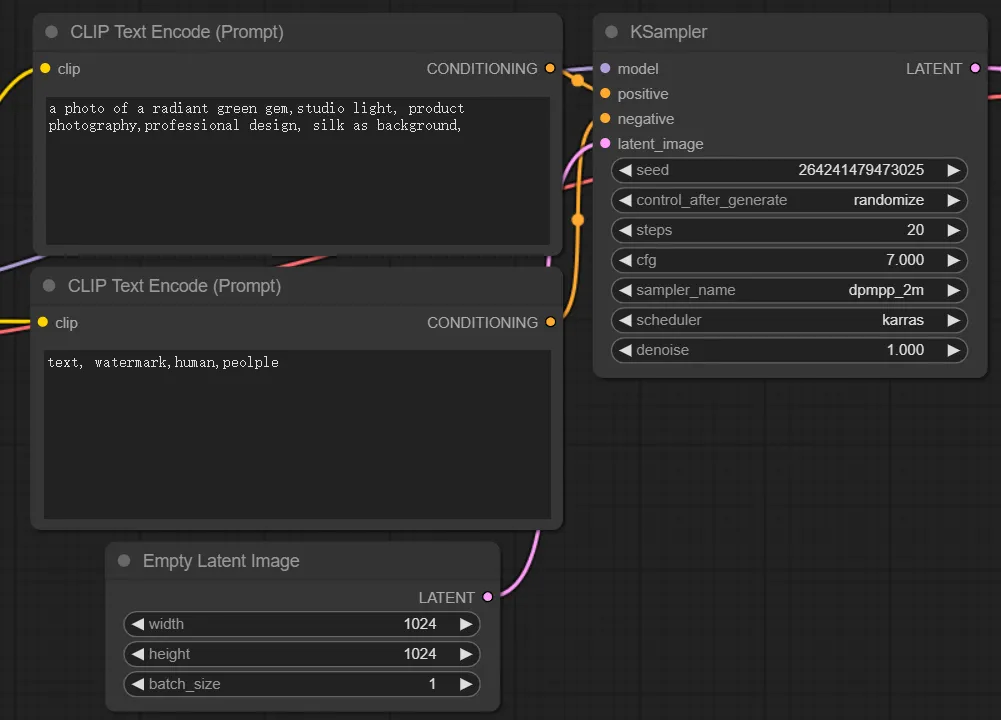
3. Next is the "model", which is the main model of SD. So how are images generated? In stable diffusion, images are generated by the "Sampler". The sampler receives the main model and the forward and reverse prompt words encoded by CLIP as input, and also requires an empty "latent image". The "latent image" can be understood as the data representation used by the SD model, while the "pixel image" is the form of data we finally see. The latent image is a highly compressed form of the pixel image, which retains the high-level features of the pixel image, while the amount of data is significantly reduced. It is worth noting that the data processed by the sampler is the latent image rather than the pixel image. It is because of this that stable diffusion can run on consumer-grade graphics cards and generate images at such a fast speed.
4. Finally, VAE. The sampler receives 4 inputs and forms a new latent image output. As we just said, the latent image is a data form that the SD model can understand. It needs to be converted into a pixel image before we can understand it. What VAE needs to do is to convert the latent image into a pixel image. The role of the VAE Decode node is to receive the latent image generated by the sampler, and use the VAE model to decode it into a pixel image, and finally output it as a PNG format image.
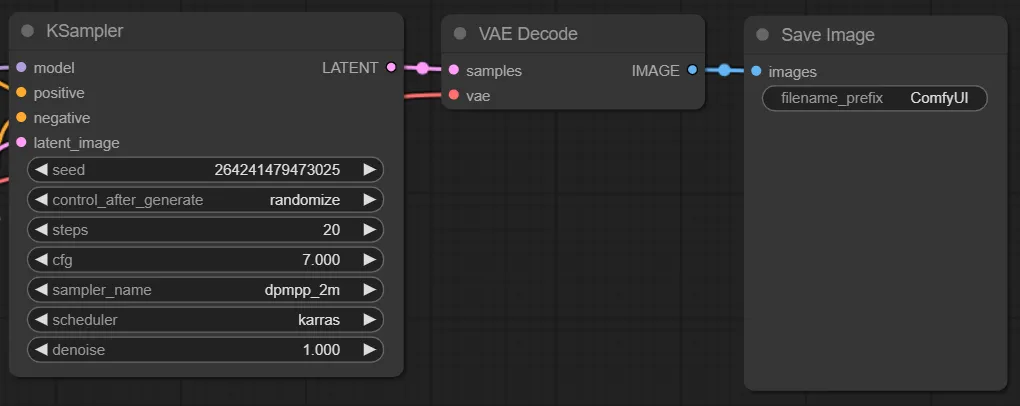
5. In general, the text generation process of stable diffusion is that CLIP first encodes the text we input into data that can be understood by the SD model. Then the sampler accepts the CLIP-encoded data and an empty latent image, and adds noise to the empty latent image according to the seed value. Then the sampler restores the noisy latent image into a clear latent image according to the set parameters. Finally, the clear latent image is decoded by VAE into a clear pixel image and saved as a png format file.
6. If you have a general understanding of the above, then you can try to think about how the image generation process works. If you were asked to create a image generation process yourself, could you create it successfully?
5. Advanced Usage
1. Create a graph generation process
① The process of stable diffusion for image generation is slightly different from that for text generation.
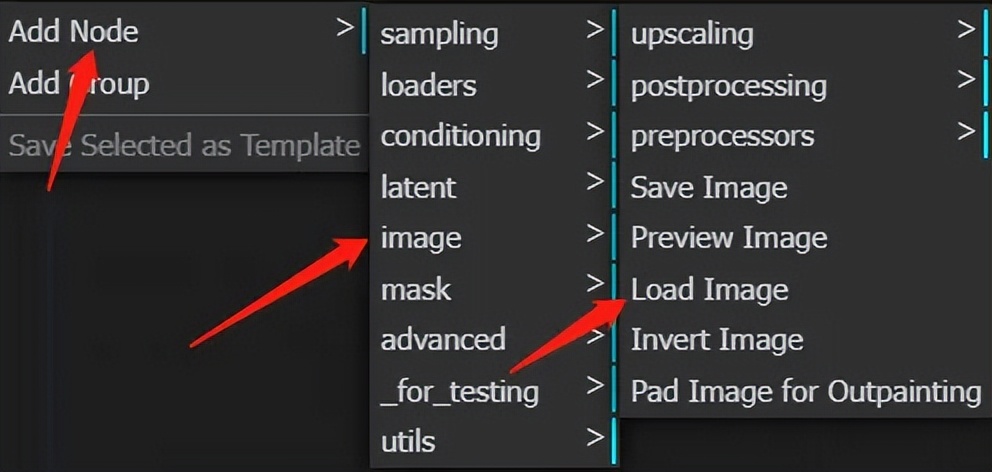
② The first step is to load the image. The node for loading the image is "Add Node" >>> "image" >>> "Load Image"
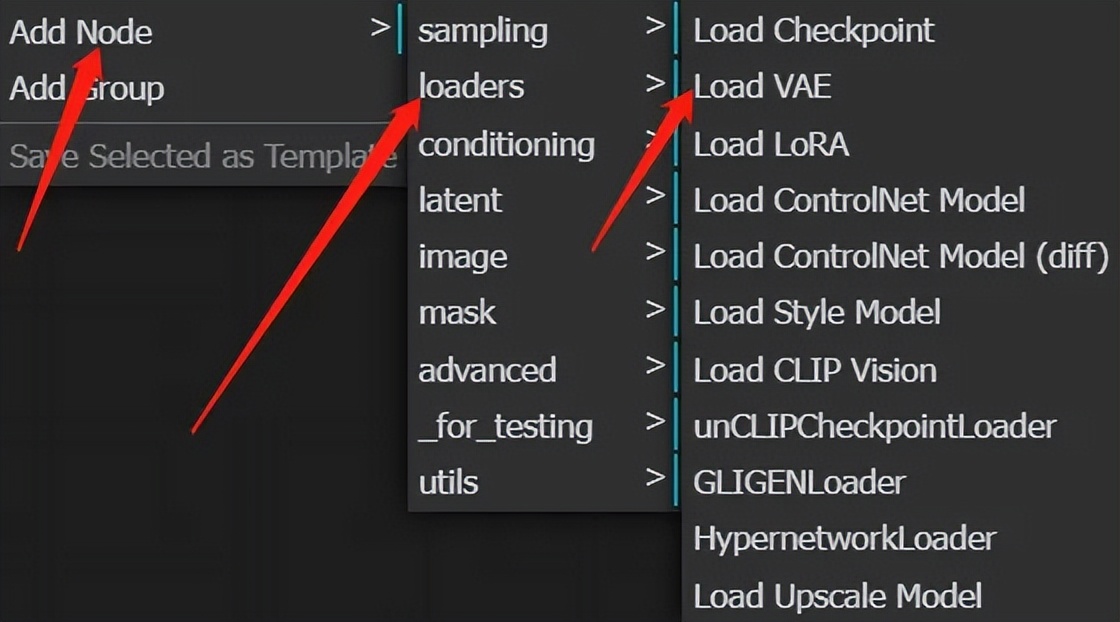
③ As we mentioned before, the image processed by stable diffusion is a latent image, so next we need to use VAE to convert the pixel image into a latent image. Select "Add Node" >>> "loaders" >>> "Load VAE".
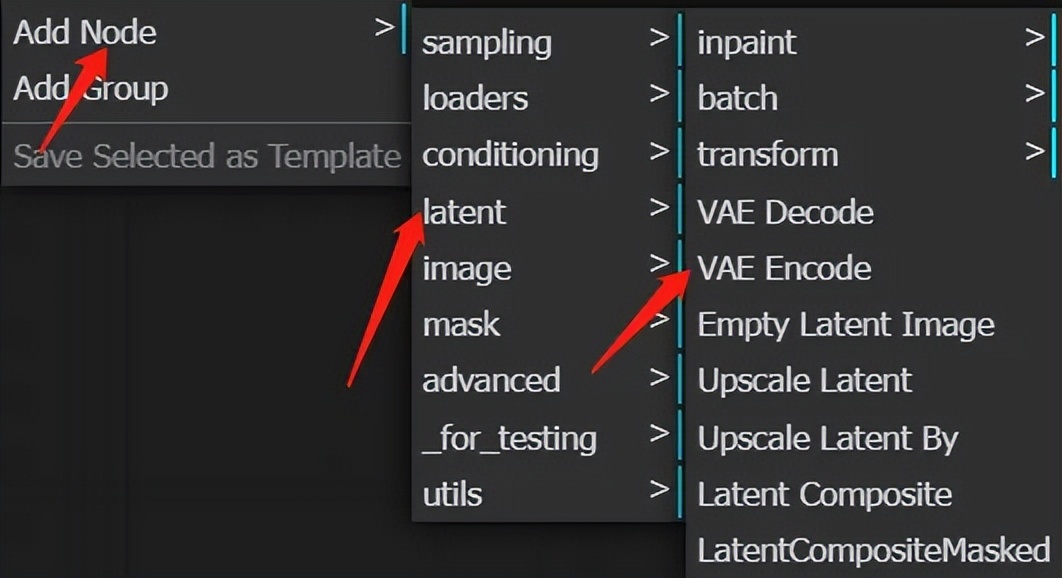
④ Just loading VAE is not enough, you also need to add a VAE encoder node to encode the pixel image into a latent image. Select "Add Node" >>> "latent" >>> "VAE Encode"
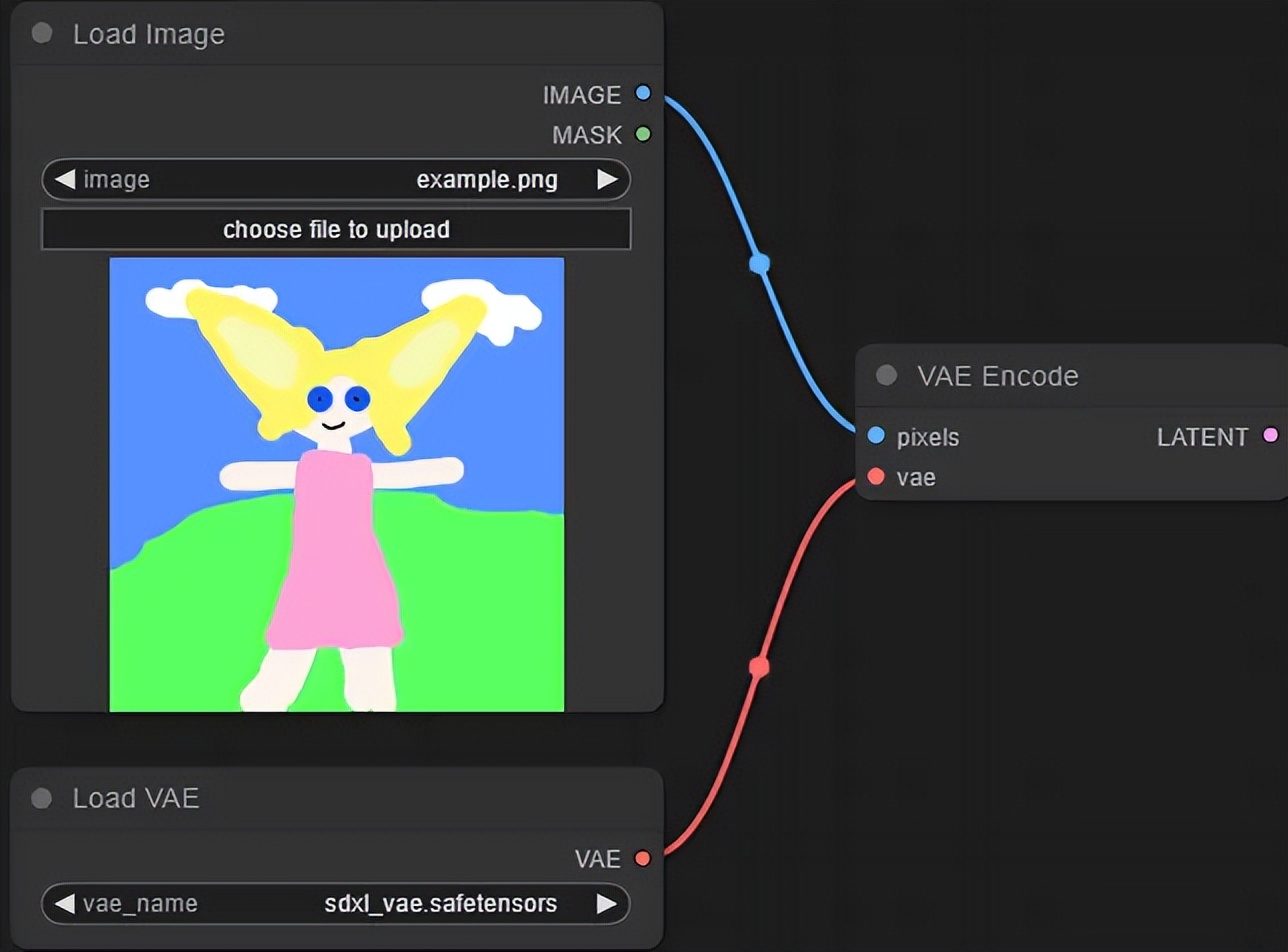
⑤ At this point, we have added three nodes, and the connection method is as shown in the figure below. The blue line is the connection line between the pixel image and the VAE encoder, and the red line is the connection line between the VAE loading node and the VAE encoder.
⑥ Of course, if you do not download the independent VAE model, you can also use the VAE model that comes with the SD model to encode pixel images.
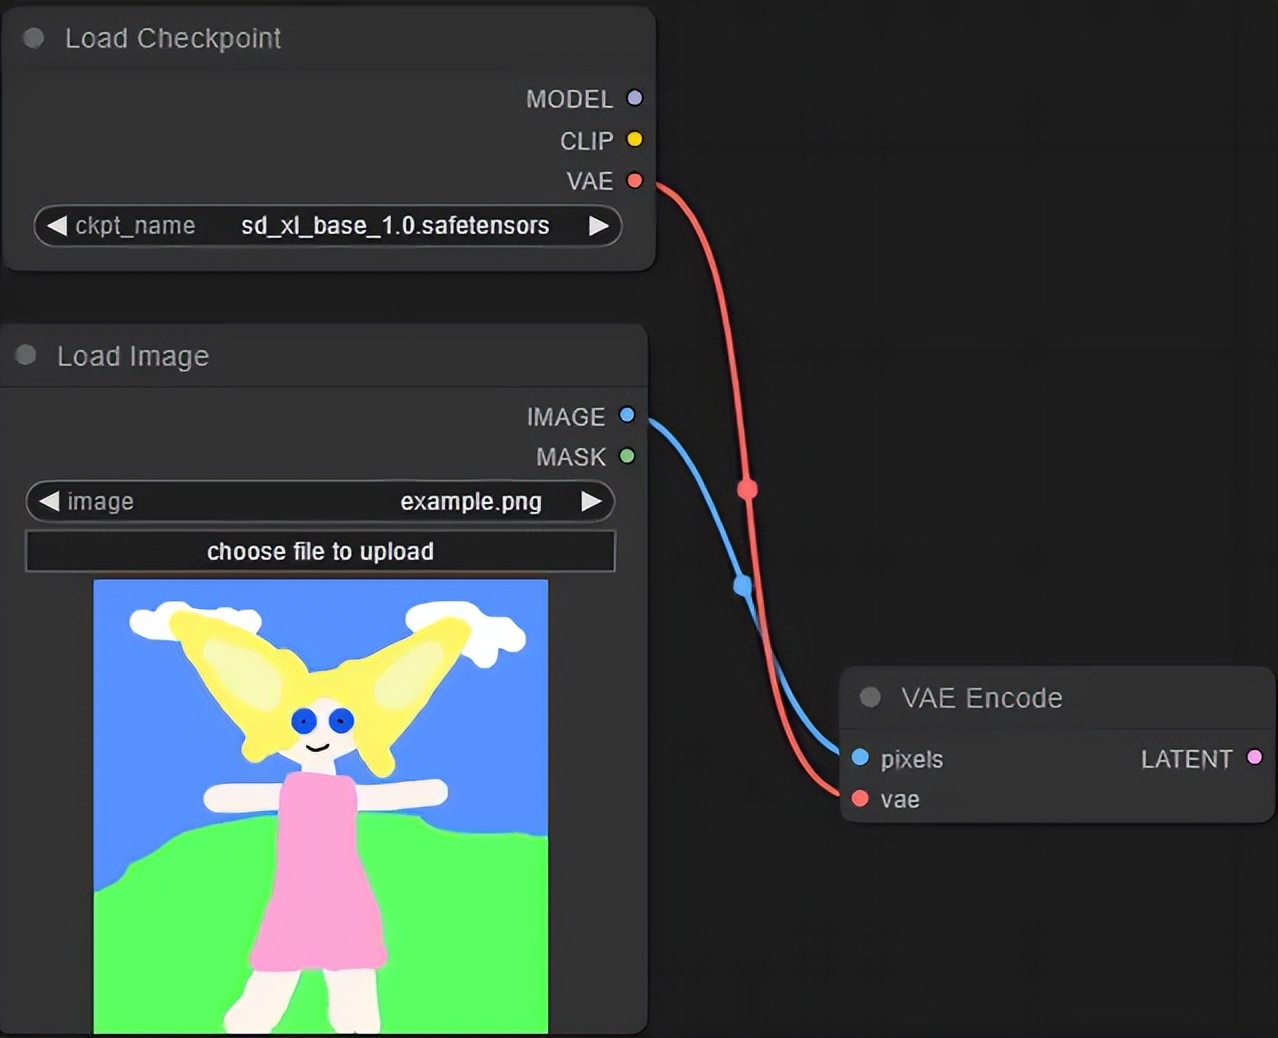
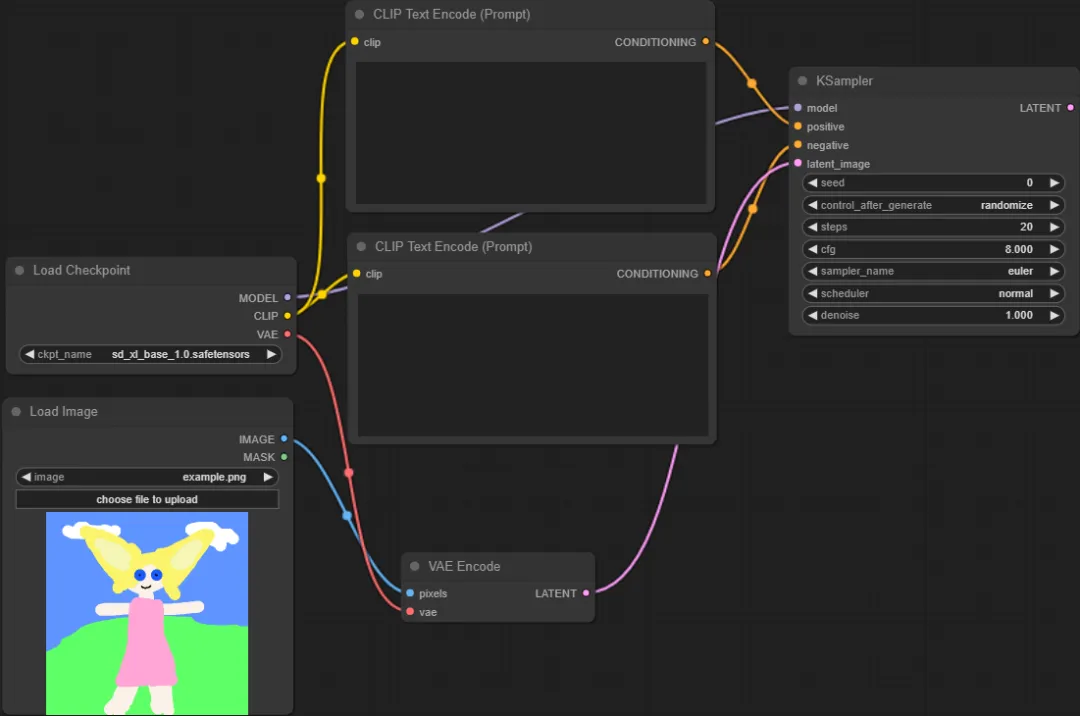
⑦ Next, use the main model of SD to process the latent image. Select “Add Node” >>> “conditioning” >>> “CLIP Text Encode (Prompt)” to add twice as the forward and reverse prompts of the image generation process. Select “Add Node” >>> “sampling” >>> “KSampler” to add a sampler. And connect it as follows.
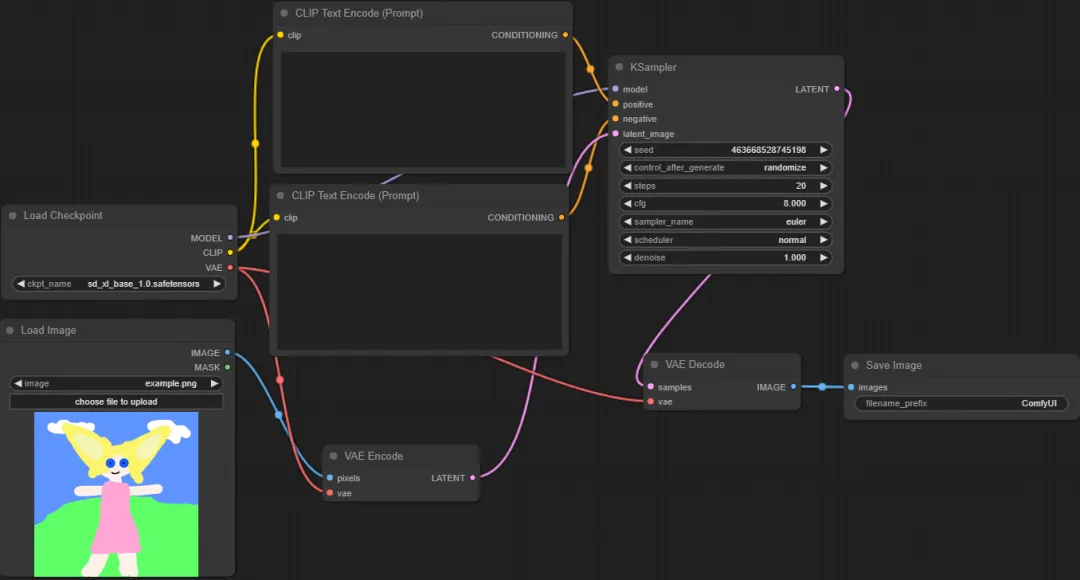
⑧ The latent image output by the sampler node can generate a pixel image after VAE decoding, and finally save it as a PNG format image file. Therefore, you need to add a VAE decoder node and an image saving node. Select "Add Node" >>> "latent" >>> "VAE Decode", select "Add Node" >>> "image" >>> "Save Image". Finally, connect the nodes as shown in the figure below.
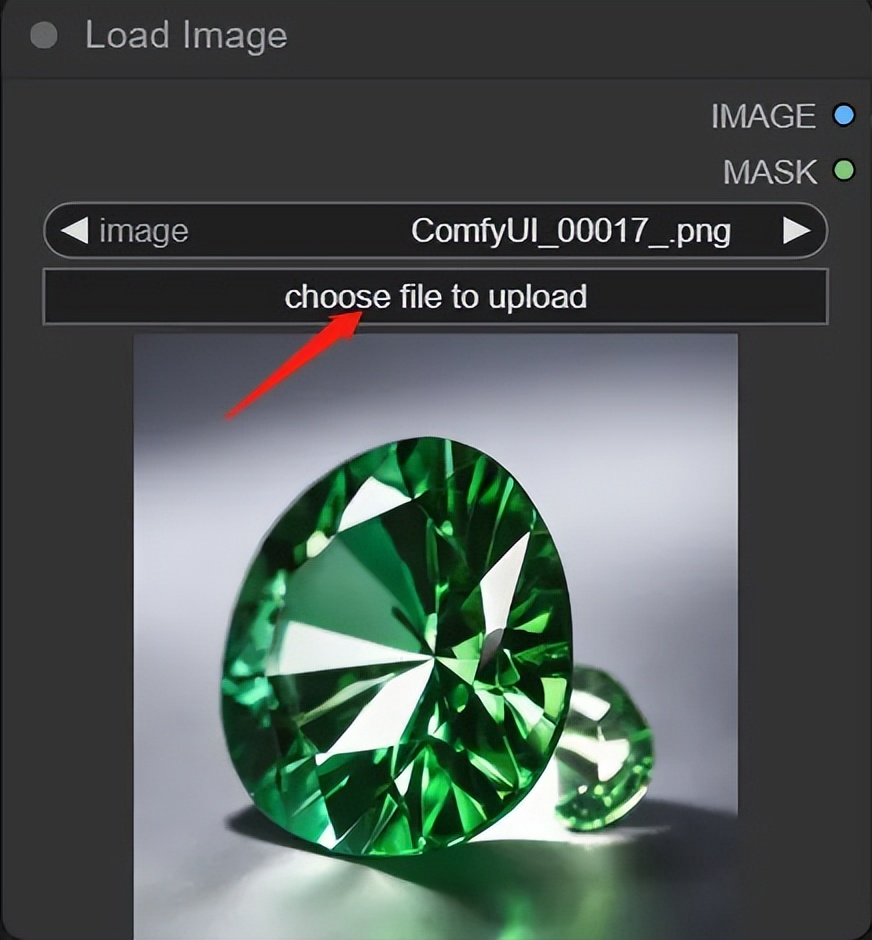
⑨ In the "Load Image" node, click "choose file to upload" to upload the image.
⑩ Enter the prompt word, set the redraw amplitude in the denosie option of the "KSampler" node, and finally click "Queue Prompt" in the upper right corner to generate the image. The final effect is shown in the figure below
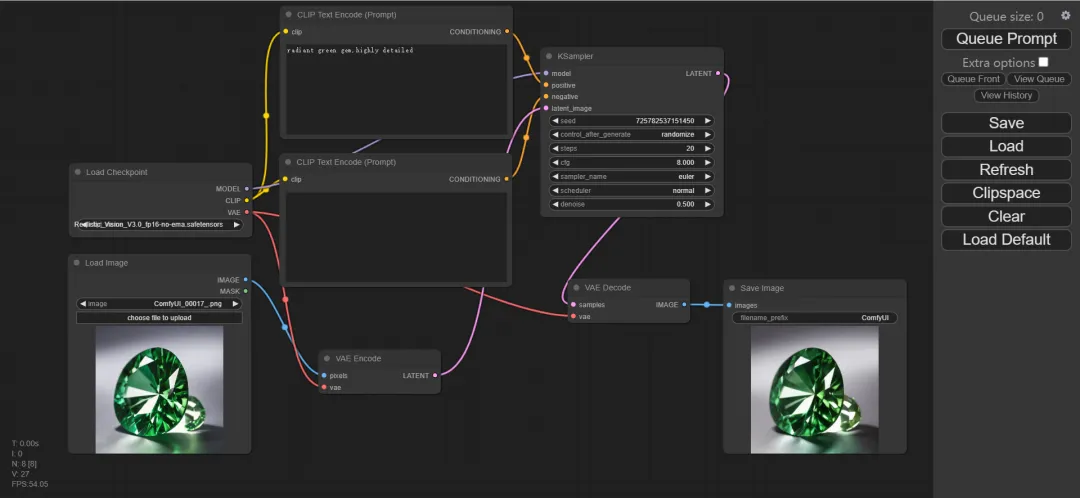
11 Next you should be able to set up various nodes according to your goals, and have fun exploring!
2. Save and use the created process
The images generated by ComfyUI contain the process information of generating the image, which means you can get all the node information by loading the image. In addition, you can also save the created process in the ComfyUI interface.
Here are the steps:
① Click the "Save" button in the upper right corner
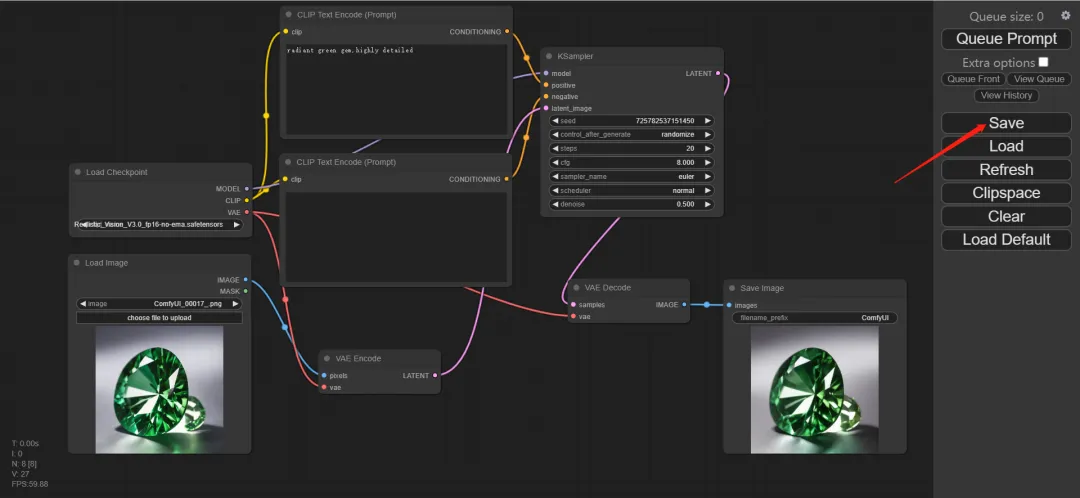
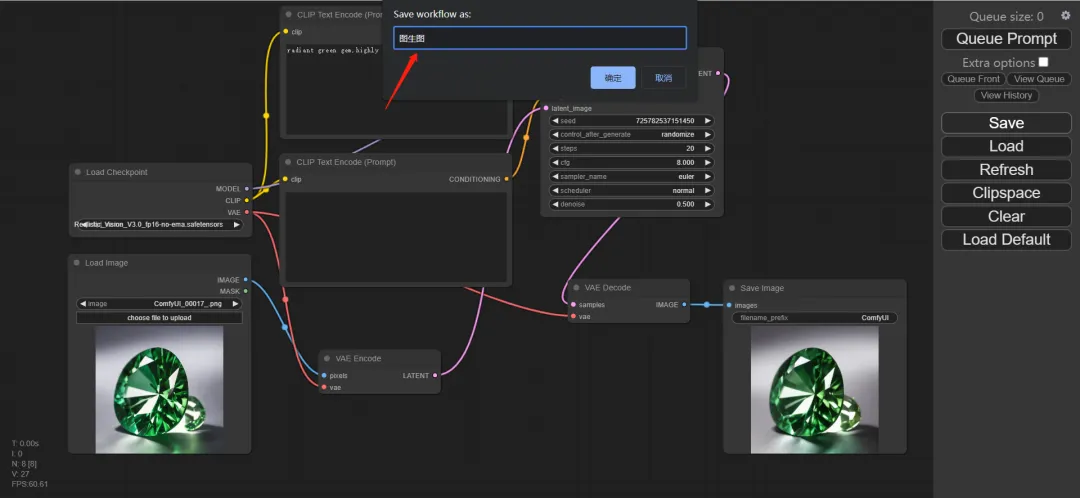
② Enter a new file name in the pop-up dialog box and click "OK" to save the file in a place where you can easily find it.
③ The saved file can be loaded into the ComfyUI interface again. Press "Clear" to clear the interface, then click "Load"
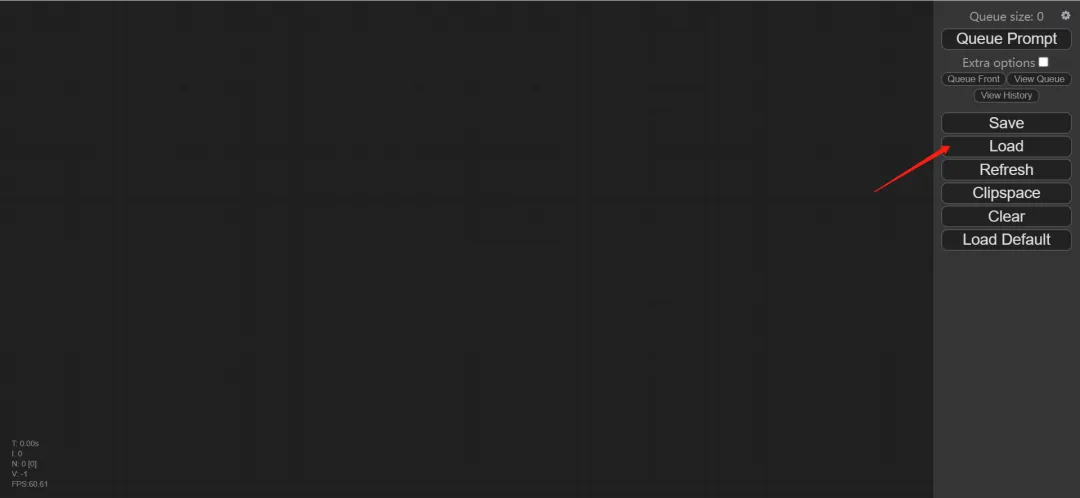
④ Find the folder where the template file is stored, select the process you want to load, and click Open
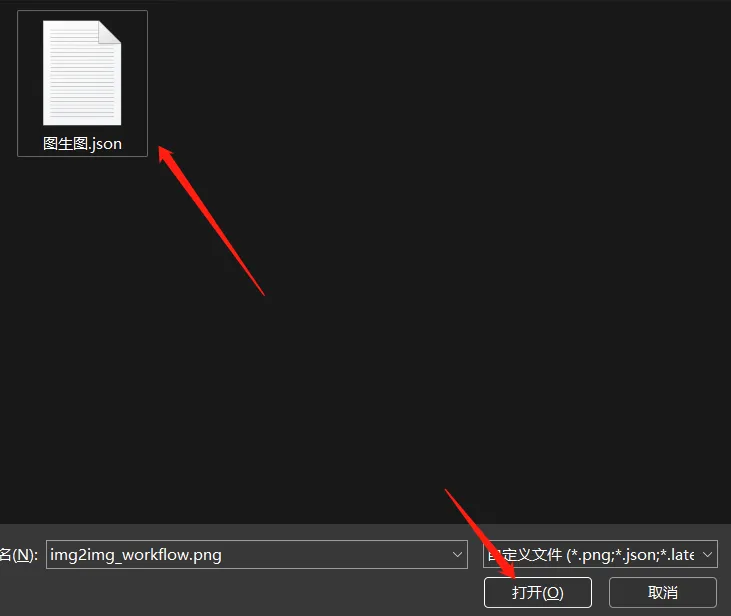
⑤ You can reload all previously saved node information
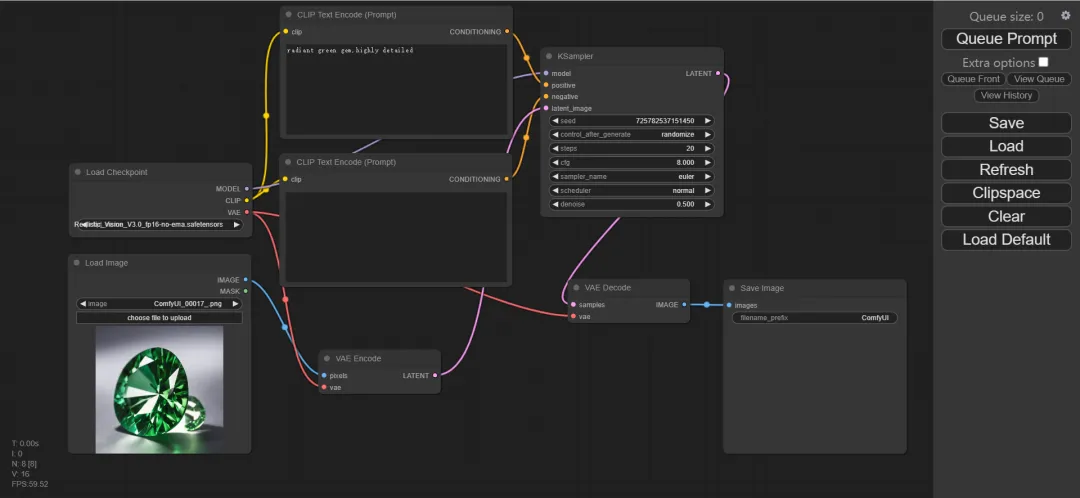
⑥ In addition to loading .json files, we can also use the image generated by ComfyUI as a template to load and obtain all the node settings that generated the image. The loading steps are exactly the same as the above steps. Click "Load", select an image generated by ComfyUI, and then click Open.
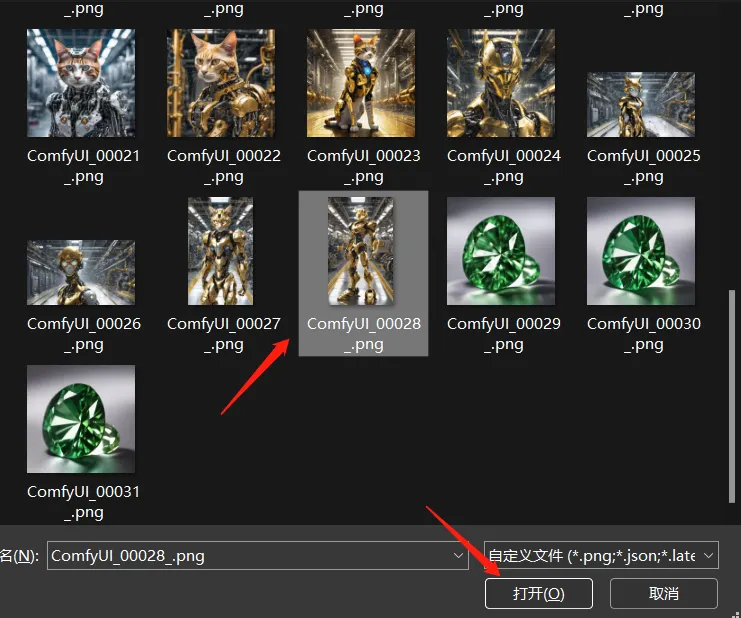
⑦ Finally, you can get the generation information of the picture
