After 1 month of exploding my liver, I finally sorted out a systematizedAI Video CreationWorkflow now!!!
And, after dozens of workflow refactoring and toolset testing, I also finally felt confident enough to write a tutorial to share.
In this article, we're going to take apart in depthAI VideoA very dry (liver) 7-step authoring workflow covering the full chain of hands-on exercises from script generation, image production to video compositing, involving tool synergies across the three major AI domains (text/image/video)!
Below, I'll pass on this workflow.
Step 1: AI Generation of Creative Scripts
There are many choices of AIGC tools in the text generation category, such as Deepseek, ChatGPT, Claude, Grok, and many more.
When I was planning to create this video, the biggest AI model on the market was the Grok 3 model released by Ma (the smartest AI on the planet, according to him).
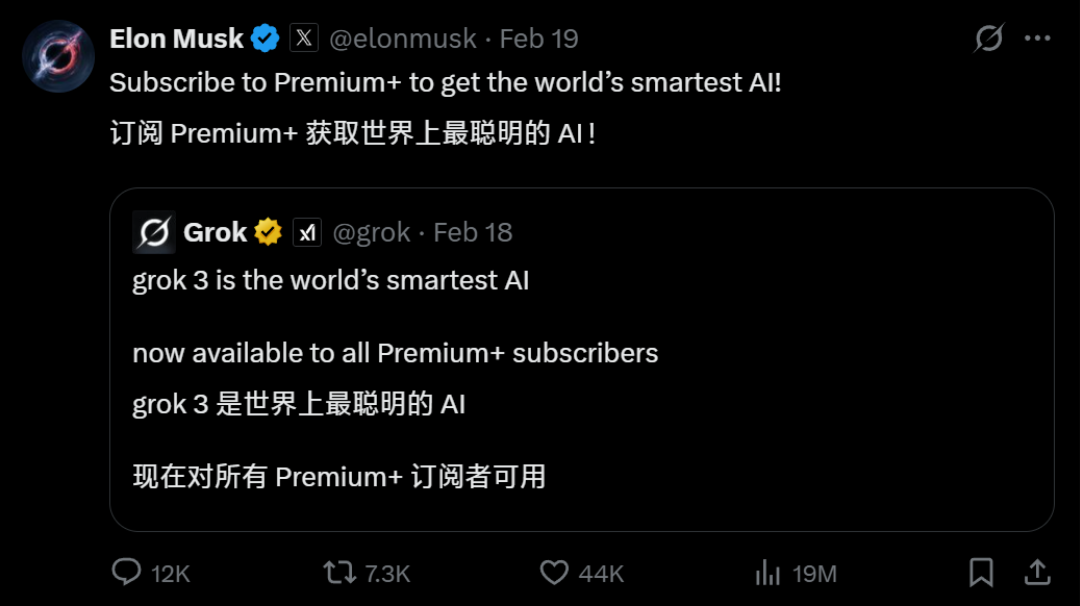
So, it stands to reason that the creative script for this video uses the Grok 3 model.
The address is here: https://x.ai/
As the "smartest" AI on the planet, you don't need to write complicated prompts when talking to it, just describe your needs and its tasks.
Requirement: I want to make a short AI creative movie about xxx
Task: help me write the creative script, 9 subplots.
So the full prompt is: "I need to make an AI creative short film about "Xiaomi Su7 Ultra, Captain Potato (Xiaohongshu IP mascot), winter scene, spring scene, Shanghai Oriental Pearl Tower", and I need you to write down the creative script of this short film for me, about 9 subplots. "
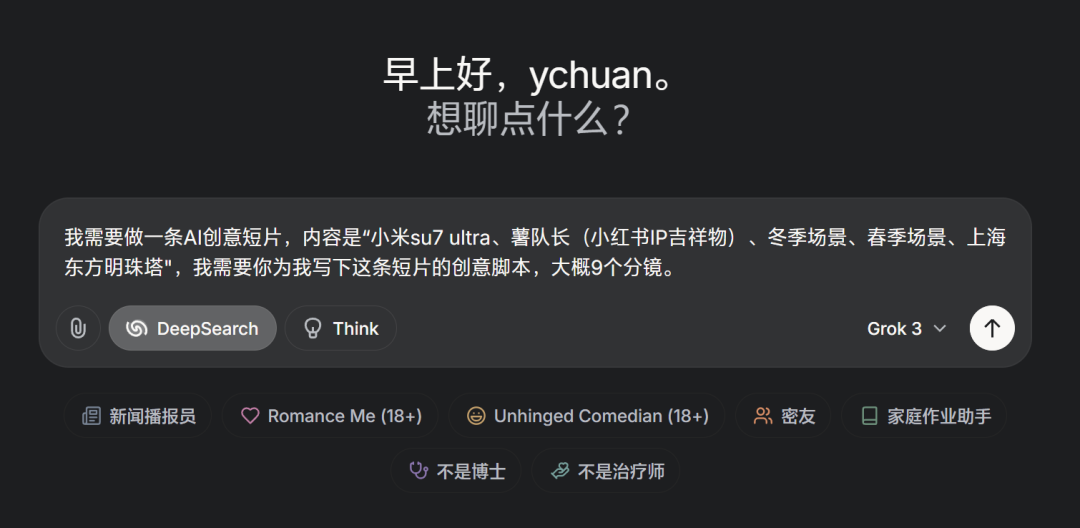
To harp on another point, the theory is that the more detailed you describe your needs when you talk to the AI, the more accurate the AI's response will be.
But in the matter of creativity, who starts out with a very clear need?
Then we can set a general direction and let the AI play on its own first, then have multiple rounds of dialog with it.
The equivalent is that you have a heated discussion with the AI about how to write this creative video proposal, rather than just letting it come up with the proposal for you. During this discussion, I suggest you think of the AI as your colleague (leader or subordinate), your teacher.
Grok 3's DeepSearch capability is really very strong, and you can see its search thinking process displayed in great detail.
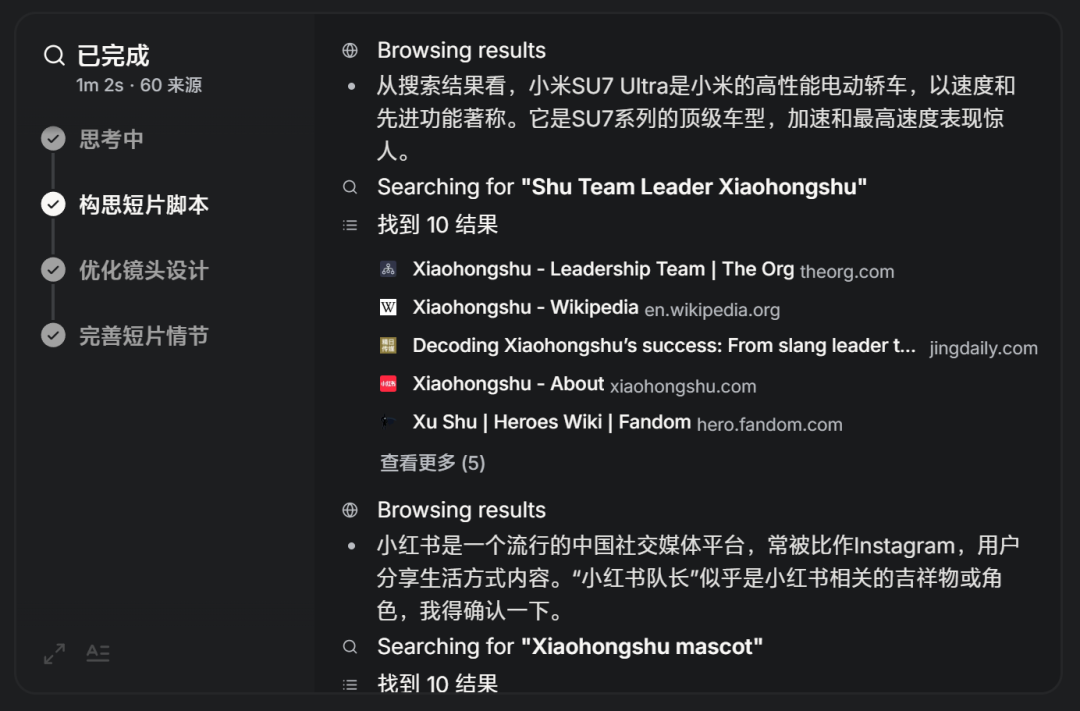
The content of the output split-script:
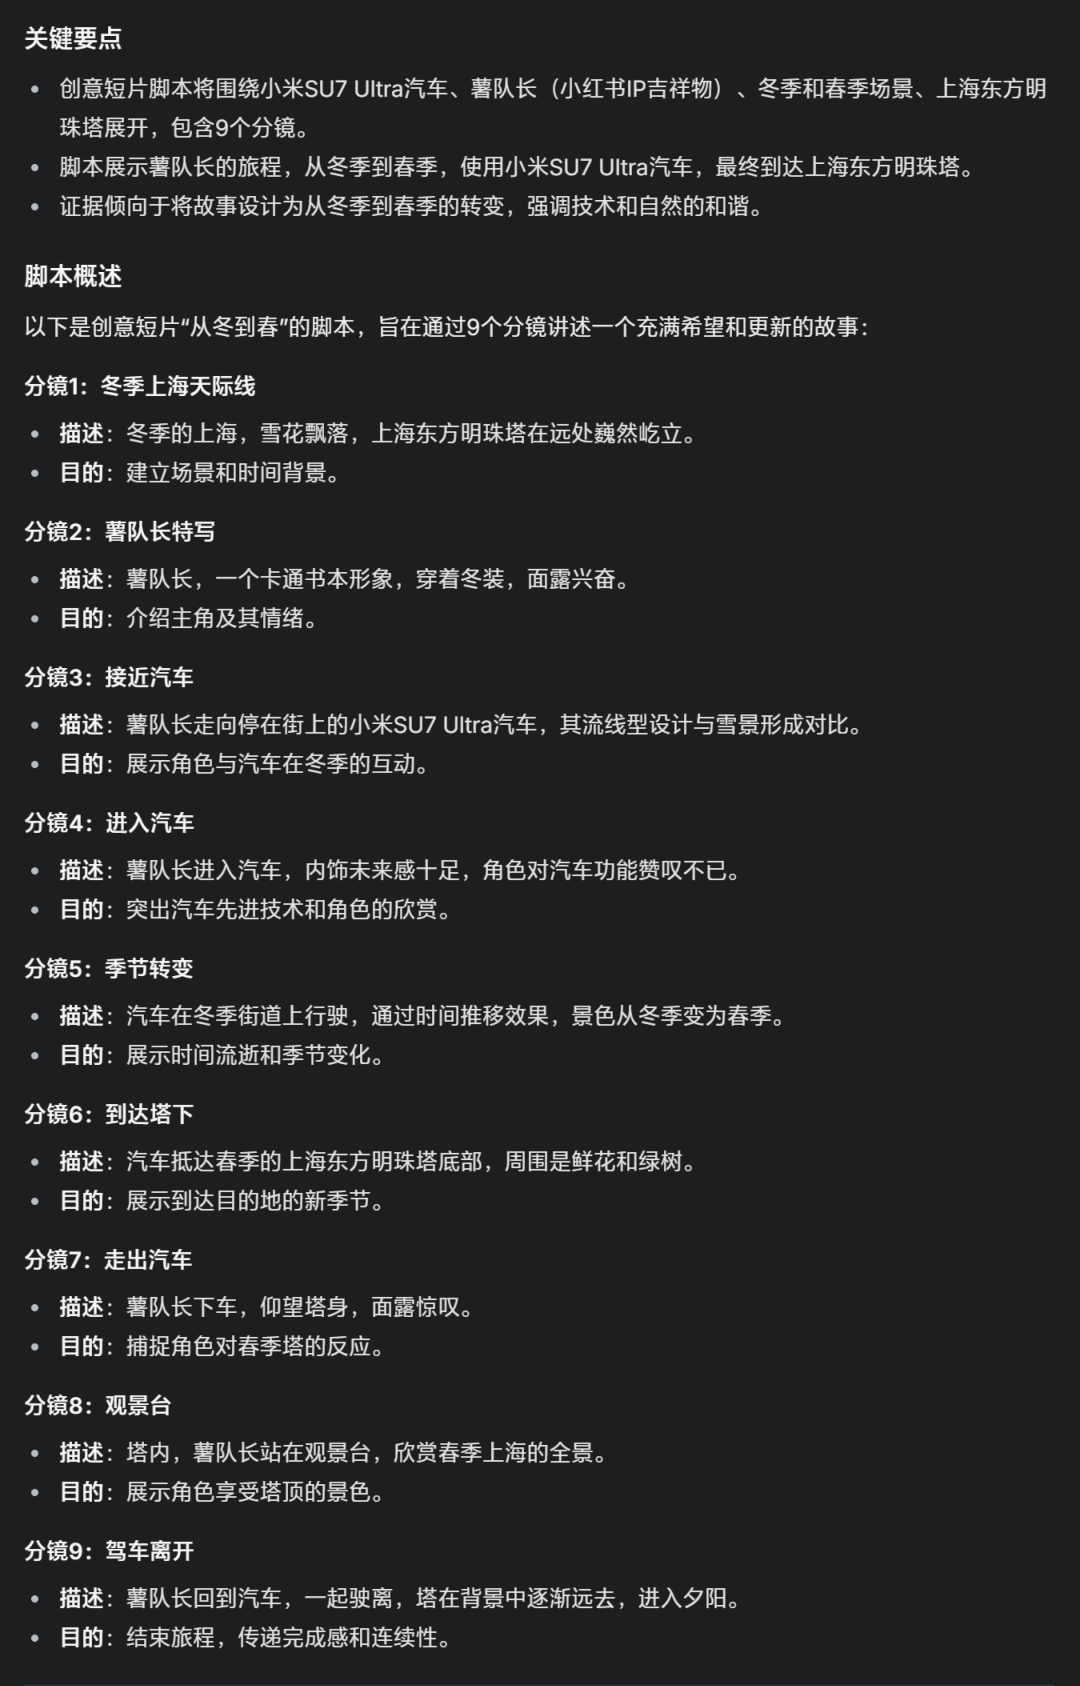
There's really nothing particularly spectacular about the split-screen content that Grok 3 outputs, and it outputs scripts that other big AI models can do as well.
But, it will give you a research and analysis program, which is outrageous. Just if you were a leader, would you clap your hands when your subordinate gave you this program?
Put it out there for all of you to see:
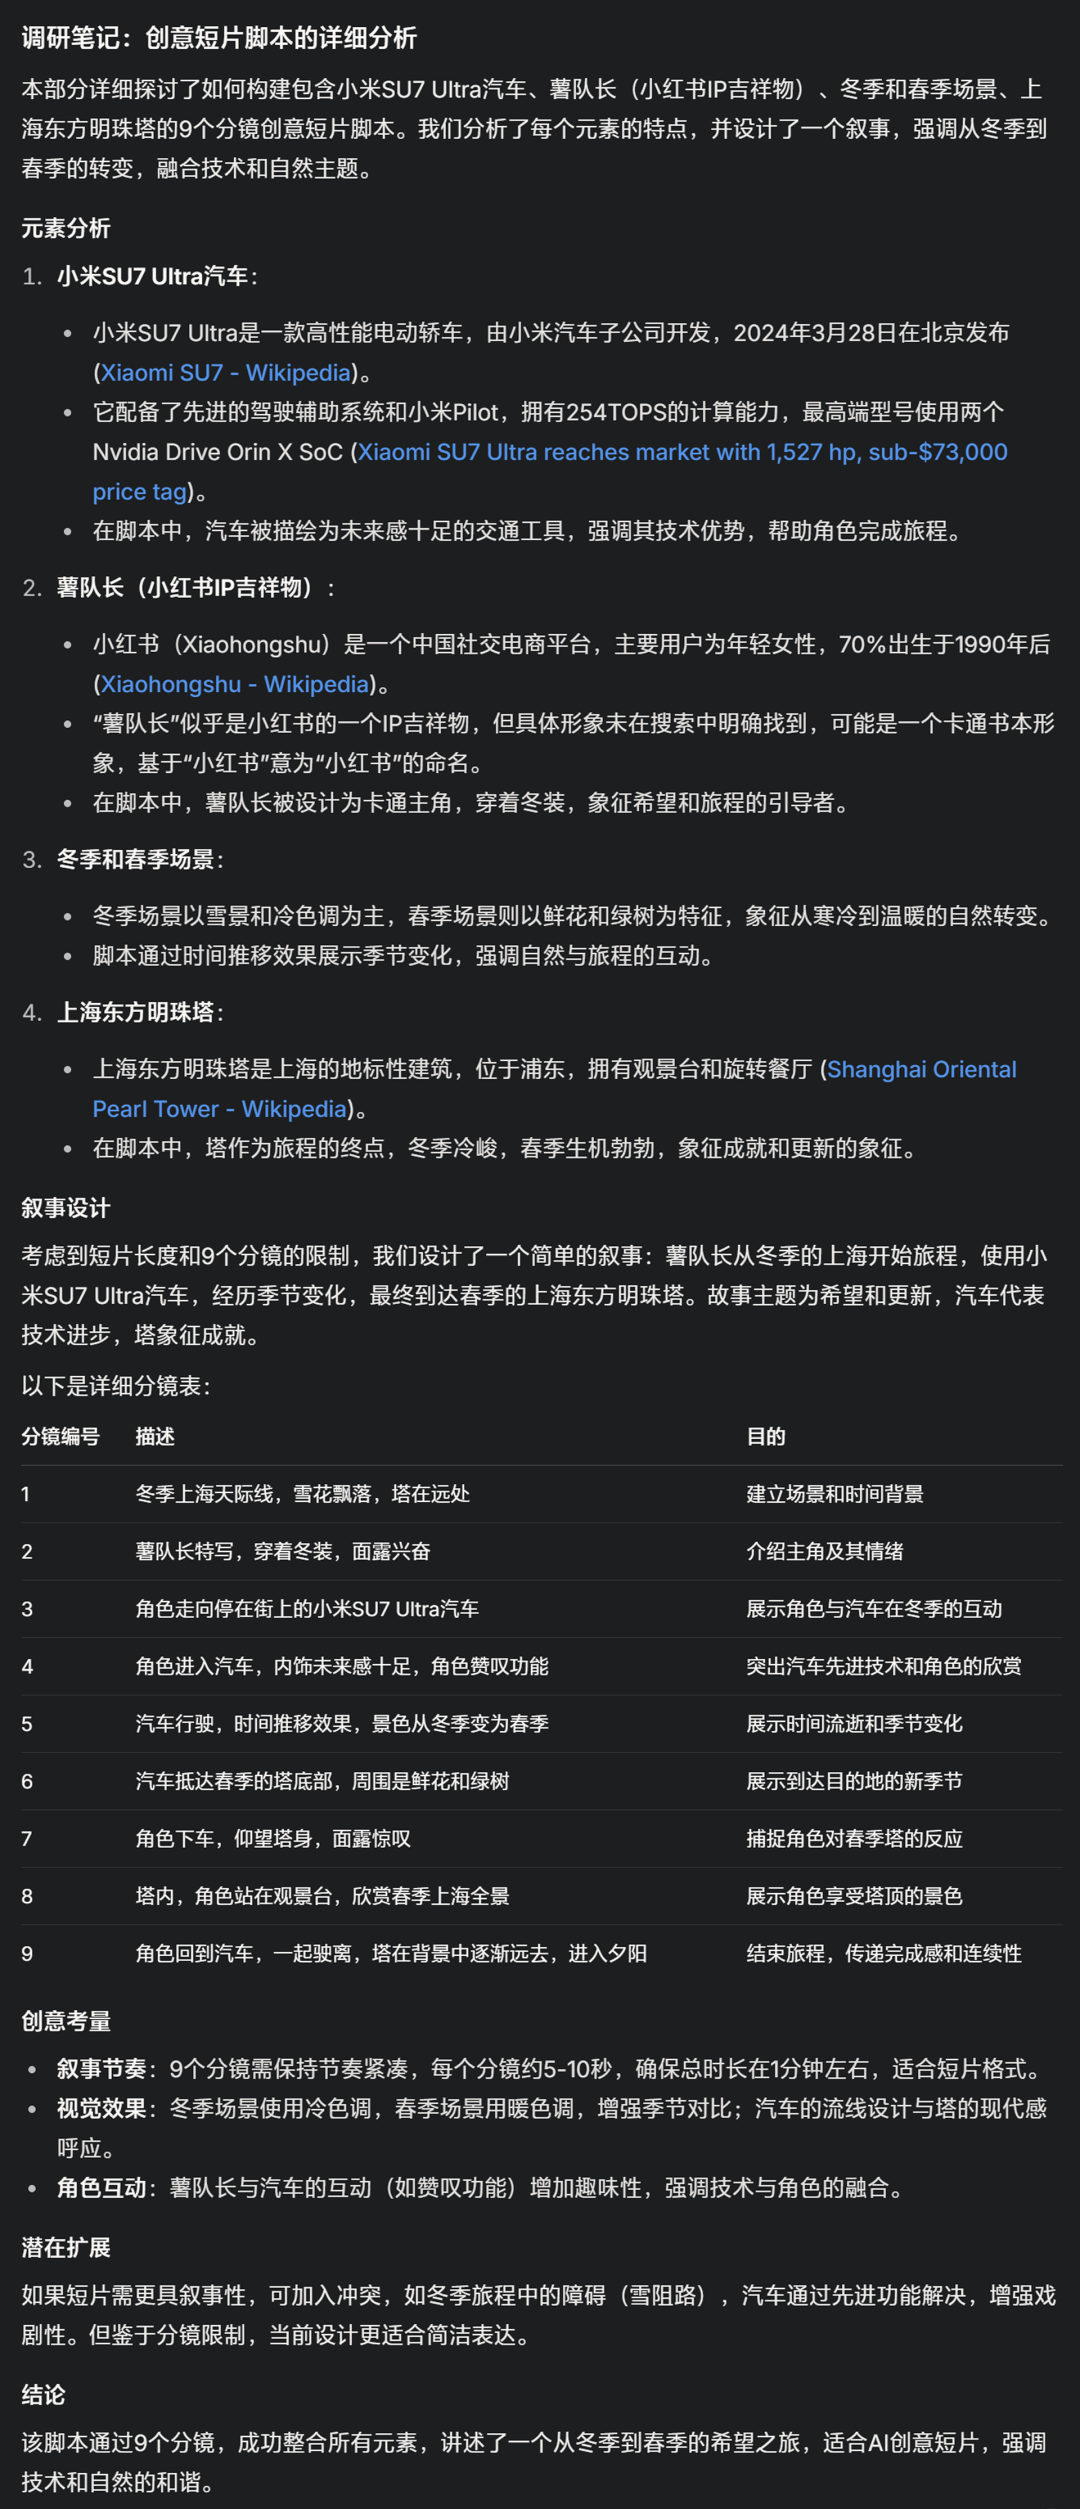
Stop here, this post is breaking down the process of creating this video, any further writing would be a review of the Grok 3 model, so you can go and experience it for yourselves.
Going back to the creative script, if you are not satisfied with the output from the AI, then have multiple rounds of dialog until you are satisfied.
It's the same "need + task" prompt that I mentioned earlier:
For example, "The Xiaomi SU7 Ultra has a yellow color, I want the first few scenes to be of the Xiaomi SU7 Ultra chugging through the snow in winter, and then in the fifth scene, it switches from the snowy mountains in winter to the city in spring. Please optimize this creative script according to my description."
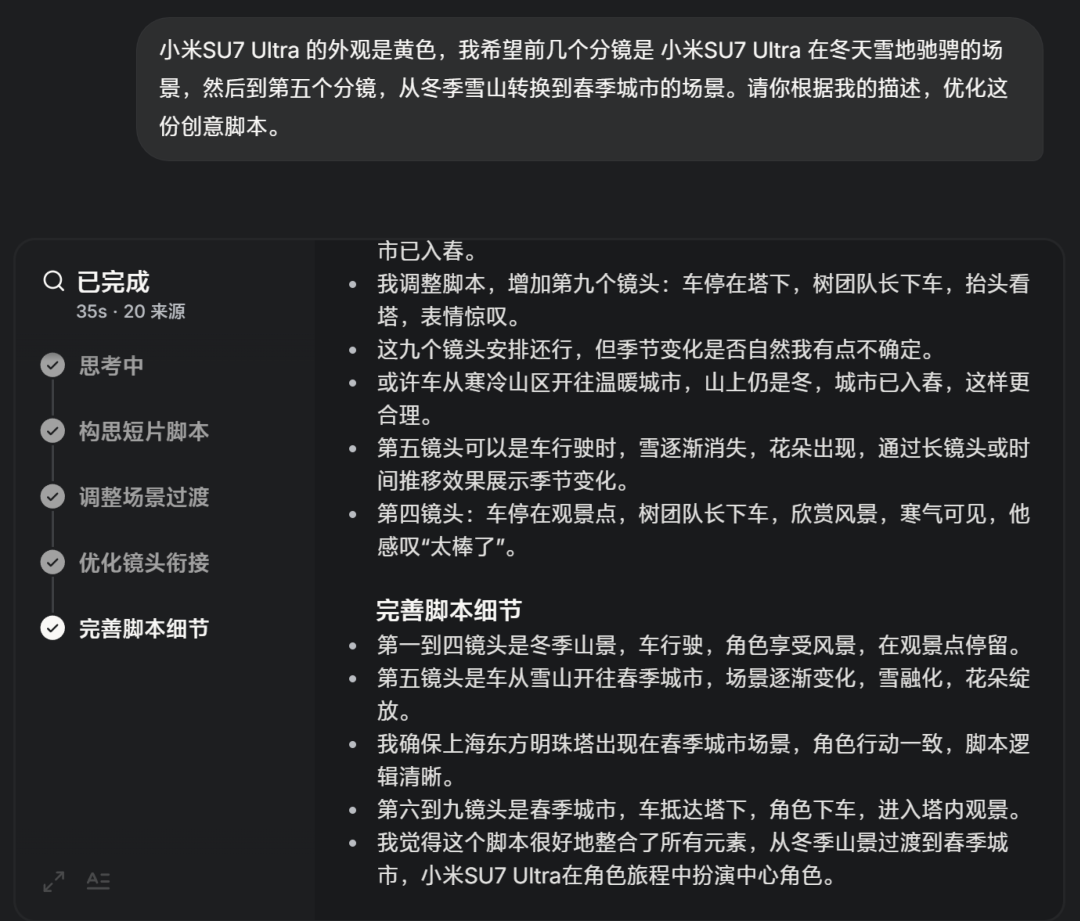
At this point, the process of generating creative scripts by AI is written, and the final script solution I have chosen will not be shown, it is rather long.
But the point to emphasize to you here is that the goodness of your script output is dependent on the capability of the big AI model, and with a good model, the output will be more accurate and richer.
Deepseek, ChatGPT, Claude, Grok are all good choices if you need my recommendation.
Step 2: AI Generates Image Cue Words
AI macromodel can generate creative scripts, naturally, it can also generate Prompt (cue words). Compared to dealing with the complex task of creative scripting, the task of AI inverting the Prompt based on the description of the subplot or the content of the picture is a bit simpler.
Recommend using Kimi to generate prompts for no other reason. It's smooth to use and quick to respond.
Address: https://kimi.moonshot.cn/
For example, using Grok's DeepSearch feature gives me a meal of output, but I really only need the English and Chinese cue words.
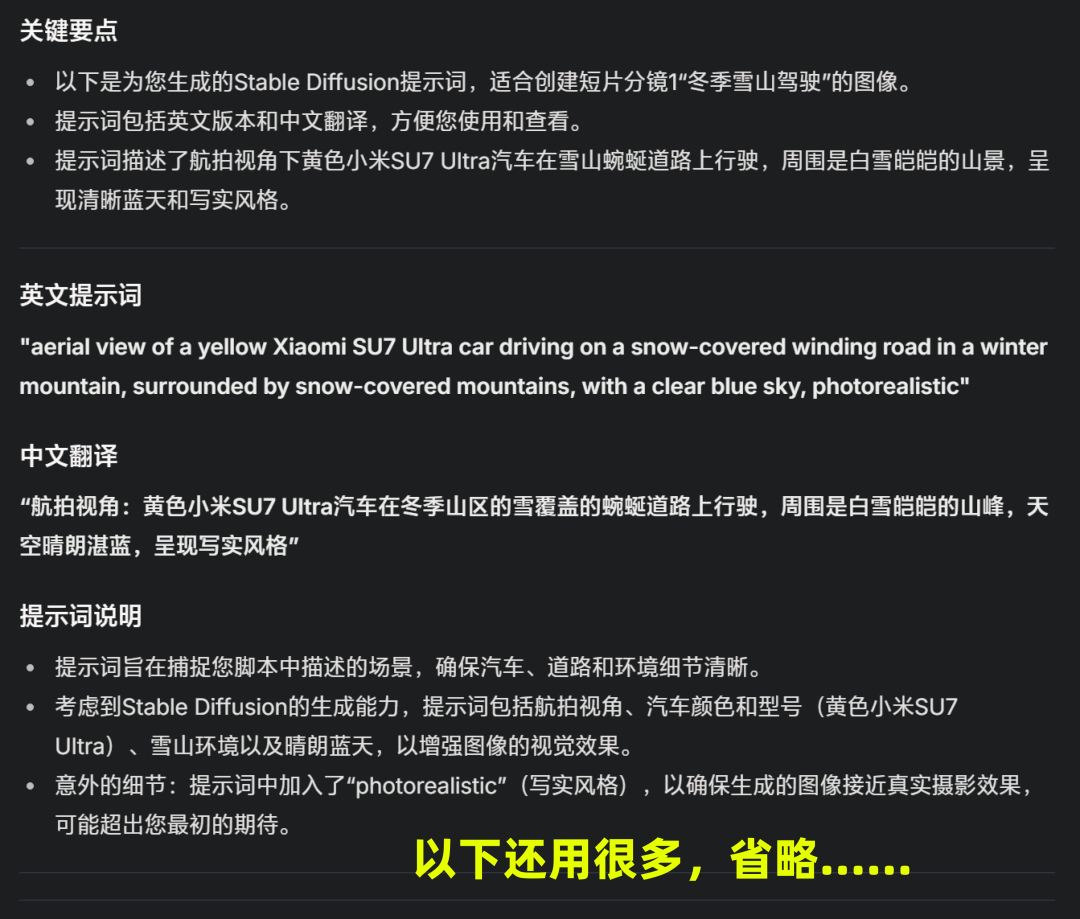
And with Kimi, it's simple and pure.
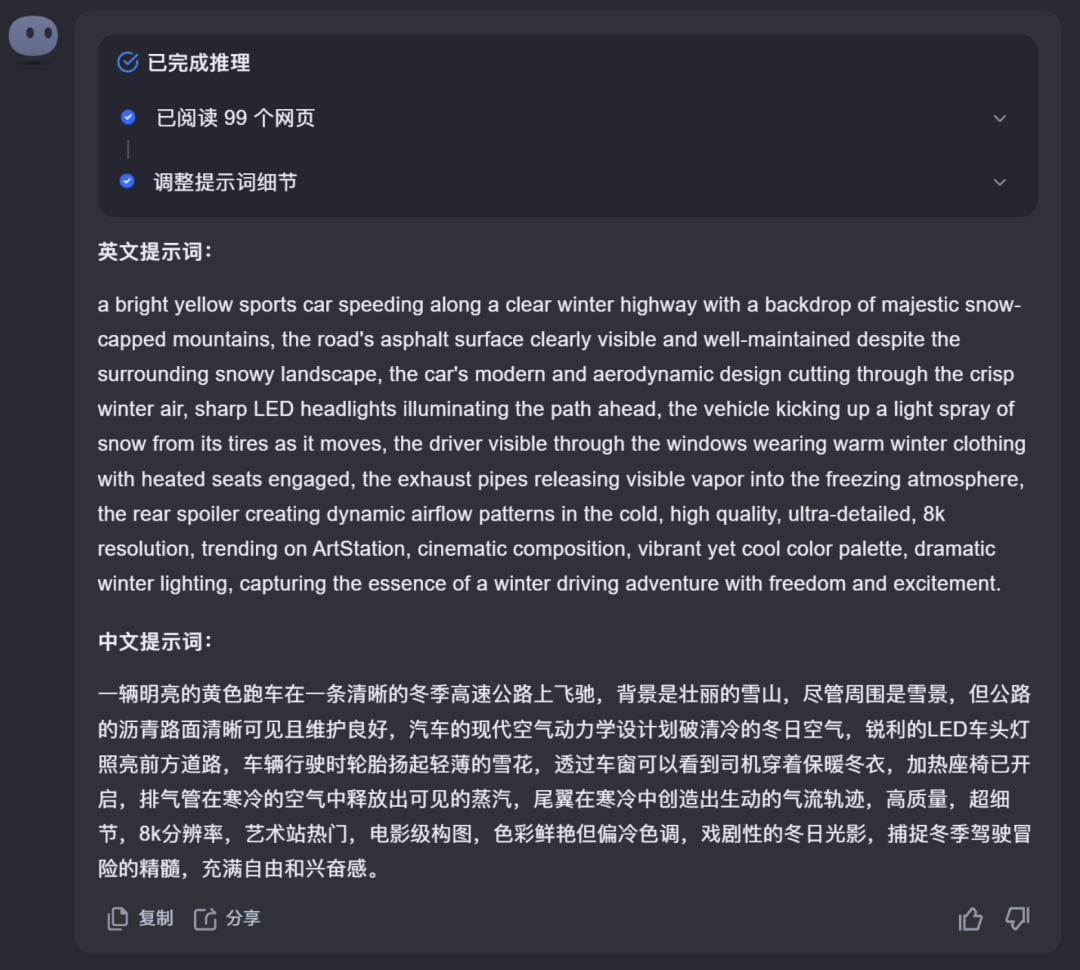
The procedure for generating image cues is similar to the first step, say what you need and what you need it to do for you.
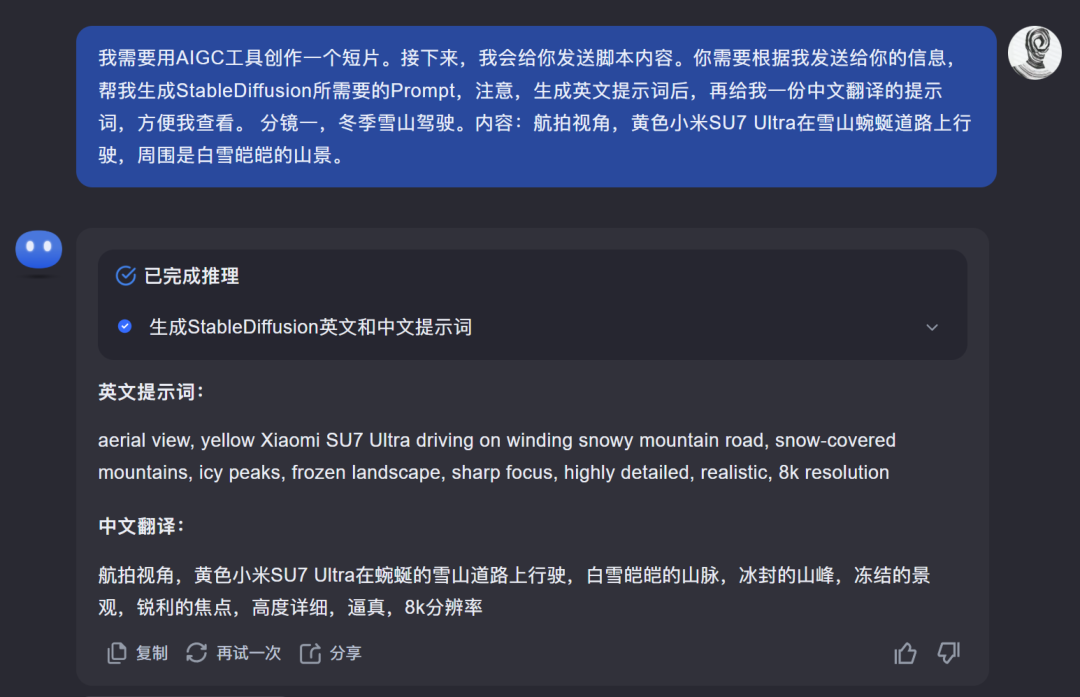
Step 1 We have generated the video script using AI, then send the script content to Kimi:
"I need to create a short movie using the AIGC tool. Next, I will send you the content of the script. You need to help me generate the Prompt needed for StableDiffusion based on the information I send you, and note that after generating the English cue, then give me a Chinese translation of the cue for my convenience. Subtitle I, winter driving in snowy mountains. Content: aerial view of a yellow Xiaomi SU7 Ultra driving on a winding road in the snowy mountains, surrounded by snow-capped mountain scenery."
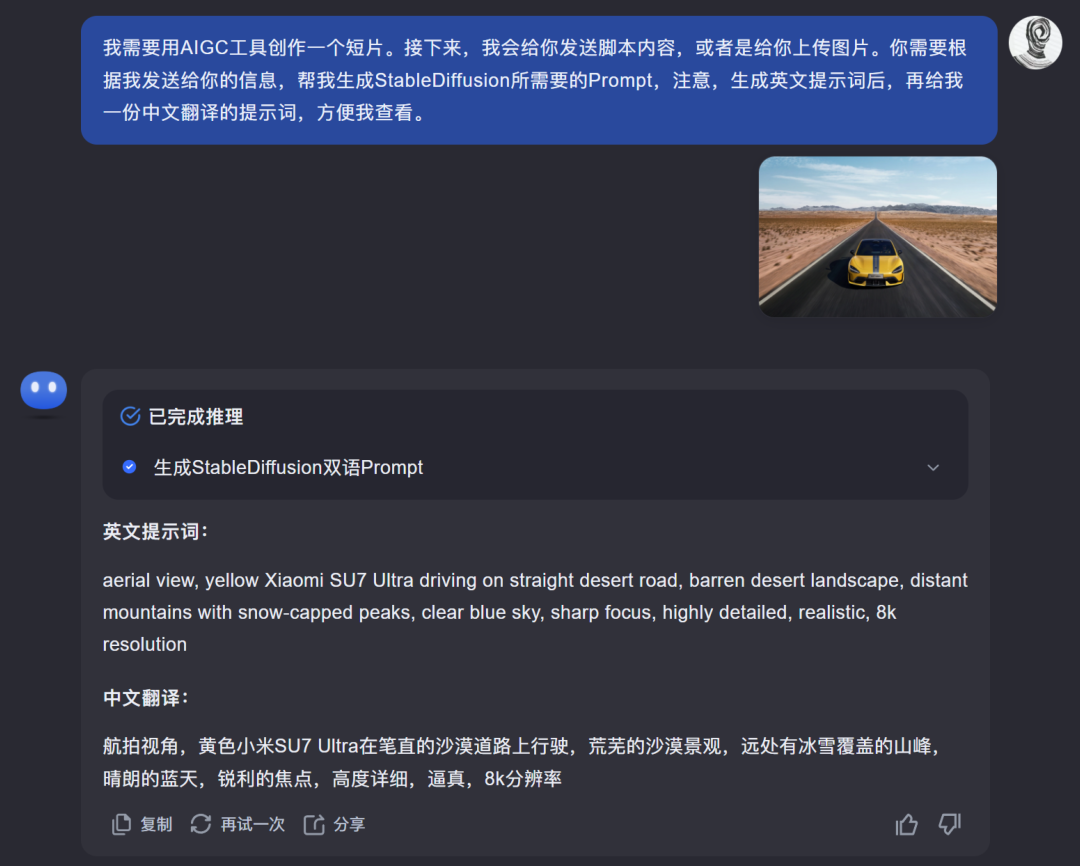
Alternatively, find an image similar to the split screen script to use as a reference and send it to Kimi:
"I need to create a short movie using the AIGC tool. Next, I will send you the script content, or upload images to you. You need to generate the Prompt for me that I need for StableDiffusion based on the information I send you, and note that after generating the English Prompt, then give me a Chinese translation of the Prompt, so that I can easily view it. "
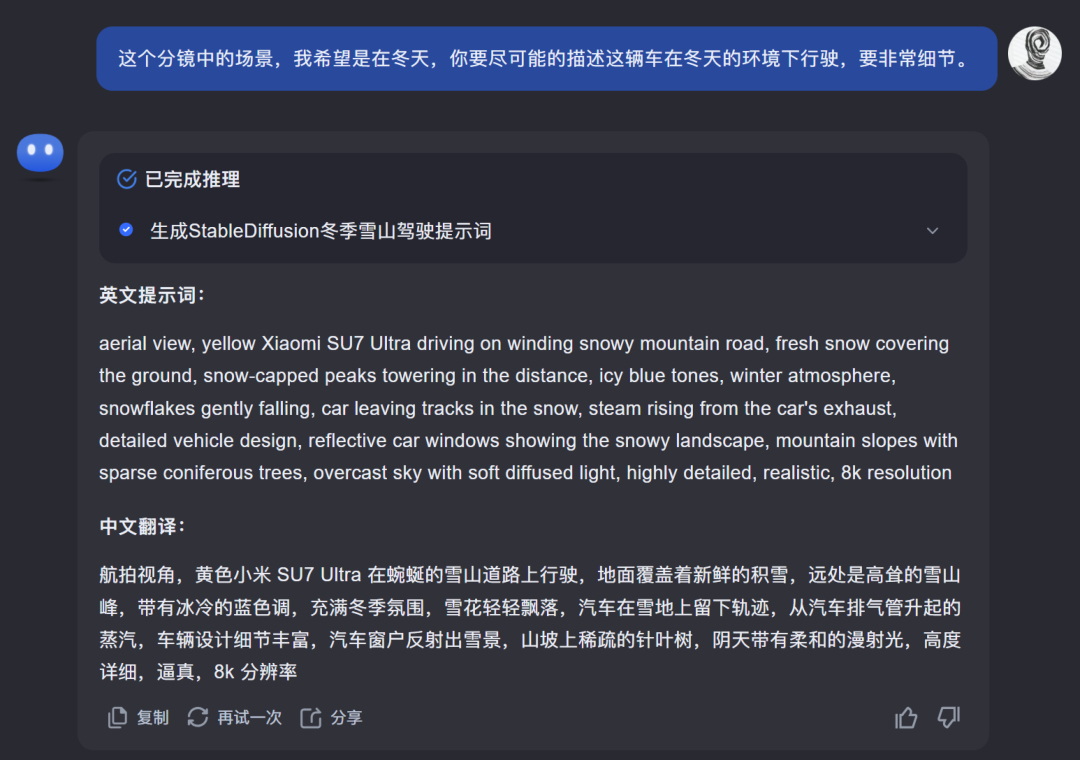
Usually one round of dialog is not enough to satisfy our needs, at this point you can continue to talk to it and let it modify the cue words according to your requirements.
For example, "The scene in this subplot, I want it to be in the winter, and you want to depict this car driving in winter conditions in as much detail as possible."
How do we verify the validity of this set of cues after the cues for Subtitle I have been generated?
The answer is that cue word generation is synchronized with image generation (the steps for image generation are covered in the next section).
Put the output cue words into StableDiffusion, set the relevant parameters of the raw map, and then start the raw map to test the effect.
"aerial view, yellow Xiaomi SU7 Ultra driving on winding snowy mountain road, fresh snow covering the ground, snow-capped peaks towering in the distance, icy blue tones, winter atmosphere, snowflakes gently falling, car leaving tracks in the snow, steam rising from the car's exhaust, detailed vehicle design, reflective car windows showing the snowy landscape, mountain slopes, and the snowy landscape. detailed vehicle design, reflective car windows showing the snowy landscape, mountain slopes with sparse coniferous trees, overcast sky with soft diffused light, highly detailed, realistic, 8k resolution"
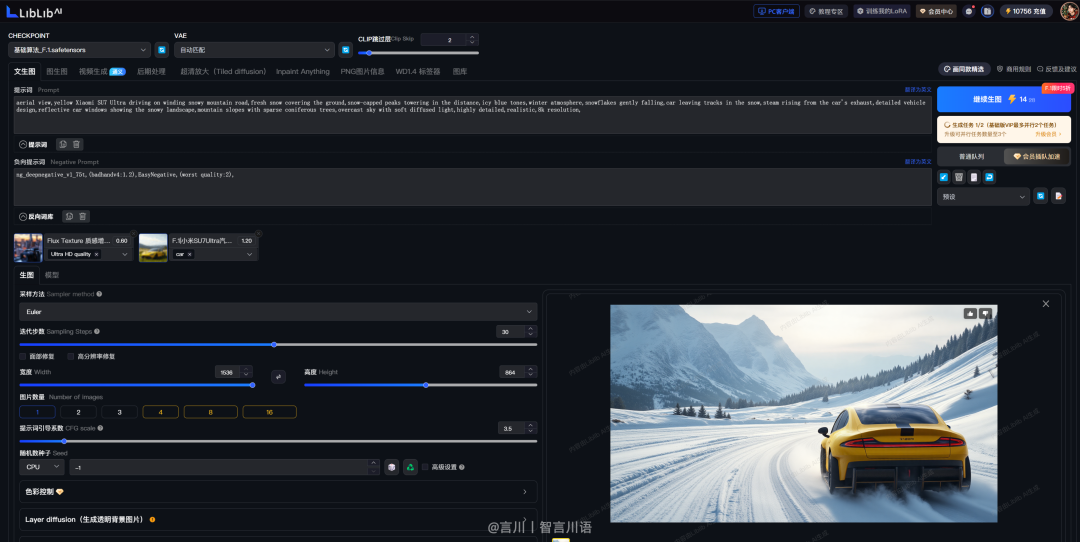
In the subplot one screen, the image effect I need is to be able to see the front of the car (the front end), but the cue word set generates the result of the back (the rear end).
The problem with analyzing this, is that the cue word does not appear to be a description of the front of the car, and then the AI generates a picture with randomness, such as occasionally the front of the car can be seen, and occasionally the rear of the car.
So, send the question to Kimi to help us optimize the cue word.
For example, "The cue word for subplot 1 needs to be changed because when I was using SD raw, I realized that the generated result, the car is back to the camera. And I need to need to see the front of the car in this subplot. Can you please re-optimize the cue word for subplot one based on my description."
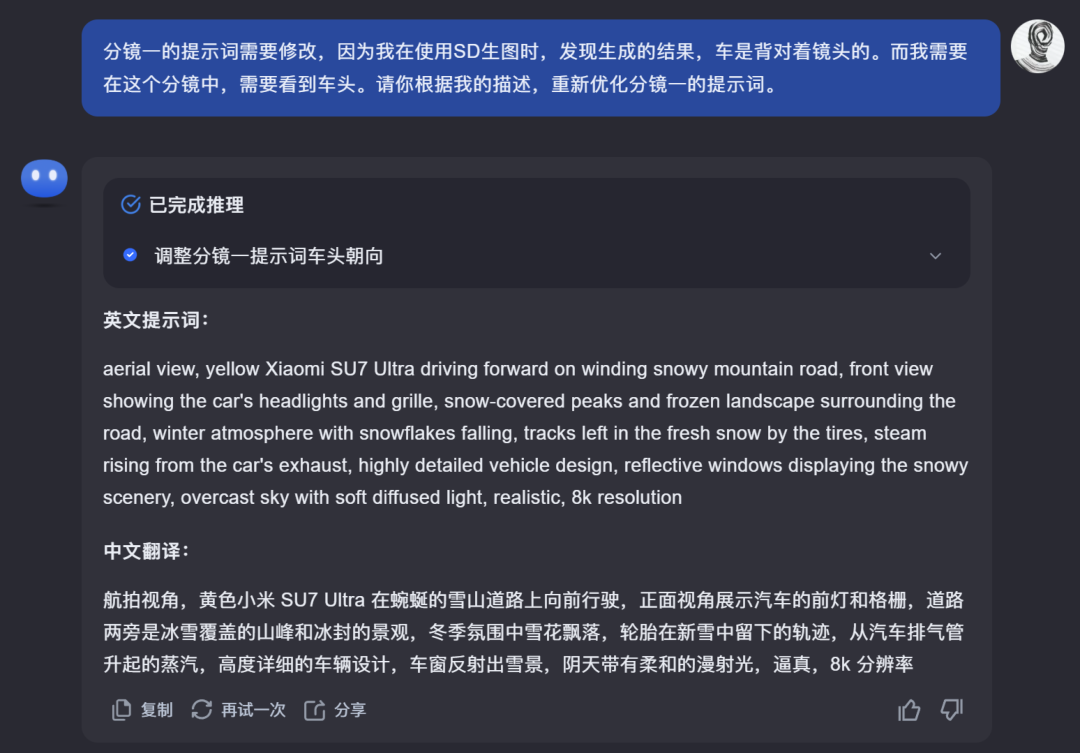
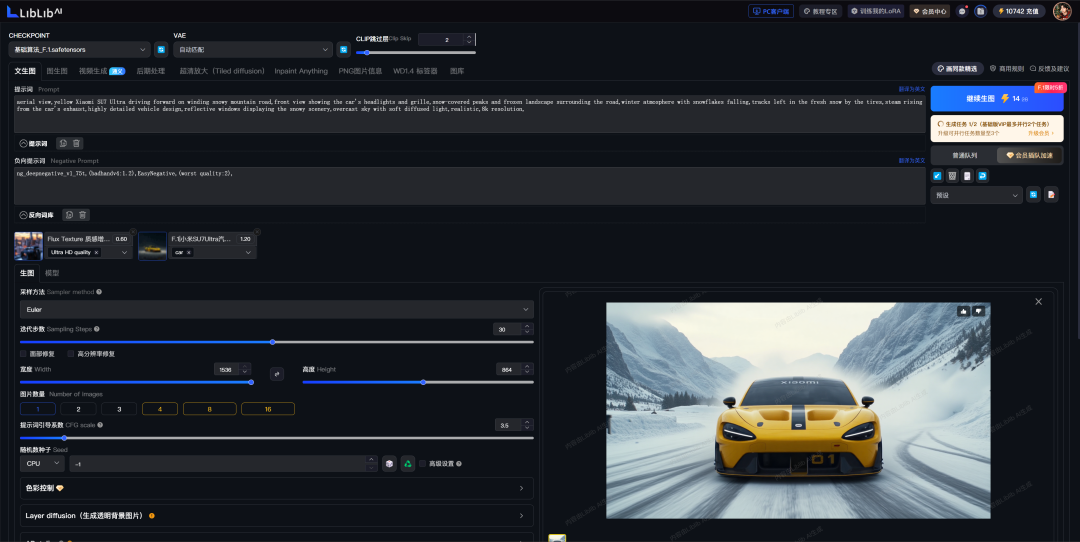
Look closely at the cue section above, Kimi has added the cue "Front view showing the headlights and grill of the car" to meet my needs.
Then, based on the modified cue word, the image is generated again, and it can be noticed that the front end has appeared and is very stable.
When subplot one cue word is done, go ahead and have Kimi write the cue word for the next subplot.
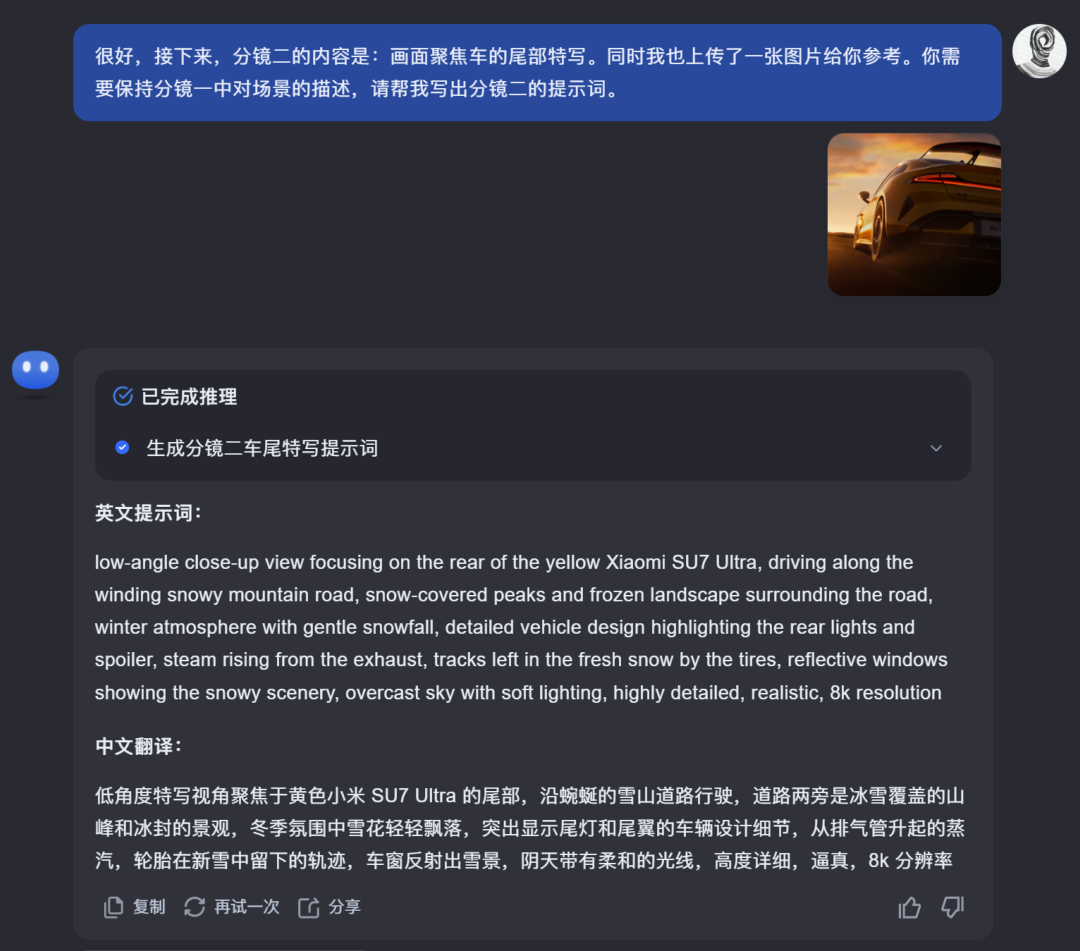
For example, "Very good, next, subplot two is: the image focuses on a close-up of the rear of the car. Also I've uploaded an image for your reference. You need to keep the description of the scene as it was in subplot one, so please help me write the cue words for subplot two."
The cue word effect was tested with SD generated images:
low-angle close-up view focusing on the rear of the yellow Xiaomi SU7 Ultra, driving along the winding snowy mountain road, snow-covered peaks and frozen landscape surrounding the road, winter atmosphere with gentle snowfall, detailed vehicle design highlighting the rear lights and spoiler, steam rising from the exhaust, tracks left in the fresh snow by the tires, reflective windows showing the snowy scenery, overcast sky with soft lighting, highly detailed, realistic, 8k resolution

The results are very good, the resulting rendering is basically the same as the content of the image I uploaded, and it also maintains consistency of style.
So, when you repeat the actions above, you can convert the split script all the way to image cue words. (This part was written in 1500 words, so give it a like before you read on, thanks!)
Step 3: AI generated microscope images
There are many AIGC tools for generating images, such as Midjourney, StableDiffusion, and Instant Dream AI.
But if you need to control the subject in the image, then there is only one choice, StableDiffusion.
1. Pre-conceptualization
Let's start by thinking about the subject of our short creative video.
Xiaomi SU7 Ultra and Xiaohongshu mascot (Captain Potato).
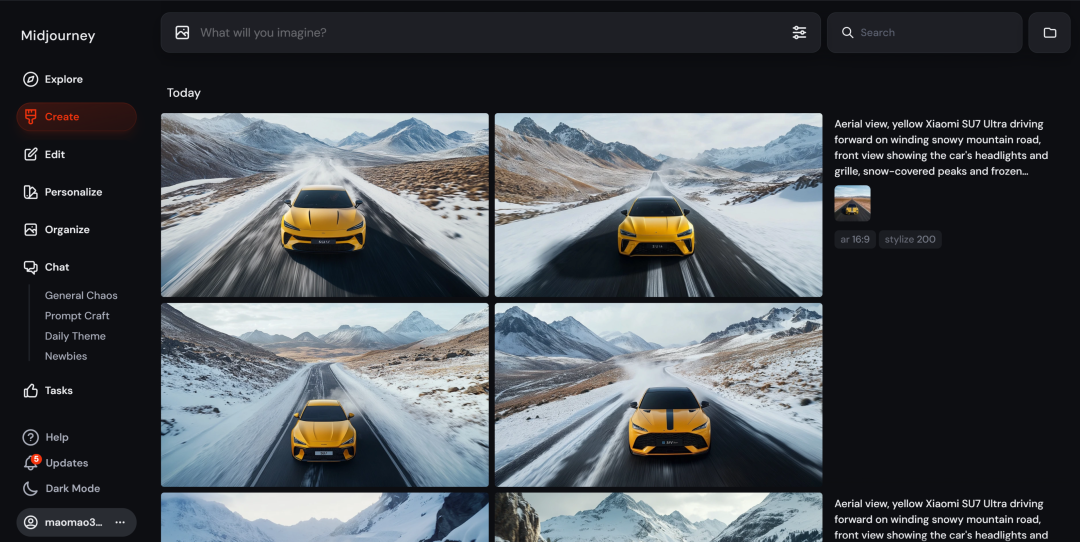
If you send the split cue word for Xiaomi SU7 Ultra to Midjourney, this is what it can generate for you.
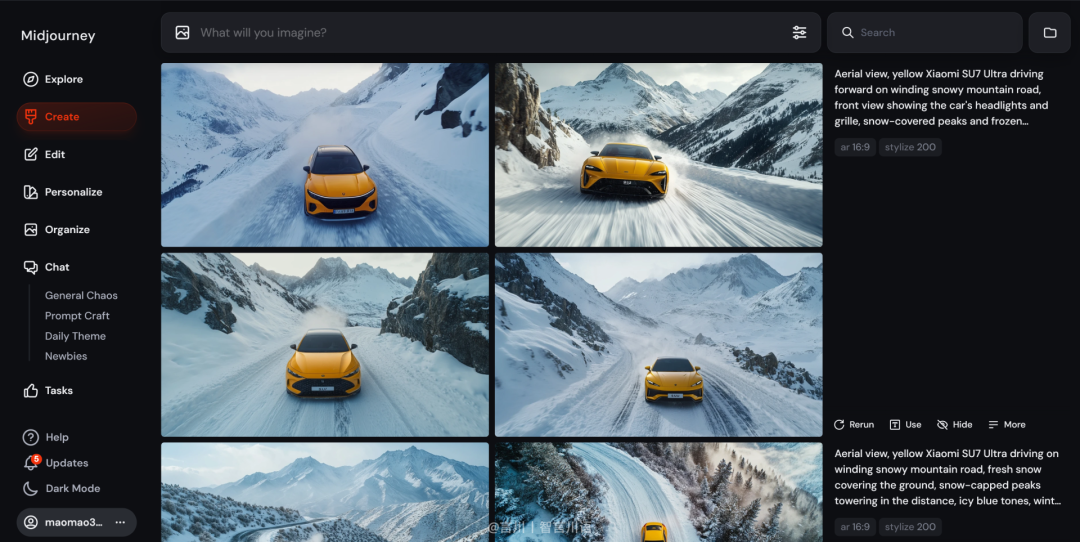
Like? Only the color is like, none of the exterior details are Xiaomi SU7 Ultra.
The reason is that there is no image data for Xiaomi SU7 Ultra in the Midjourney model data, so naturally it can't be generated for you.
Maybe you're thinking of padding the chart to make it happen, so look at how padding works.
It doesn't look like it either, as the matting is for the AI to learn to reference the information from your uploaded image, and the result generated can't be exactly the same as the real Xiaomi SU7 Ultra.
And can StableDiffusion's native models (e.g. Flux, SDXL, SD2.1, etc.) generate Xiaomi SU7 Ultra?
The answer is that it can't either, because StableDiffusion's native model is also missing image data from Xiaomi SU7 Ultra.
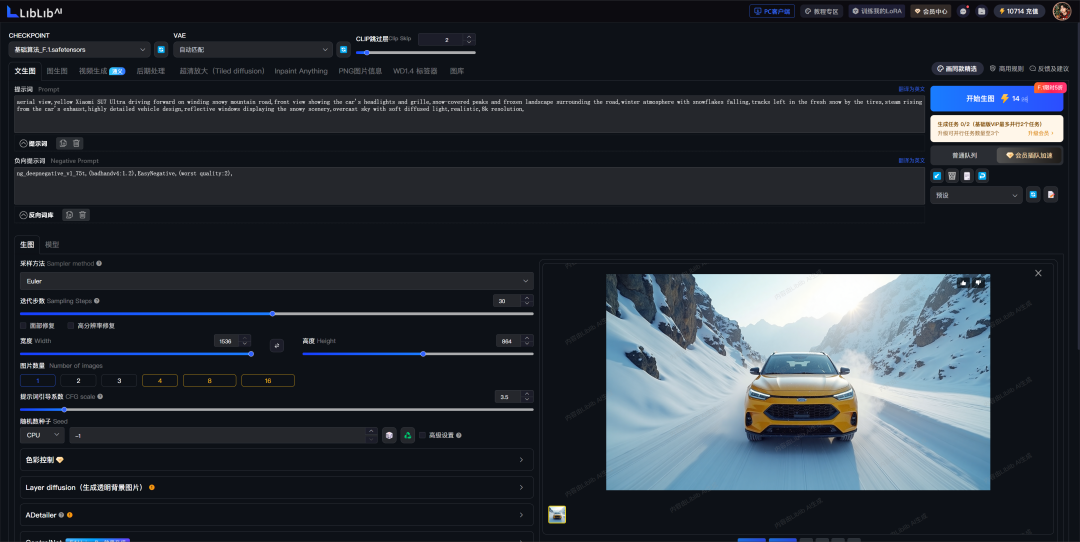
So, the results have been quite certain: "The model lacks the image data of Xiaomi SU7 Ultra, and being able to solve the image data of Xiaomi SU7 Ultra and put these data into the image model enables subject control."
One of the technologies that happens to be implemented in the StableDiffusion open source ecosystem is the Lora model.
Introduced in a paragraph:
LoRA (Low-Rank Adaptation) model is a lightweight deep learning fine-tuning technique, which can realize task-specific or style-specific adaptation with only a small number of parameters by low-rank matrix decomposition of large models (e.g., Stable Diffusion), which significantly reduces computational resource requirements. It is widely used in AI painting as a "patch" for large models to enhance specific character features, artistic styles, or details, and the generated files are usually only a few tens to hundreds of MB. Compared with full retraining, LoRA strikes a balance between model size and effect, avoiding the high storage cost of large models and providing a better performance than Textual Inversion. (Textual Inversion (TI) provides richer information than full retraining. Users can quickly implement customized image generation by simply combining the LoRA model with a larger model.
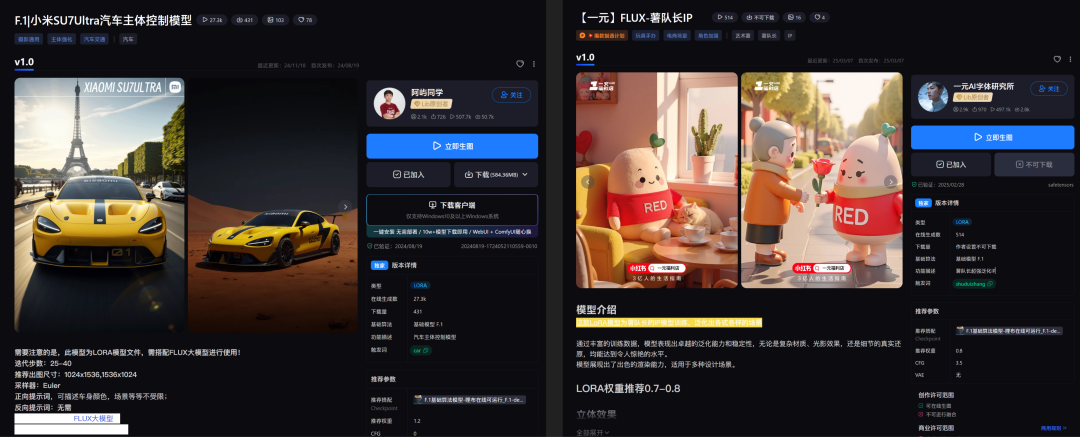
On Mile High Cloth AI, a model author trained the Lora model based on image data from Xiaomi SU7 Ultra.
Model address: https://www.liblib.art/modelinfo/2cc6ac1a404d43b1ad3798ef0186acec?from=sd&versionUuid=beda18bd08974a3faf6e3e4a6abf1d8b

Similarly, the Little Red Book mascot (Captain Potato) has a Lora model.
Model address: https://www.liblib.art/modelinfo/af0ed4695ca24a5f89f5818d3c6dad48?from=sd&versionUuid=18d2229333ca44ad9a86c3344b40024a

Xiaomi SU7 Ultra and Captain Potato are able to realize "interdimensional" linkage when multiple Lora models are working on a single map at the same time.
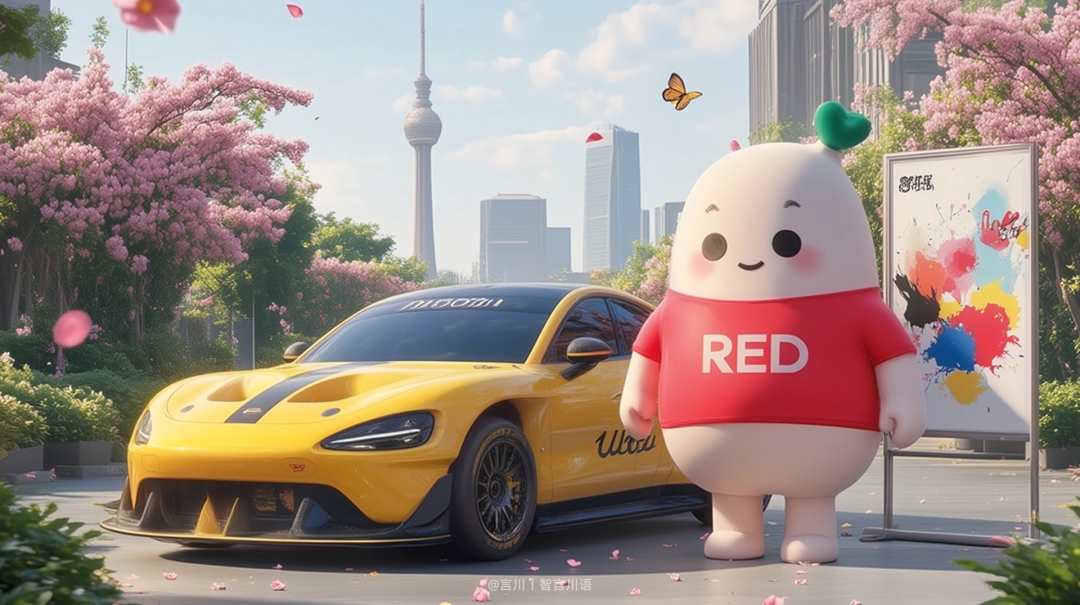
Once the above is understood, the next step in generating diagrams will be very simple, three words "text generates diagrams".
2、Model Setting
In this video, I call up a total of 5 different Lora models.
First up is the main Lora: Xiaomi SU7 Ultra and Captain Potato.
Next is the Scene Lora: Winter Scene and Spring Scene.
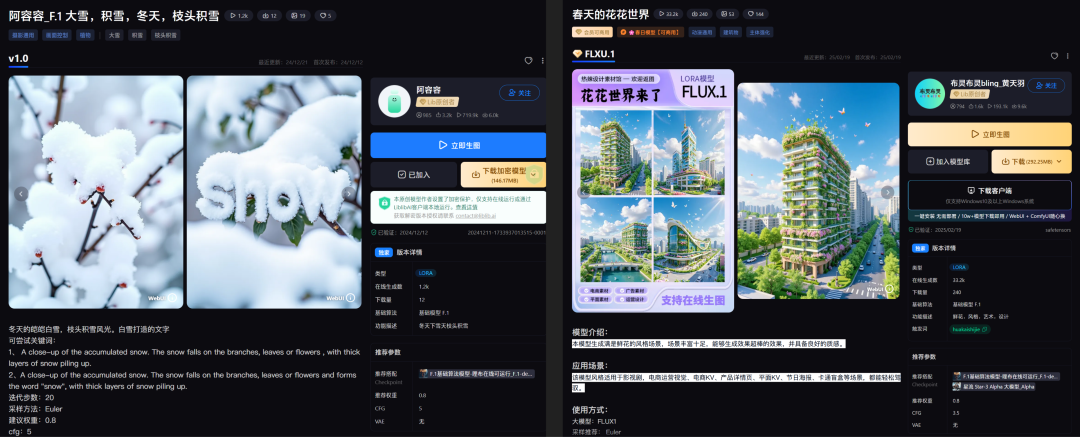
Finally, there is the adjustment of Lora: image texture, detail enhancement.
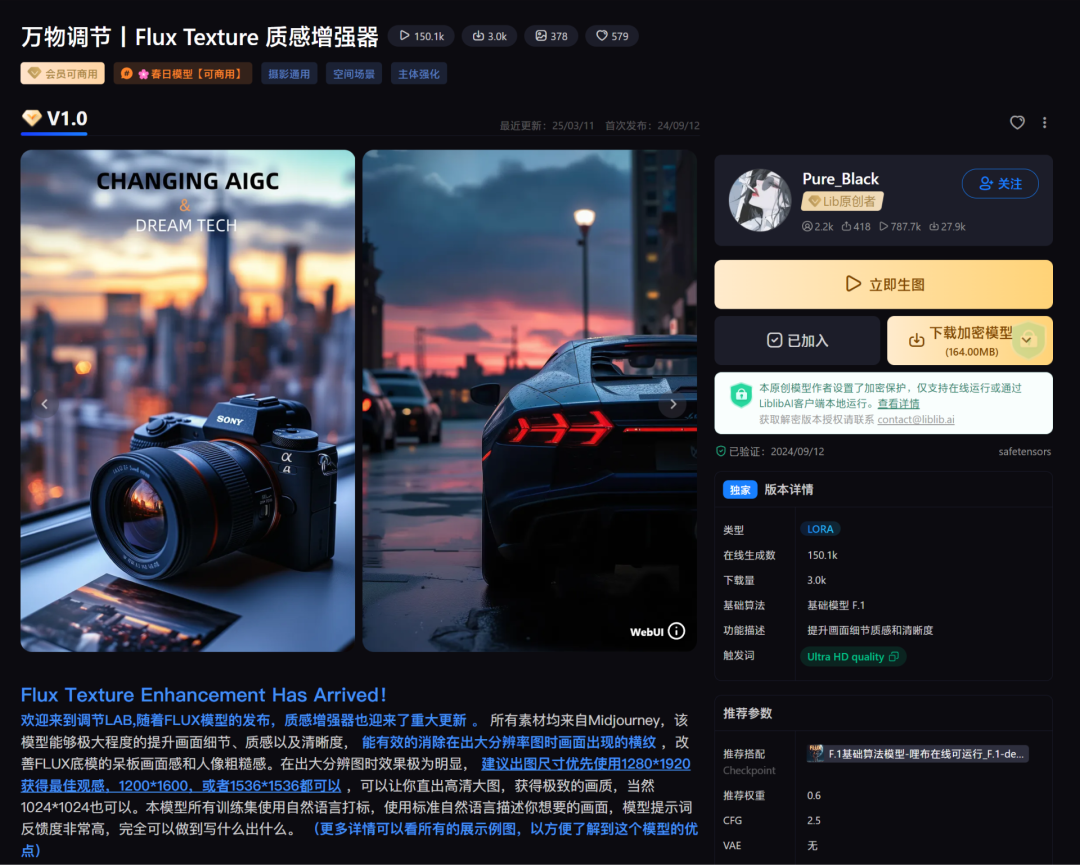
All these Lora models above, are trained based on Flux models. So, in StableDiffusion, the big models need to choose Flux series models, and F.1-dev-fp8 models are recommended.

3. Practical sessions
The process of generating a map is basically fixed, except that you need to switch the appropriate Lora model to control the map in different subscales, with the following parameter settings:
-- Large model: F.1-dev-fp8
-- LoRA model: Ah Yung Yung_F.1 Big Snow, SU7 Ultra Car Body Control, Flux Texture Texture Enhancer (weights refer to author's recommended values)
-- Basic parameters: sampling method (Euler), number of iteration steps (30)
-- Size setting: 1536*864
💡 Tip: Don't turn on HD Repair when testing cue word raw images. When the cue word is stabilized, batch generate images, then pick an image you're happy with and fix the Seed value for HD Fix.
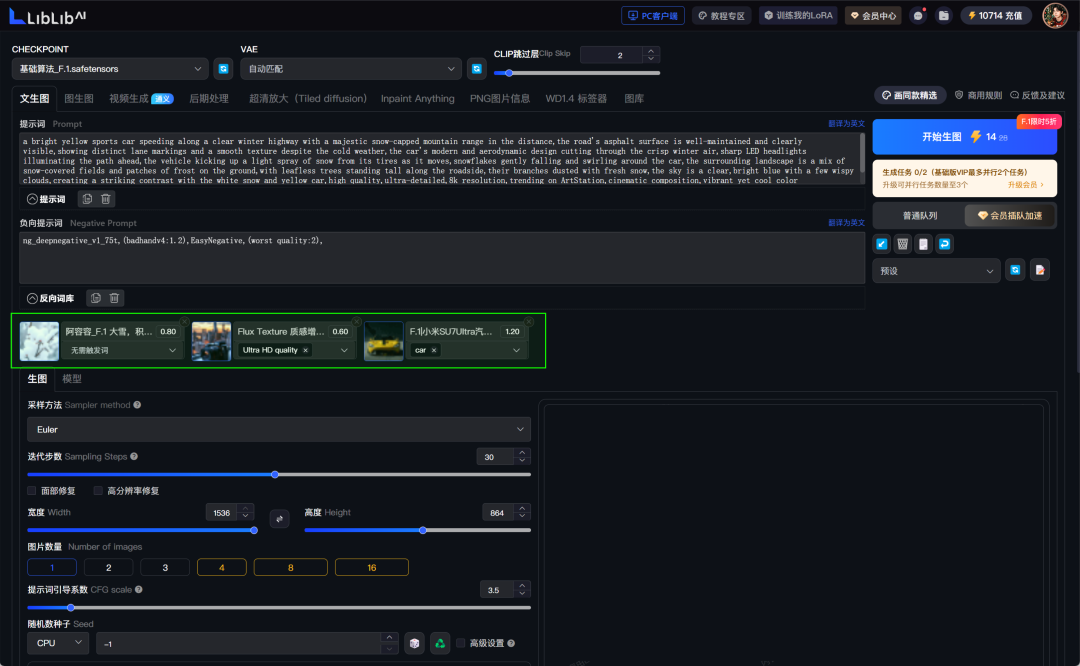
Case prompt: a bright yellow sports car speeding along a clear winter highway with a majestic snow-capped mountain range in the distance, the road's asphalt surface is well-maintained and clearly visible, showing distinct lane markings and a smooth texture despite the cold weather, the car's modern and aerodynamic design cutting through the crisp winter air, LED headlamps, and a large number of other features. aerodynamic design cutting through the crisp winter air, sharp LED headlights illuminating the path ahead, the vehicle kicking up a light spray of snow from its tires as it moves, snowflakes gently falling and swirling around the car, the surrounding landscape is a mix of snow-covered fields and patches of frost on the ground, with leafless snow and snowy soil. frost on the ground, with leafless trees standing tall along the roadside, their branches dusted with fresh snow, the sky is a clear, bright blue with a few wispy clouds, creating a striking atmosphere. wispy clouds, creating a striking contrast with the white snow and yellow car, high quality, ultra-detailed, 8k resolution, trending on ArtStation, cinematic composition, vibrant yet cool, and a beautifully crafted, beautifully crafted, and beautifully crafted, cinematic composition. cinematic composition, vibrant yet cool color palette, dramatic winter lighting, capturing the essence of a winter driving adventure with freedom and excitement.

to show a subplot of a spring scene.
-- LoRA Model: Fingerling AI_Flowering World, SU7 Ultra Car Body Control, Flux Texture Texture Enhancer
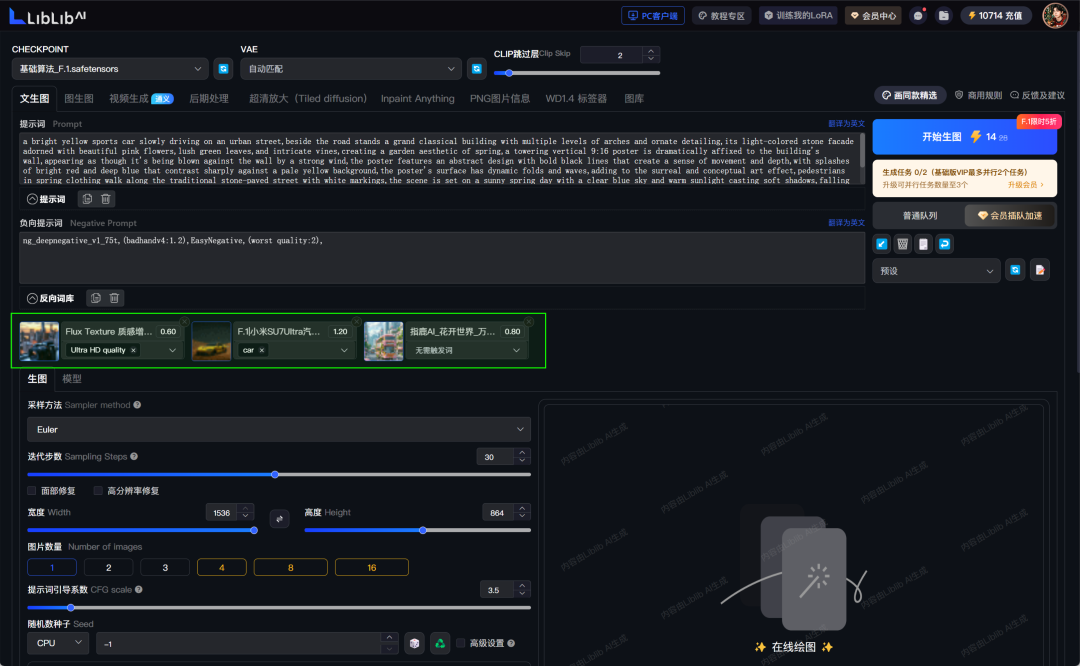
案例提示词:a bright yellow sports car slowly driving on an urban street,beside the road stands a grand classical building with multiple levels of arches and ornate detailing,its light-colored stone facade adorned with beautiful pink flowers,lush green leaves,and intricate vines,creating a garden. ornate detailing,its light-colored stone facade adorned with beautiful pink flowers,lush green leaves,and intricate vines,creating a garden aesthetic of spring,a towering vertical 9:16 poster is dramatically affixed to the building's wall,appearing as though it's being blown against the wall by a strong wind,the poster is a beautifully crafted and elegantly designed building with multiple levels of arches and ornate detailing. wall by a strong wind,the poster features an abstract design with bold black lines that create a sense of movement and depth,with splashes of bright red and deep blue that contrast sharply against a deep blue that contrast sharply against a pale yellow background,the poster's surface has dynamic folds and waves,adding to the surreal and conceptual art effect,pedestrians in spring art and the art of the "poster". The poster's surface has dynamic folds and waves,adding to the surreal and conceptual art effect,pedestrians in spring clothing walk along the traditional stone-paved street with white markings,the scene is set on a sunny spring day with a clear blue sky and warm sunlight casting soft shadows,falling petals and fluttering butterflies add to the romantic spring atmosphere,surrealism, rich detail,warm sunlight,8 rich detail,warm sunlight,8K resolution,realistic natural and architectural scenes,advanced aesthetic,super realistic,high quality,super clear.
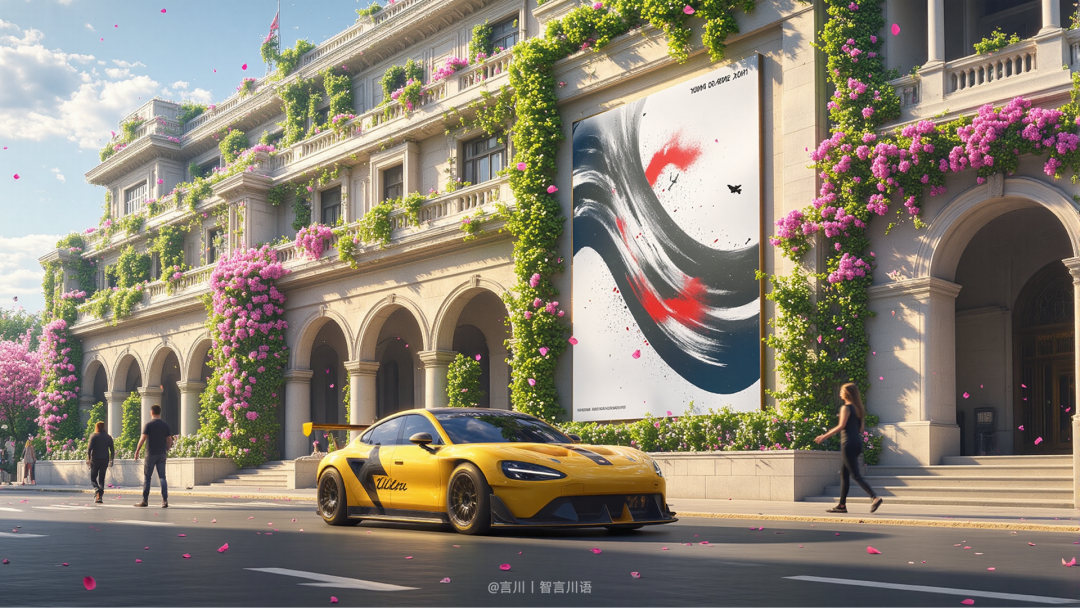
Other split image operation steps are the same, and will not be repeated here.
However, note that the cue generation and image generation is best synchronized, the abstract point of understanding is that "the left hand to generate the cue, the right hand to generate images."
It is emphasized here that these Lora models are only for study and reference, so you should not just take them for commercial use.
Step 4: AI Image Restoration
AI straight out of the box images, in the vast majority of cases, require post-processing fixes before they can be used (especially when it comes to commercial scenarios).
And for the retouching tool of choice, I recommend using a combination of both Photoshop and Midjourney.
Retouching Method 1: Simple Scene
The split-screen description reads "Xiaomi SU7 Ultra traveling on a city road with a huge poster on the wall of a city building."
AI can only generate nice scenes for you, but the content of the poster can't be accurately generated.
ComfyUI might work, but the workflow would be more complicated. At this point, using Photoshop is the best option.

I'm not going to tell you about how to retouch images in Photoshop, but you can refer to the layers I retouched in PS.

Retouching Method 2: Complex Scenes
Take 30 seconds and think about how this diagram could be implemented.
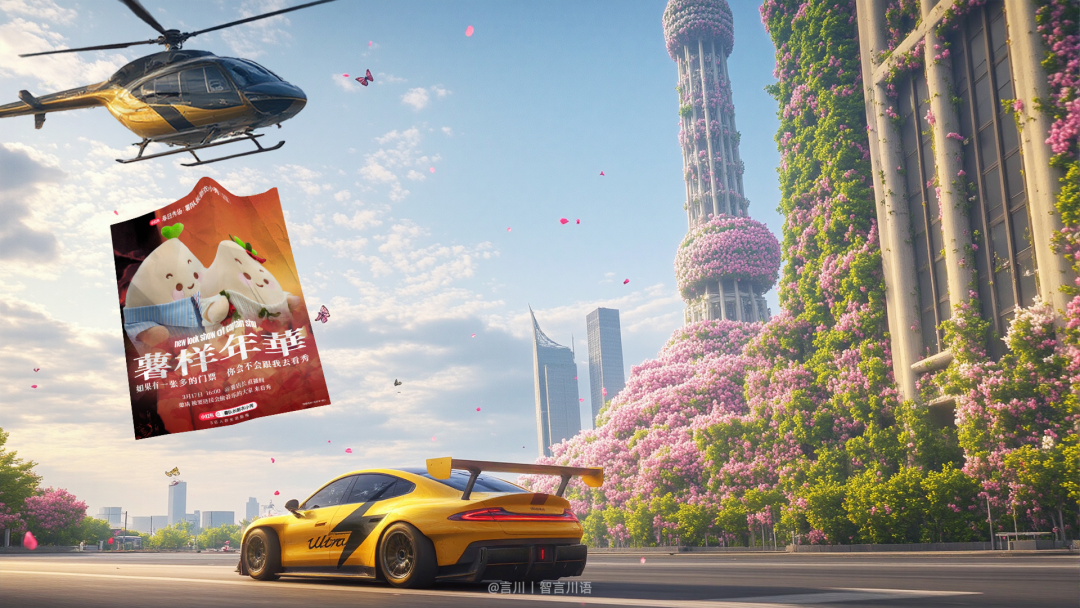
To break down my steps.
At first, I was trying to use StableDiffusion to generate it directly and then throw the screen description to Kimi to write the cue word, but no matter how I tweaked the cue word, the raw image never came out as good as I expected, as shown in the picture:
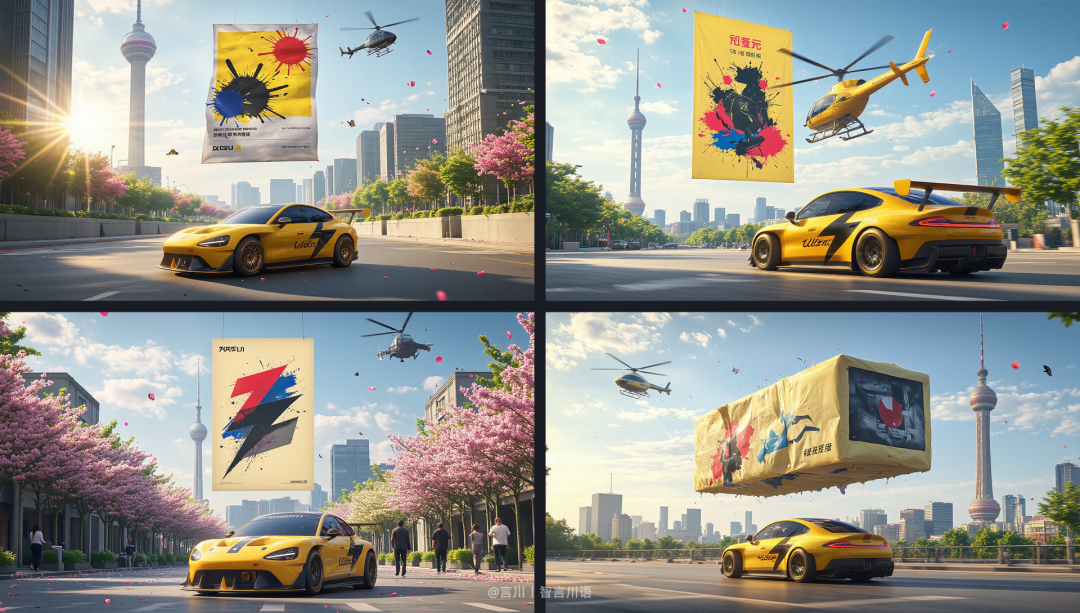
The question that came up was "A huge poster hangs under the airplane and appears in a scene with a Xiaomi SU7 Ultra in the background near the Oriental Pearl Tower in Shanghai ......" . There are too many elements of the desired image, resulting in the AI being unable to grasp the focus, and the above misalignment occurs.
So, I created a separate image of "a huge poster hanging under the airplane".
Although 4 images were generated, only the first one worked better for my needs, but it was enough.
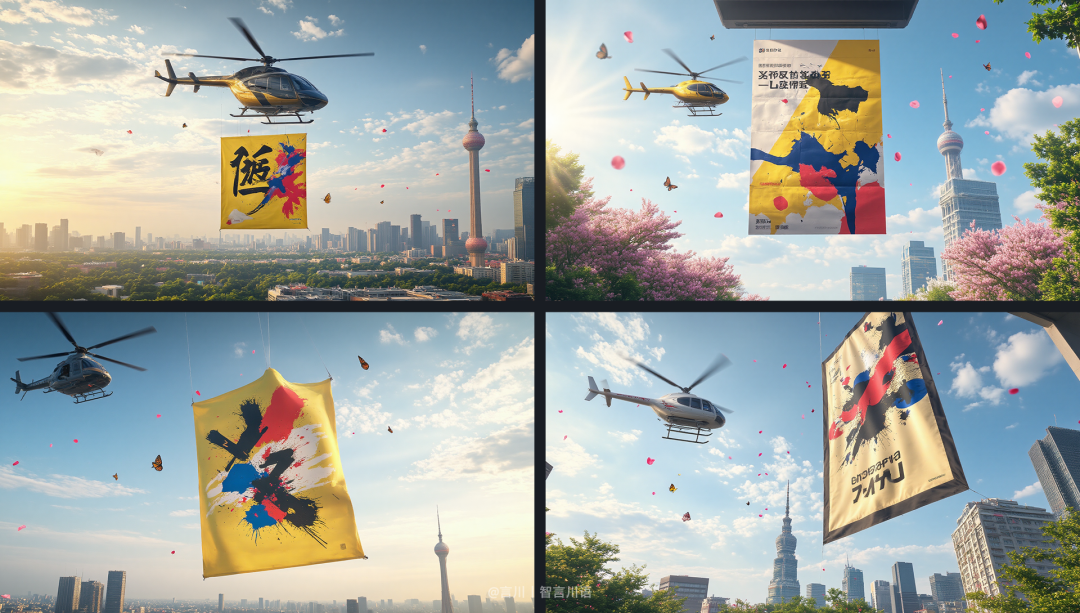
Then using Photoshop, keying, collage, poster compositing, and you're done.

Here's the Mi SU7 Ultra and Oriental Pearl Tower scene, select an image with the right angle and clear out the misplaced elements.
Note: If you are a genuine Photoshop, Genuine Fill will be very convenient for you to retouch your images.
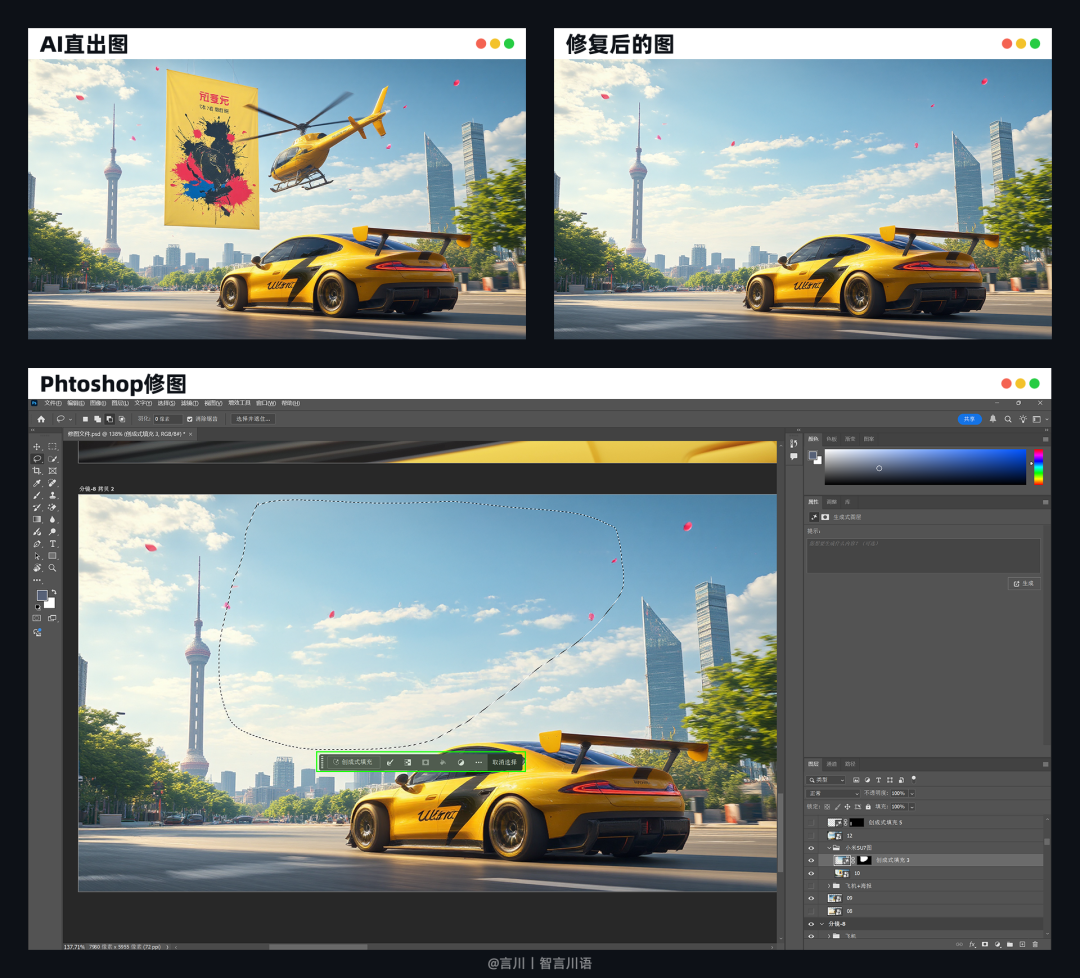
Up to this point, it's not bad to put the airplane and the scene in one picture to see how it works.

But it's not over yet, there are still problems with the composition of the image, such as "the airplane should be positioned higher in the sky and the whole scene needs to be wider."
So, here's what we're going to do, expand the map.
There are many ways to expand the map, but in this case, I'll just say Midjourney.
The operation is very simple, in Midjourney's "image editor" function, upload the picture, using SatbleDiffusion to generate a map of the set of prompts, adjust the position of the picture you need to expand.

The final result of the expanded map, shown in Fig:
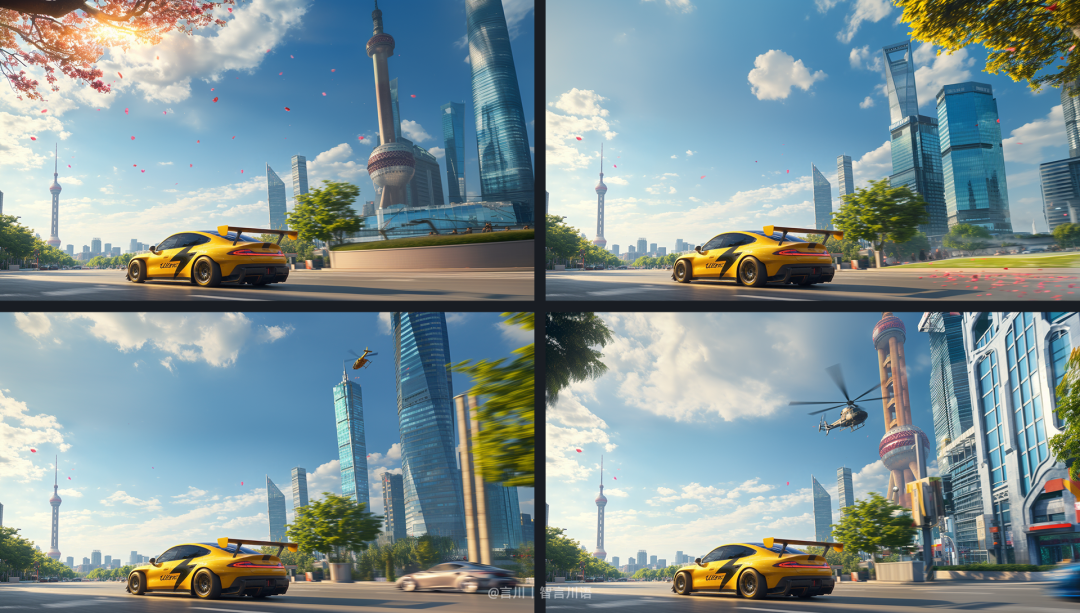
But there's another problem. Our city scene effect is: "city buildings covered with flowers and grass".
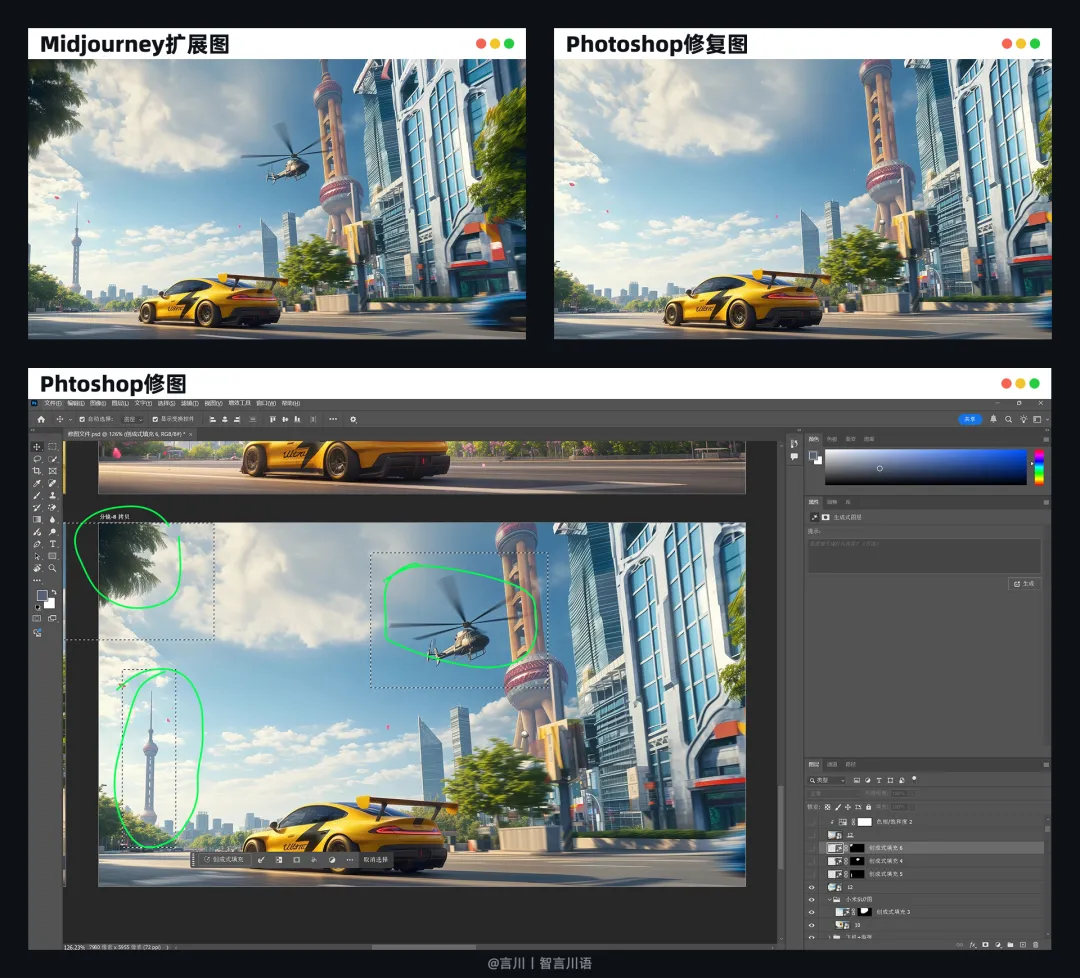
And Midjourney doesn't restore the effects generated by StableDiffusion, so the extended diagrams will need to be regenerated a bit in StableDiffusion.
So here's how this step works:
Select a diagram of the Midjourney extension and remove the unwanted elements in PS.
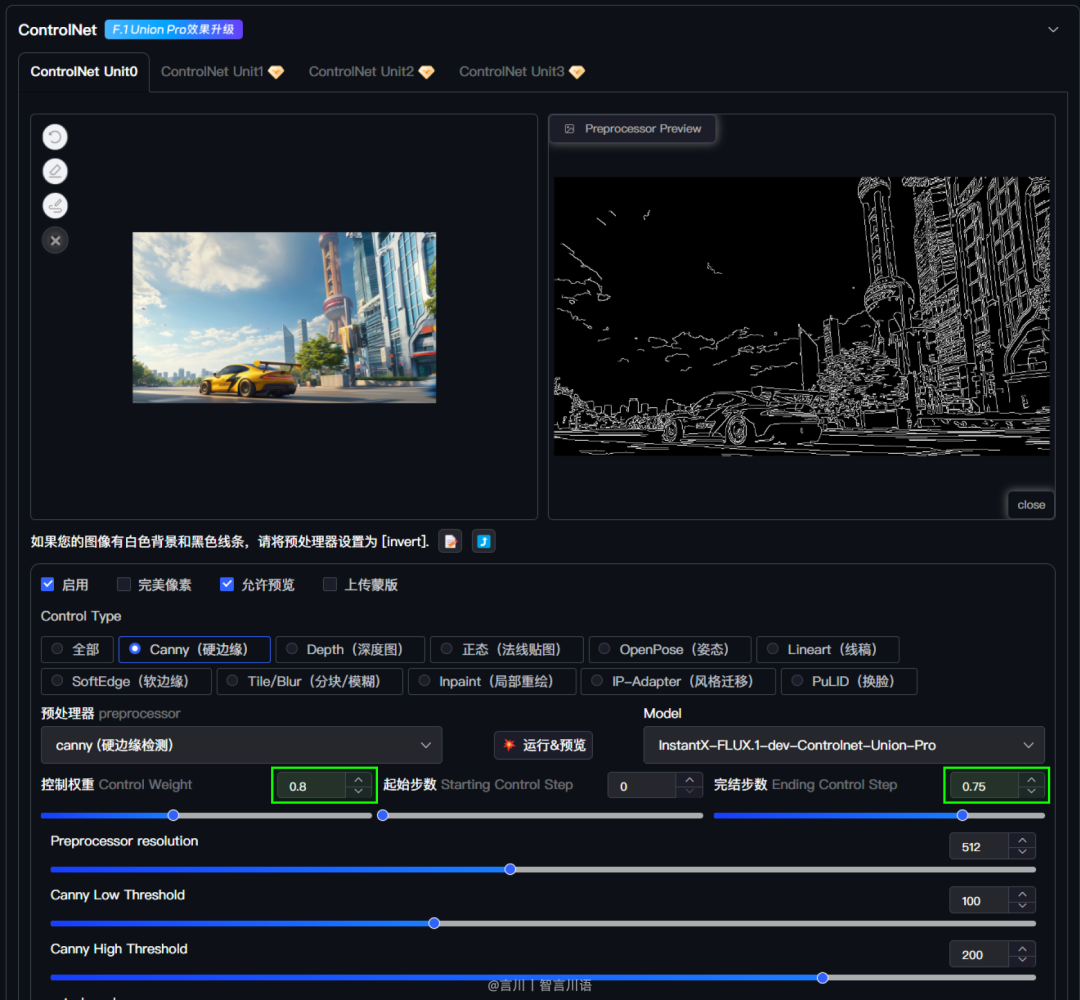
Then in StableDiffusion, use the Controlnet plugin's Canny model control chart.
Note that in Controlnet, the parameters that control the effect of the graph are "control weight, number of start steps, number of finish steps".
The generated effect is shown in the figure:
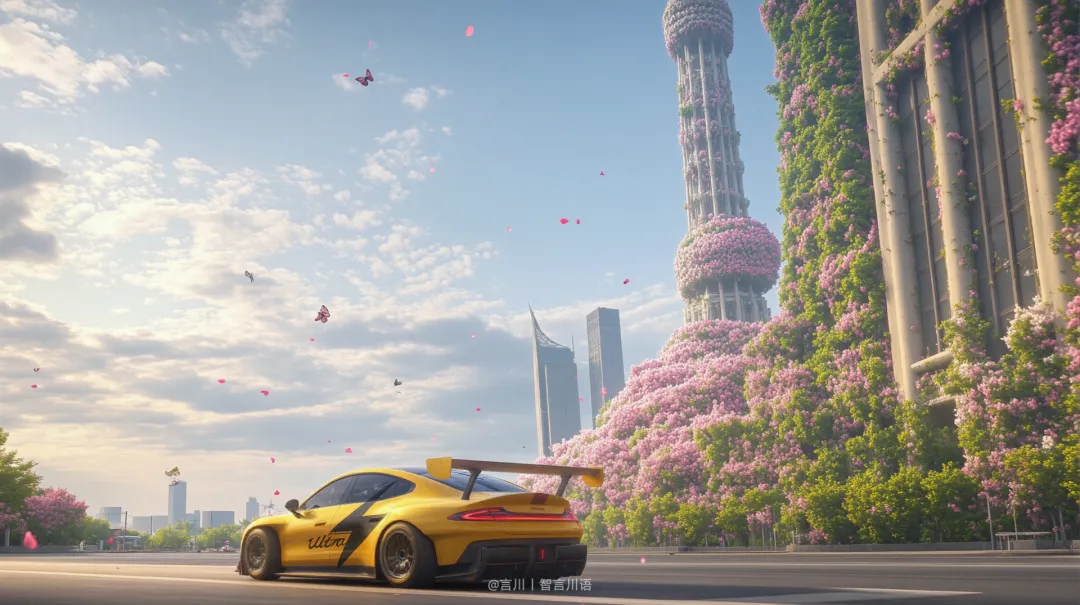
Finally, Photoshop compositing and this split-screen is done.
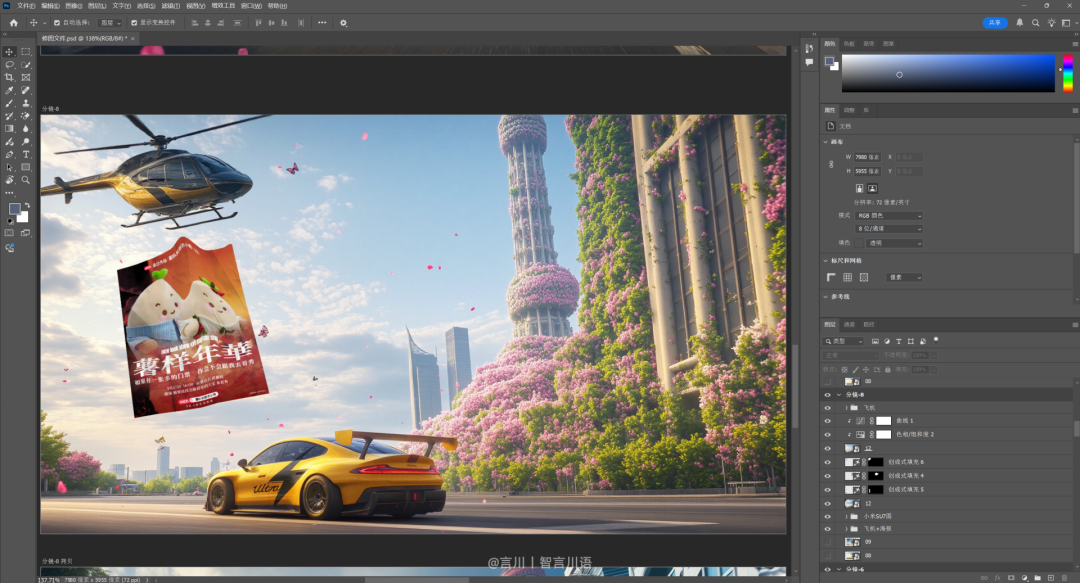
So, the key points of the retouching steps are disassembled.
Step 5: AI Raw Ingredient Mirror Video
Some of the better AI video models on the market today are Ke Ling AI, Instant Dream AI, Conch AI, Vidu, and so on. However, in terms of the stability of video generation, the performance of Ke Ling AI will be stronger. Therefore, the video generation part of this article is given to Ke Ling AI to complete.
For this step, we also break down two scenarios for you, single-shot generation and double-shot (first and last frames) generation.
1. Single lens generation
Steps: Tupelo video - select the Keyline 1.6 model - enter the cue word - click Generate.
Video generation focuses on the description of the cue word, and in making this video, I wrote the AI video cue word via Grok.
And not long ago, Koring launched the DeepSeek cue word assistant, in which you can describe the image you want to show, such as "An airplane flies towards the camera dragging a huge poster, and the camera frame is eventually filled with posters." It will then generate the appropriate cue word for you.
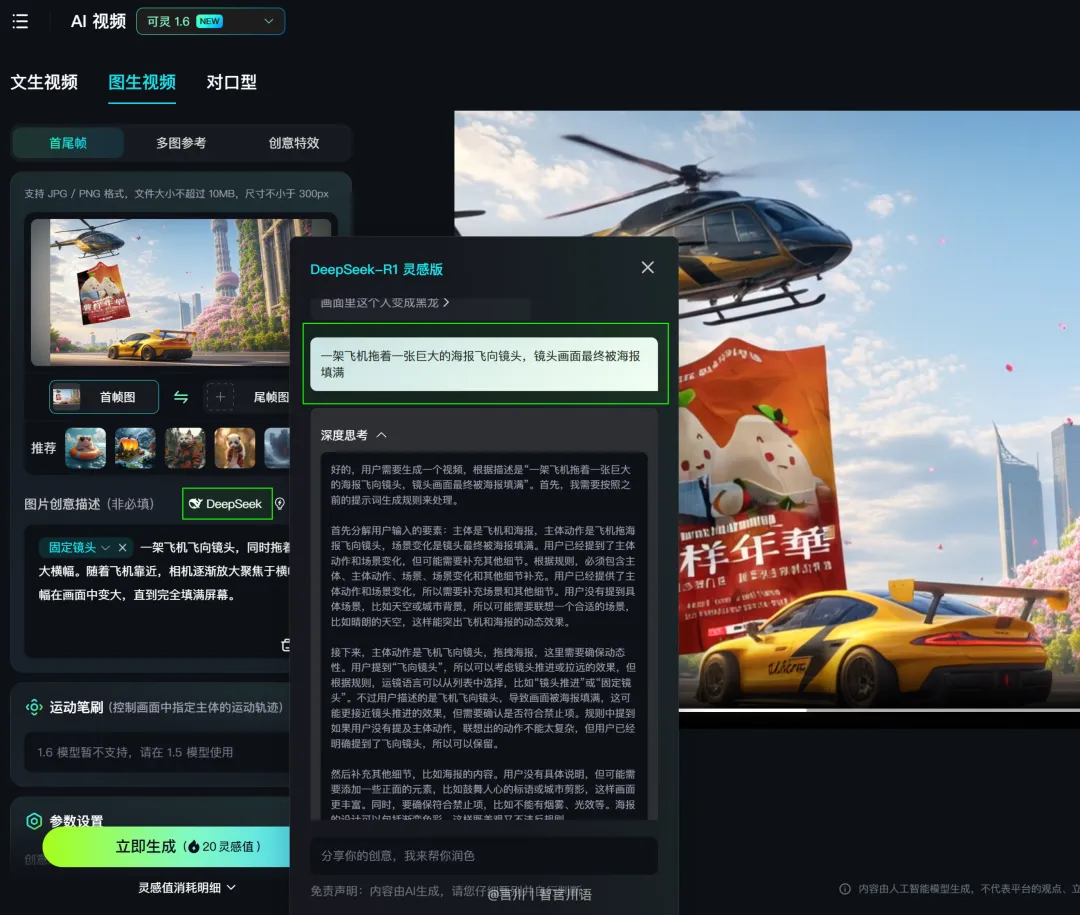
The next step is simple, single shot through the cue word description and just swipe the video to finish.
Case Cue: "Fixed shot of an airplane flying toward the camera while dragging a large banner. As the airplane approaches, the camera gradually zooms in to focus on the banner, which grows larger in the frame until it completely fills the screen."
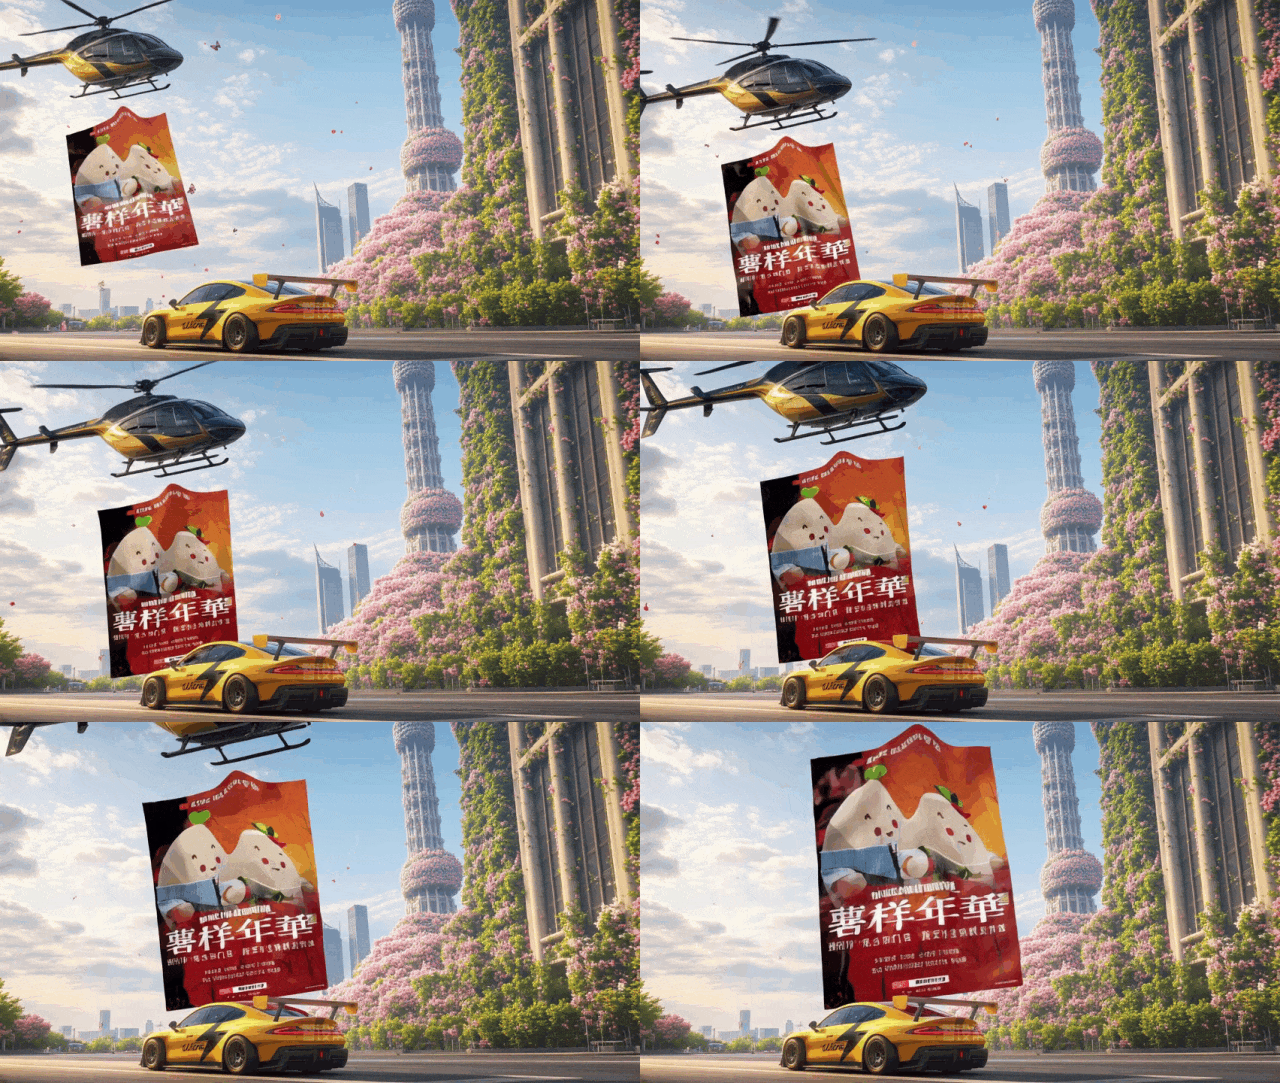
Case cue word: "Fixed shot of a bright yellow sports car traveling at high speed, starting in the near distance and fading away."
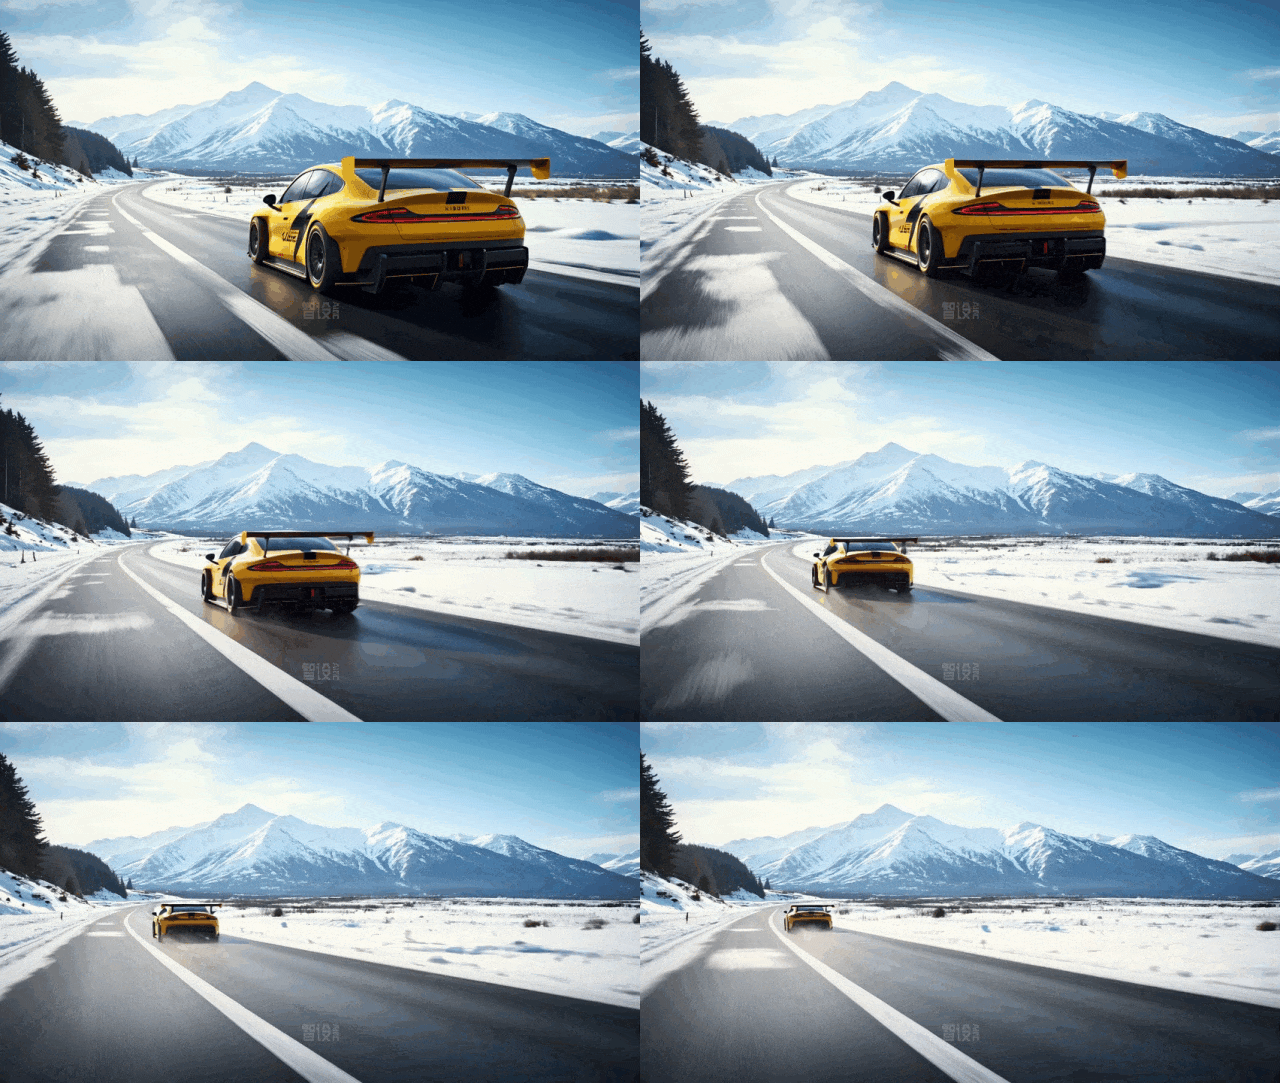
Case Cue Words: "Low angle tracking shot of a bright yellow Xiaomi-branded sports car with black stripes and rear wing, labeled 01 on the front, driving down a snowy mountain road. The camera follows and captures the sports car traveling at high speed with its wheels raising snow and ice. In the background are snow-covered mountains and pine trees, a clear blue sky, bright sunlight and snow reflecting light."

2、First and last frame generation
Let's talk about the first and last frame generation and see the final result achieved.
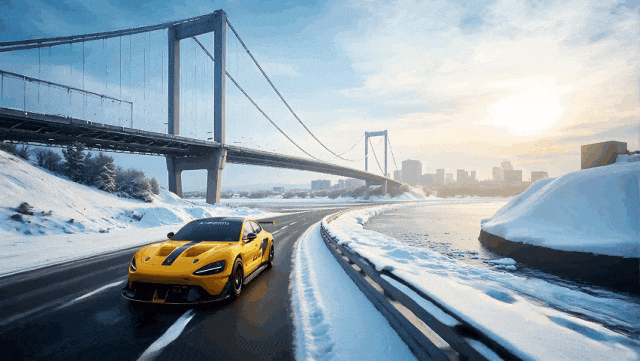
This is a shot that transitions from winter to spring, and the function used is the Tupelo first and last frames.
As the name suggests, the first and last frames are switching from the first frame image, to the last frame image by video animation. So, we need to prepare two images.
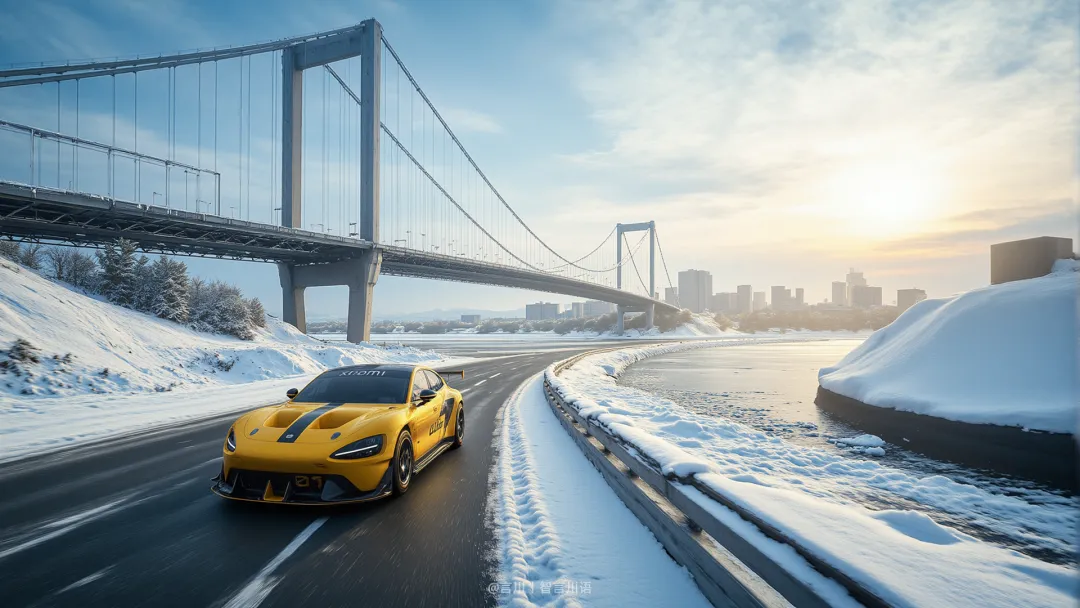
The first frame image is a good solution, follow the previous steps for generating an image to get this winter split image.
How does that spring scene work out?
Along the lines of the previous thought, there are two ways to do this:
1. Kimi generates the cue words and StableDiffusion generates the spring scene map.
But ...... You're doing everything you can in the cue word to keep the scene descriptions consistent between the two images, and changing the cue word for only the style description will likely generate results similar to this image.
And in AI video generation, if the scene of the first and last frames of the two images is too different, the generated effect will generally not satisfy you.
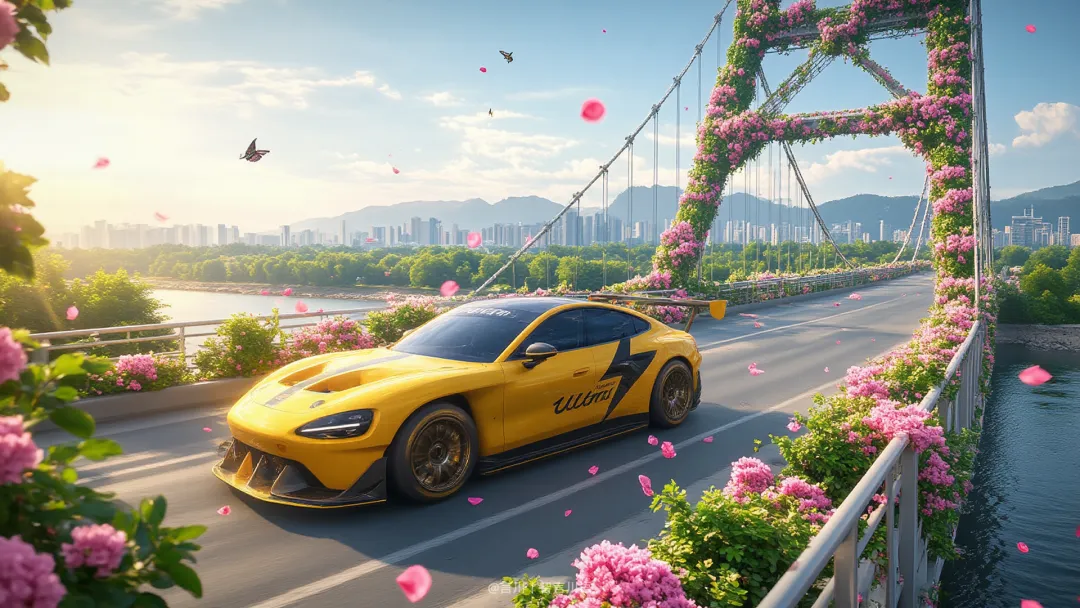
2、Use Controlnet to fix the winter split picture, not change the picture structure, only change the style.
However, if the subject (car) position and scene composition of both the first and last frames are the same, how can I make the car and scene switch more naturally?
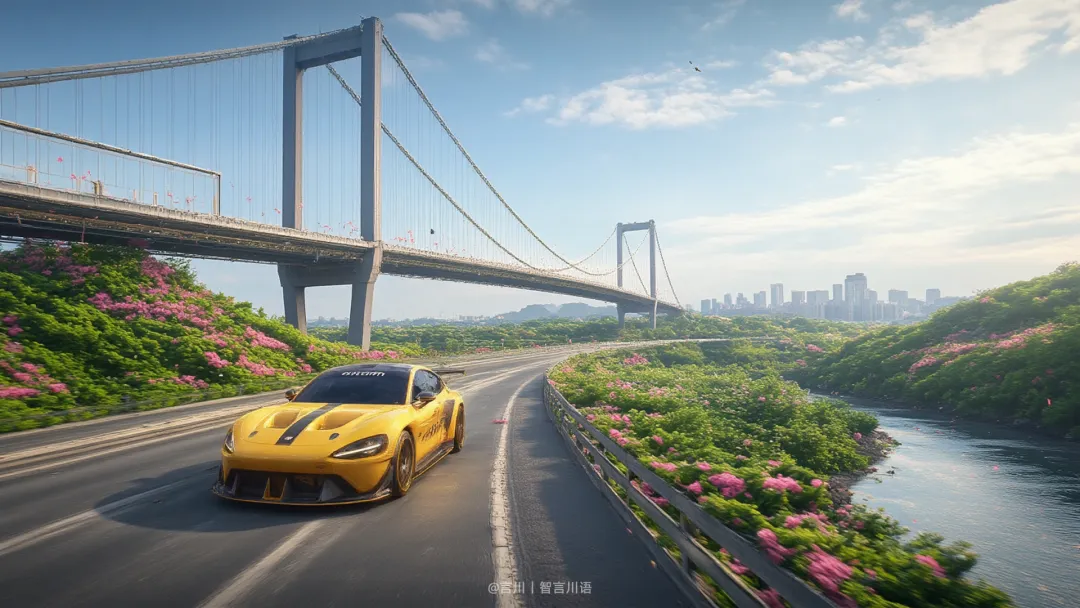
Neither of the above methods is really a good solution to this problem.
So to put it another way, I'll make the car move in the winter scene split, then after the car has traveled a bit, I'll intercept that frame and put it into StableDiffusion to redraw the scene.
Specific operations:
Upload a single shot and type in the cue word "Yellow sports car traveling fast down the road, camera following."
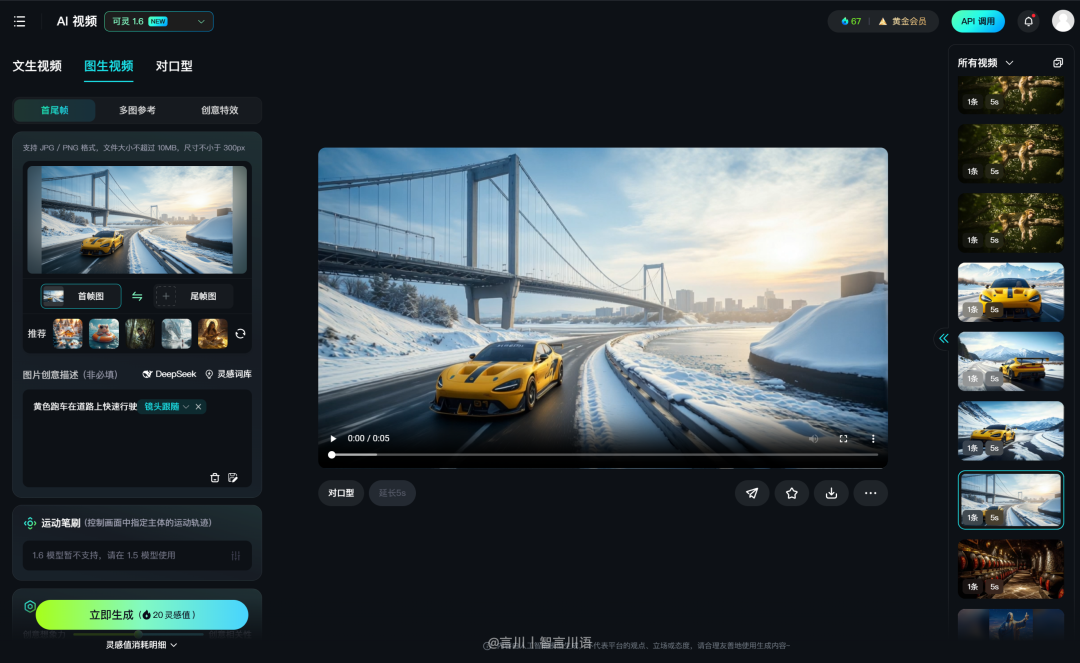
Generate a presentation of the results:
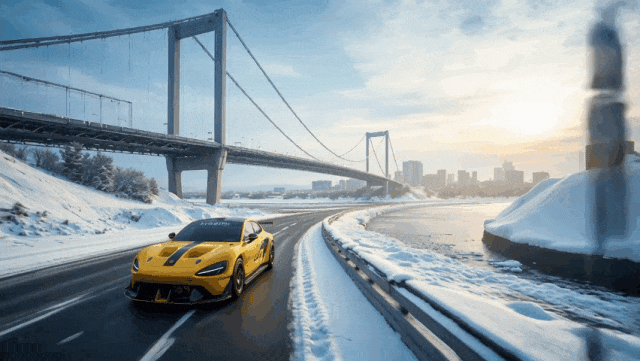
Then, from the generated video, the last frame of the image is captured.

Then put it in StableDiffusion's Controlnet, control the composition via the Canny model, and set the Spring Lora to change the style.
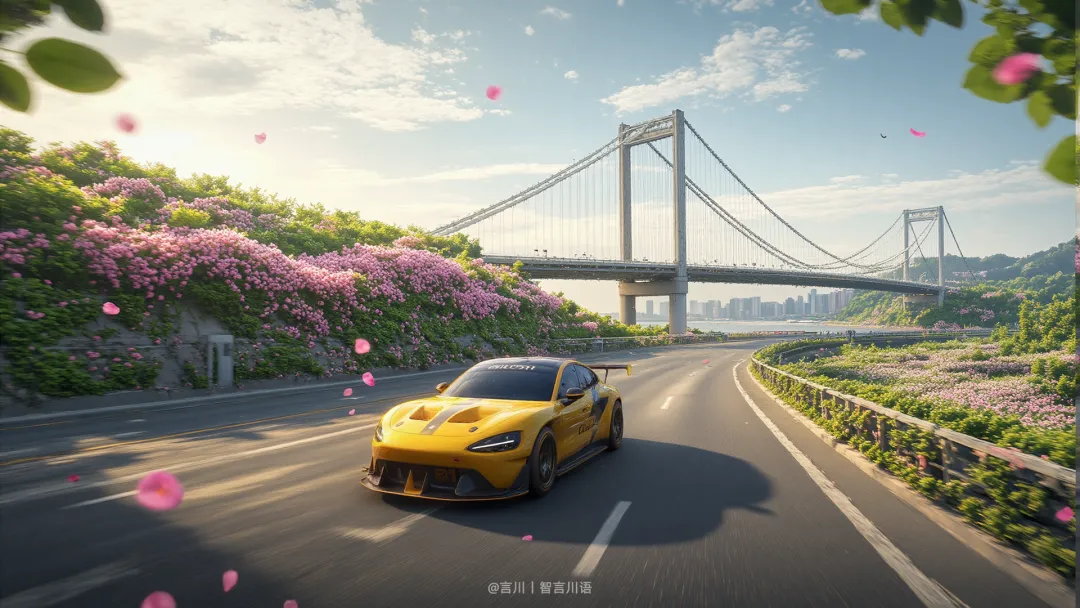
Then use the first and last frames function to combine the winter split with the spring split, and you're done.
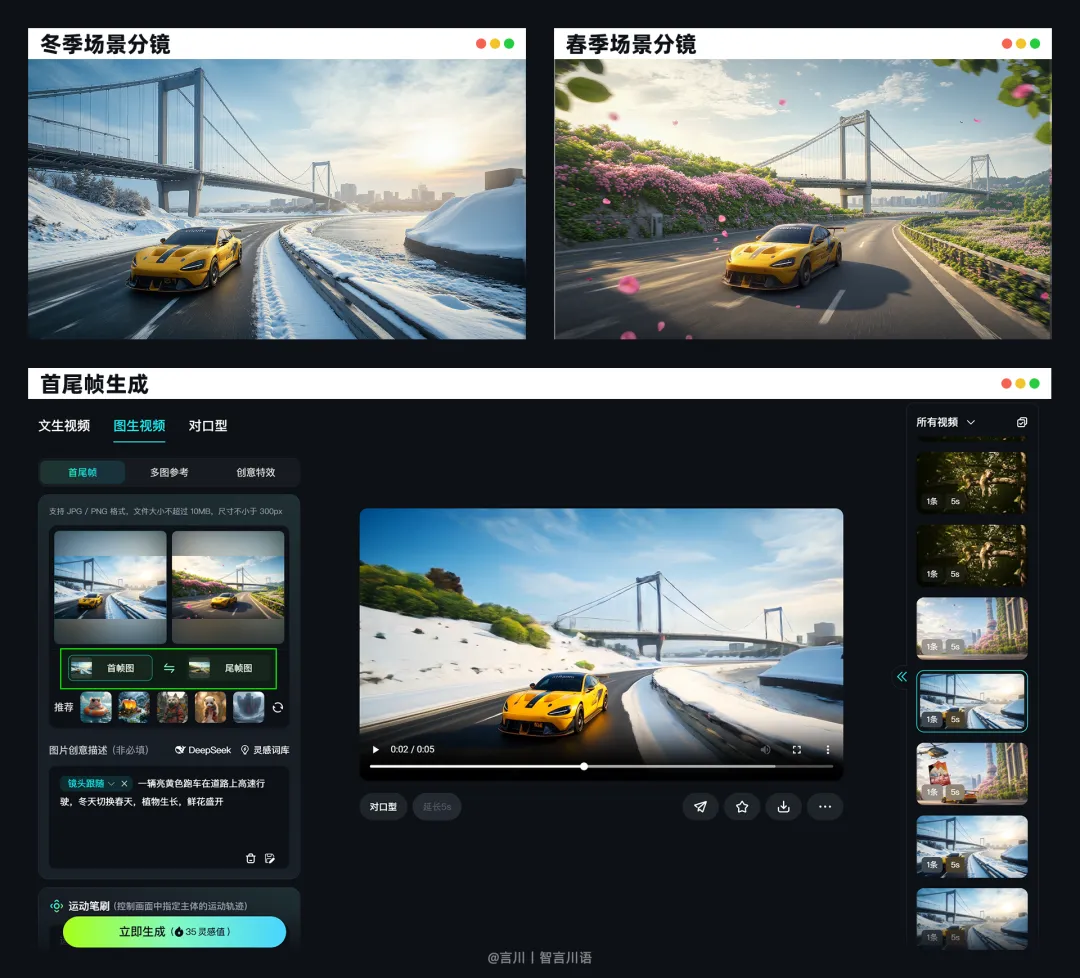
However, if you are careful, you may notice that in the case I showed earlier, the video footage of the winter and spring scene switching is from the winter viaduct to the spring viaduct (two viaducts appear).
And it's not like the winter single shot video where the background is kept the same (just a viaduct), its mainly due to the randomness of the AI, if you need that effect, got to brush up more.
And I chose this split video because, this randomness generated video turned out to be quite creative for me .......
Well, we're done breaking down the steps of video split generation.
Step 6: Video post-production synthesis
To this point, basically complete the work of this short film 80%. Of course, if you are ready to use AE and other motion tools to do film, transitions and other effects, you may also need to spend some time, this video lightly using AE, the process will not say, put a picture mean.
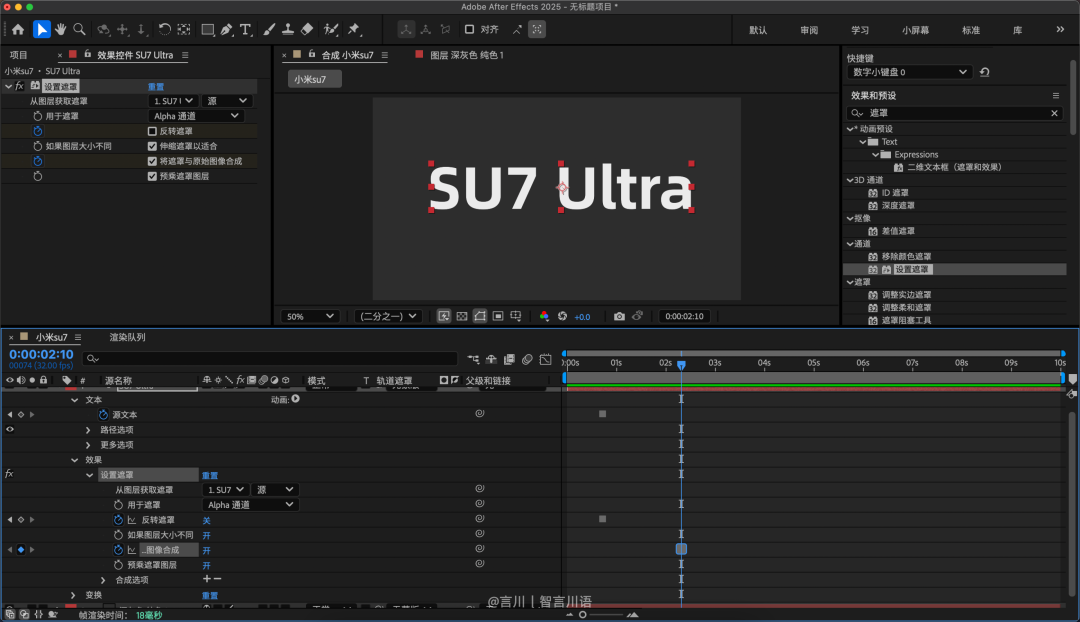
This step focuses on the AI function of clipping and mirroring.
Usually, when using AI video generation tools, the quality of the generated video is usually not too high (usually 1080P), and if you want to generate a video with Ultra HD quality, the number of generation points consumed is more, or rather, expensive! And the randomness of AI will also lead us to not be able to complete the generation task at once.
So, in general, when generating videos, it is recommended that you brush the video with a small resolution generation quality, such as the standard mode of Koring.

And in the end, the video we produce must be of clear picture quality, otherwise it is a great pity that you spend a lot of time, only to have the video not be advanced because of the picture quality in the final step of the output.
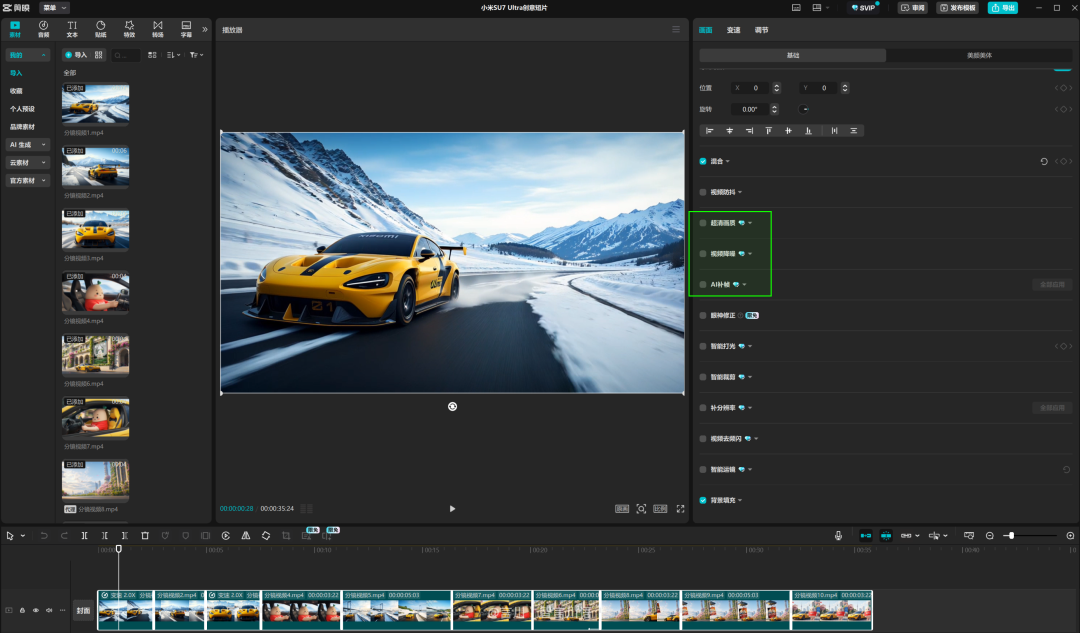
So, how to solve this problem? There are quite a few video repair and enlargement tools on the market.
But in this article, we only recommend the built-in features of the movie editing, which are convenient and easy to use. So, after you finish editing, please use "Ultra HD quality, video noise reduction, AI frame filler". (However, you need to be a member to use these)
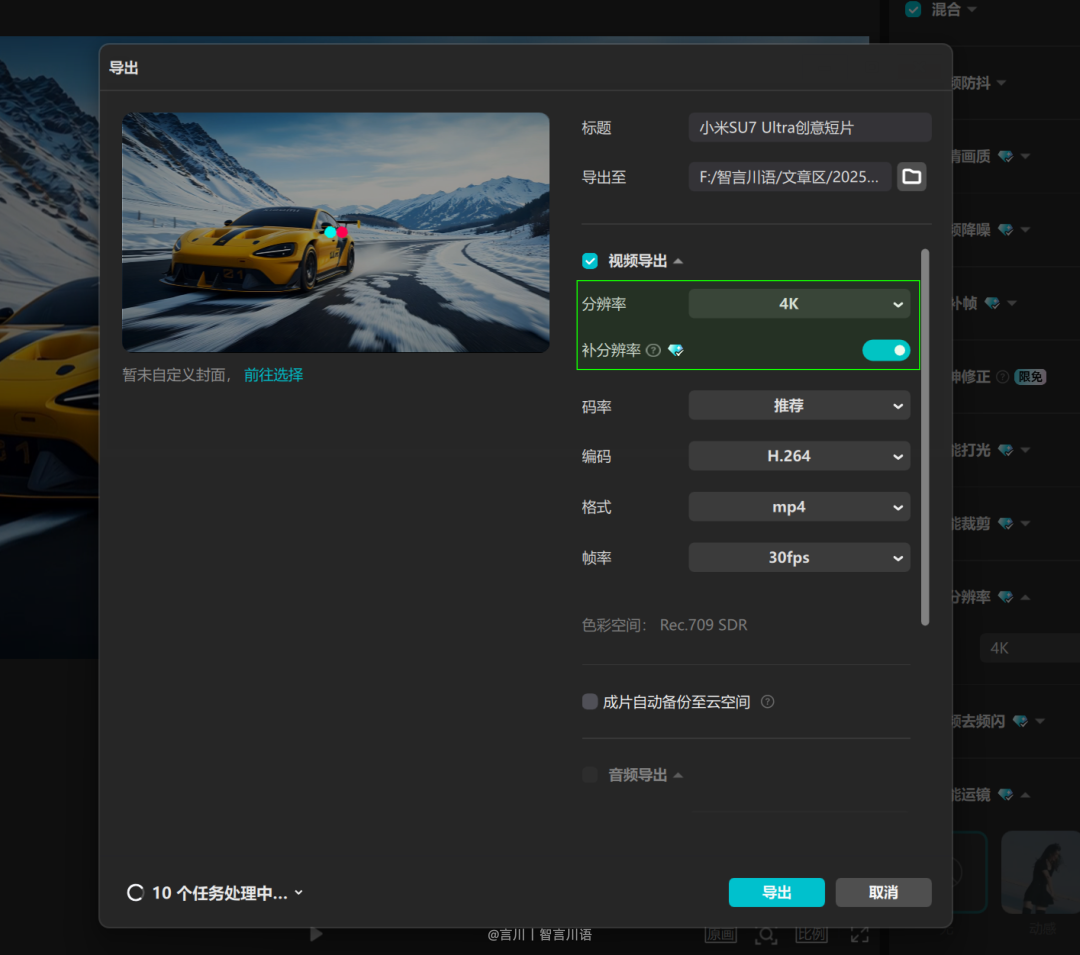
Finally, when exporting the video, set the resolution to 4K with the complementary resolution checked. That way, you'll have an Ultra HD movie.
Step 7: AI Generate Cover Title
As a final step, once the video is done, it needs a cover and usually has a title text message on the cover.
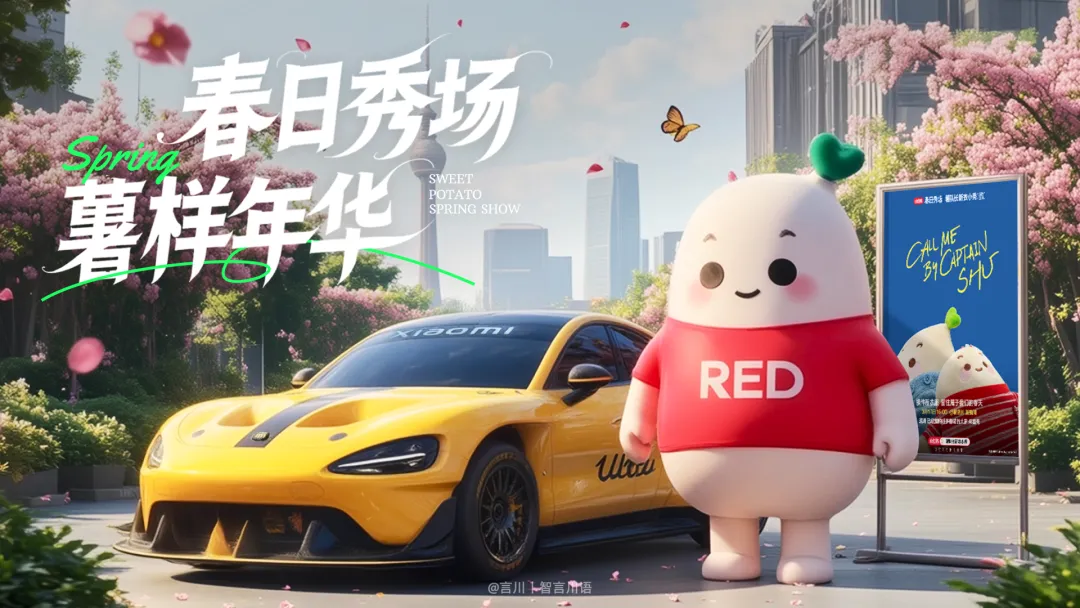
The cover is a good solution, just split it with one of the images from this strip, or just follow the steps of the raw split image to come up with one.
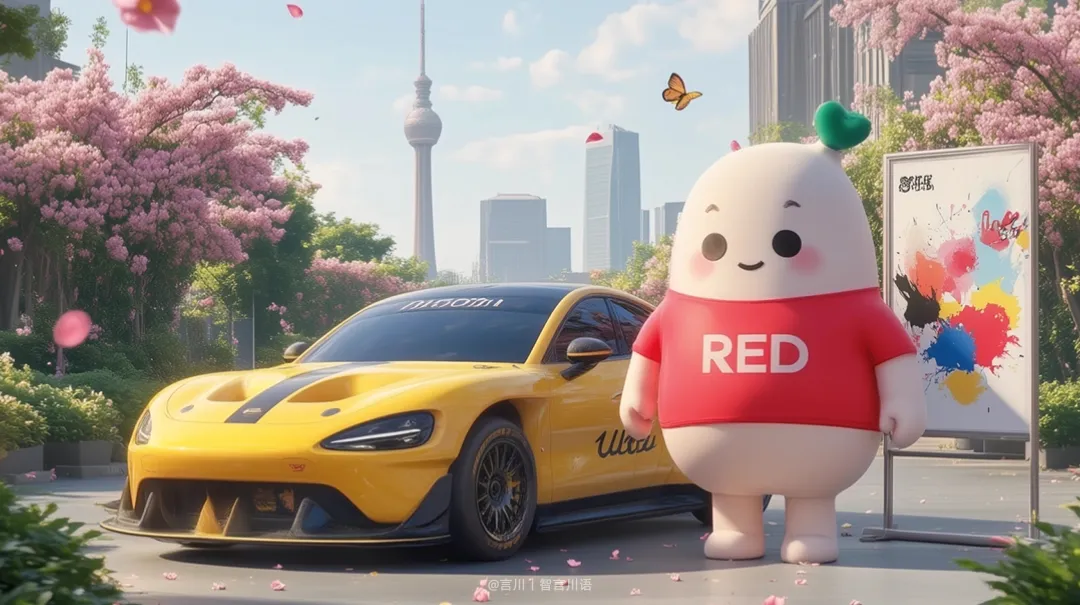
Then the title text, we can use that dream AI to do, that dream of version 2.1 model can generate Chinese fonts.
Before creating, it still uses AI to help us write the prompt words. Instant Dream AI has also recently gone live with the DeepSeek model, which allows you to send your request directly in Instant Dream, "I need to design the title text, the content is [Spring Showroom Potato Sample Years], in white letters on a black background."

Output Cue: Title text for "Spring Showcase Potato Years" in a bold, artistic, hand-drawn typeface that is dynamic and modern, with uneven strokes and street art or graphic design influences. Characters may be interconnected and the strokes blend naturally to create a fluid design that avoids the brush strokes of traditional calligraphy. The text is solid black with a solid white background, centered and arranged in a single line, slightly curved layout to enhance the sense of visual flow.
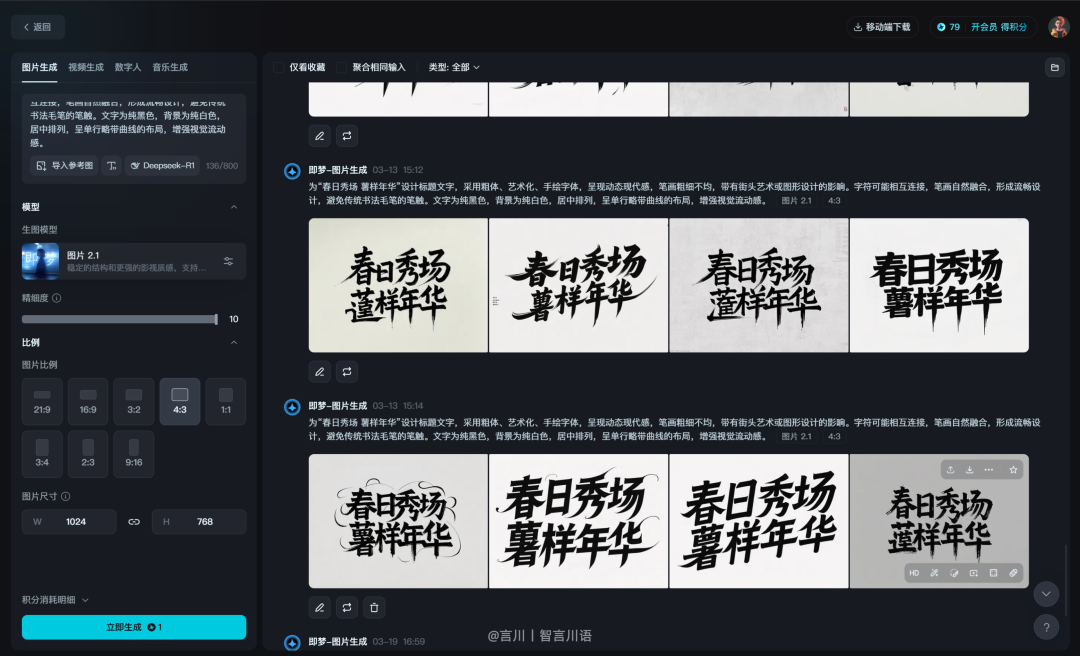
Finally, pick a headline design that you approve of and use a design layout tool like Photoshop, and you're done.
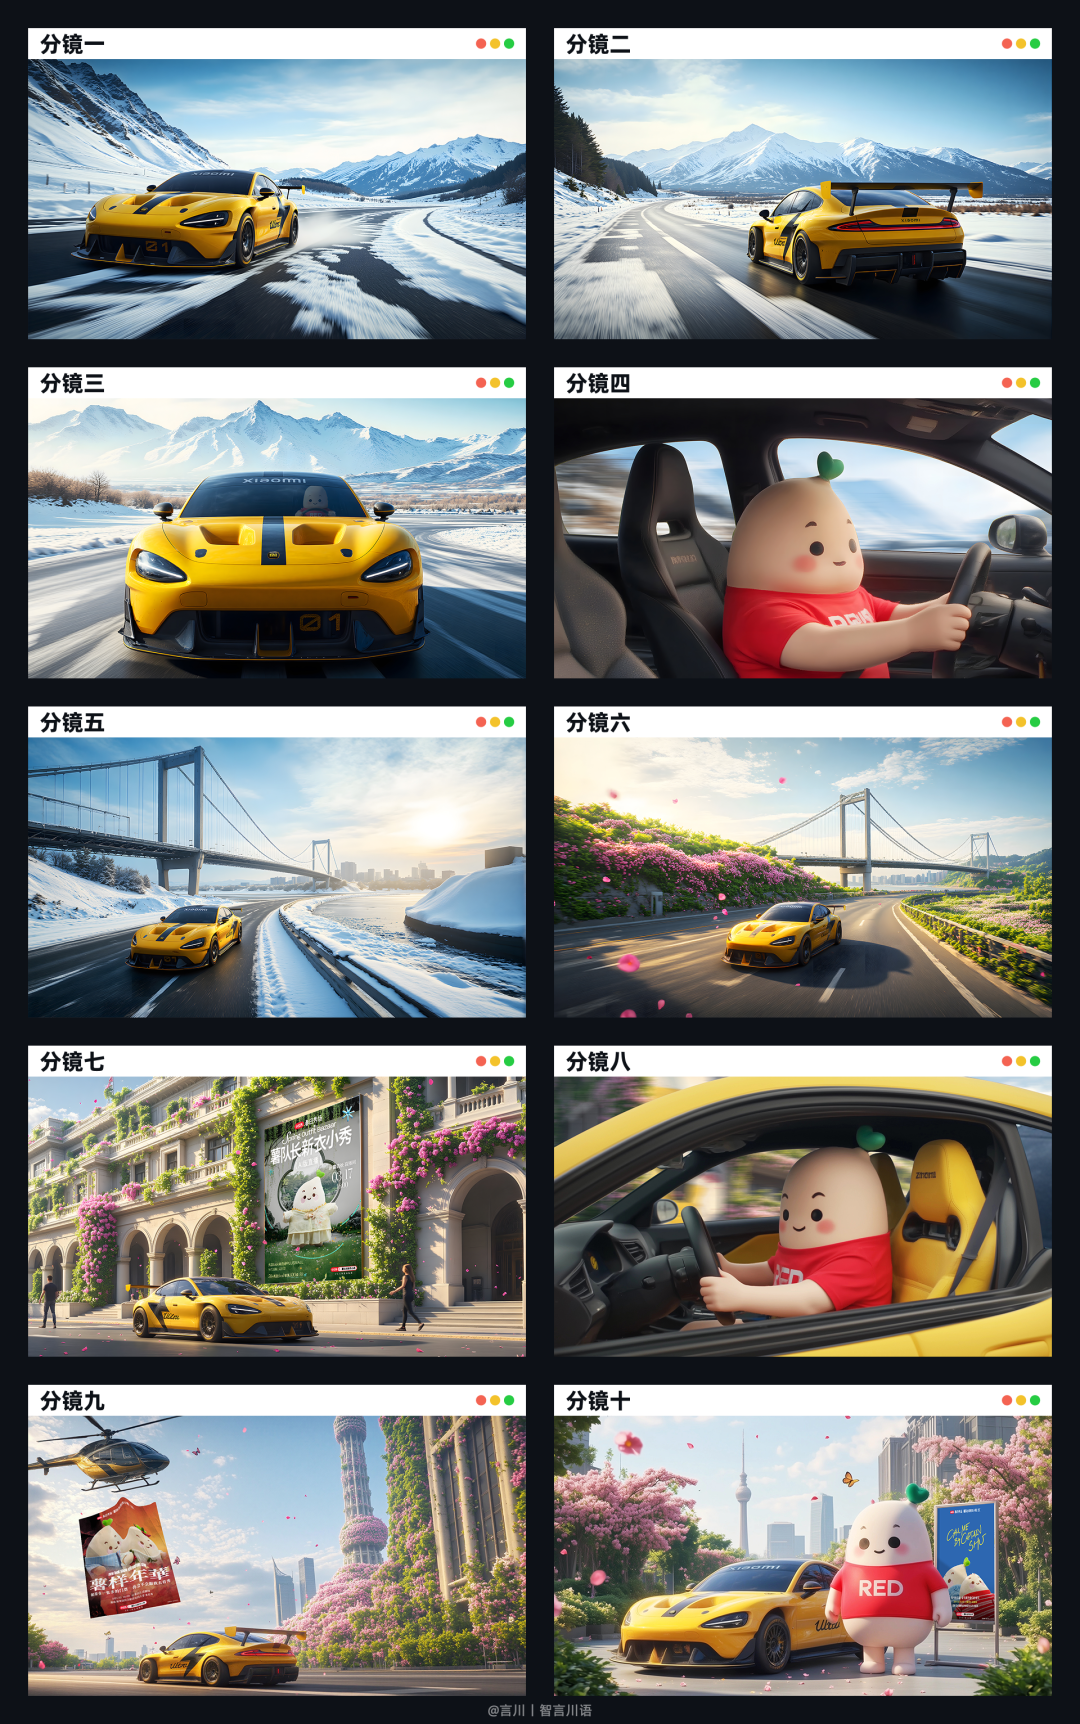
Putting up 10 split-screen images from this video for your reference.
At this point, this post comes to an end to share my experience with you:
The cost involved in creating a high quality, creative AI video is never low. You may need to spend a lot of time experimenting with split-screen (image, video) creation. Although AI is very productive, there is very little content that can really be used on the ground, because the randomness of AI will lead to the fact that we need to constantly debug the parameters and brush up the content, and we can only try to control the results generated by AI as much as we can.
As for the cost of using AI tools, the top big models, such as image models (Flux) and video models (Kerin, Vidu, etc.), basically need to open a membership in order to use them smoothly, as well as design tools such as Photoshop and Cutting Mapping, which also need to be paid for if you want to use the AI functions in them.
However, these costs are not high when compared to traditional video workflows.
And in the age of AI, everyone has the potential to be a director.
Dreams that used to be out of reach, maybe AI can actually help us realize them ......