Since the launch of Flux, the latest dark horse literary model, the wave of Flux is sweeping the world with an unstoppable momentum. Currently, to play Flux in the local computer environment, the support methods are mainlyComfyUIHowever, the installation of the ComfyUI tool has always been a confusing place for many novices. In WeChat groups and private messages among friends, the environment configuration problem of ComfyUI has always been one of the most frequent problems.
There are currently two main ways to install ComfyUI:
- Method 1: Use ComfyUI native installation package
- Method 2: Use Qiuye's ComfyUI integration package
Both of these methods are used by people. In order to take care of the needs of different friends, I will write about the two installation methods of ComfyUI separately. Today we will first look at the installation method using the ComfyUI native installation package.
1. ComfyUI native package installationTutorial
ComfyUI native package download address:
- https://github.com/comfyanonymous/ComfyUI
【Step 1】Download the native installation package
Enter from the above URL, in the Installing section, follow the red arrow to download the file to your local computer.
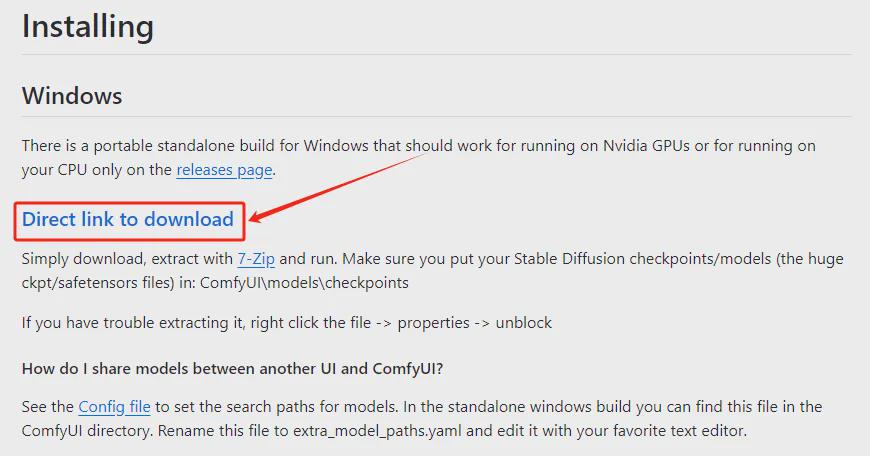
The size of the installation package is currently about 1.35G. After downloading, put it in any directory and unzip it. Here we put it in the root directory of drive E. The folder after the compressed package is unzipped is ComfyUI_windows_portable.

【Step 2】: Download the model
Commonly used model download websites:
- Domestic LiblibAI:https://www.liblib.art/
- Foreign C Station:https://civitai.com (requires scientific Internet access)
- Foreign Huggingface: https://huggingface.co/ (requires scientific Internet access)
We put the downloaded model into the corresponding directory:
- Large Model:\ComfyUI_windows_portable\ComfyUI\models
- \checkpoints
- Loar Model:\ComfyUI_windows_portable\ComfyUI\models\loras
- VAE Model:\ComfyUI_windows_portable\ComfyUI\models\vae
- embeddings:\ComfyUI_windows_portable\ComfyUI\models\embeddings
- ControlNet:\ComfyUI_windows_portable\ComfyUI\models
- \controlnet
- Clip Node:\ComfyUI_windows_portable\ComfyUI\models\clip
- Unet Node:\ComfyUI_windows_portable\ComfyUI\models\unet
Here we take the most commonly used large model majicMIX realistic as an example
- LiblibAI: https://www.liblib.art/modelinfo
- /bced6d7ec1460ac7b923fc5bc95c4540

Download it locally and place it in \ComfyUI_windows_portable\ComfyUI\models
\checkpoints directory.

[Step 3]: Start the script

If the computer has an N card, use the run_nvidia_gpu.bat script to start it. If the computer does not have an N card, use the run_cpu.bat script to start it. Just double-click to start.

At this time, a ComfyUI management interface will automatically open in the browser. If it is not open, directly enter http://127.0.0.1:8188 in the browser.
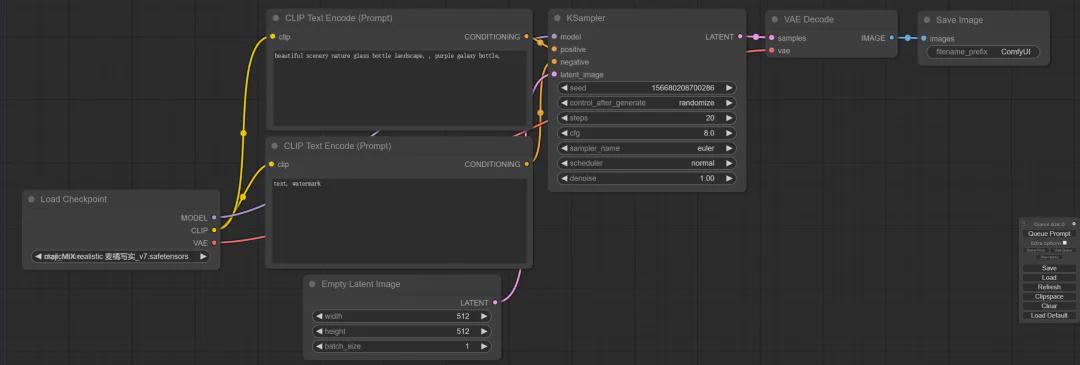
[Step 4]: Image generation
We enter the prompt word, adjust the relevant parameter settings, click the "Queue Prompt" button, and then we can generate the picture.

In the console we can see the progress information of image generation.

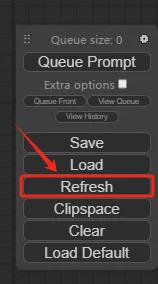
Related instructions: The default loaded workflow may not have our newly downloaded model. At this time, click the "Refresh" button on the right to load the new model.
At this point, the installation of ComfyUI is basically completed.
2. ComfyUI native decompression package directory description
The folder after decompressing the ComfyUI installation package is ComfyUI_windows_portable. Below we will give a brief description of the function of each file or folder.
Files/Folders
Functional Description
ComfyUI
ComfyUI main function folder
python_embeded
Independent dependent Python environment folder
update
Folders to be updated
README_VERY_IMPORTANT.txt
Very important instructions for use
run_cpu.bat
Startup script when the computer has no GPU (N card)
run_nvidia_gpu.bat
Start the script when the computer has a GPU (N card)
Let's take a brief look at the important files/folders below.
(1) ComfyUI
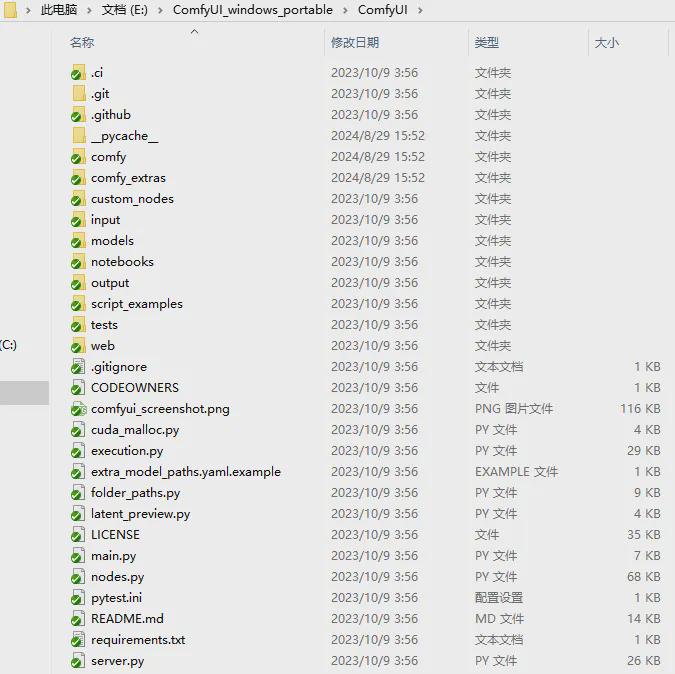
The contents of this folder are basically the same as the directory on the ComfyUI installation package web page.
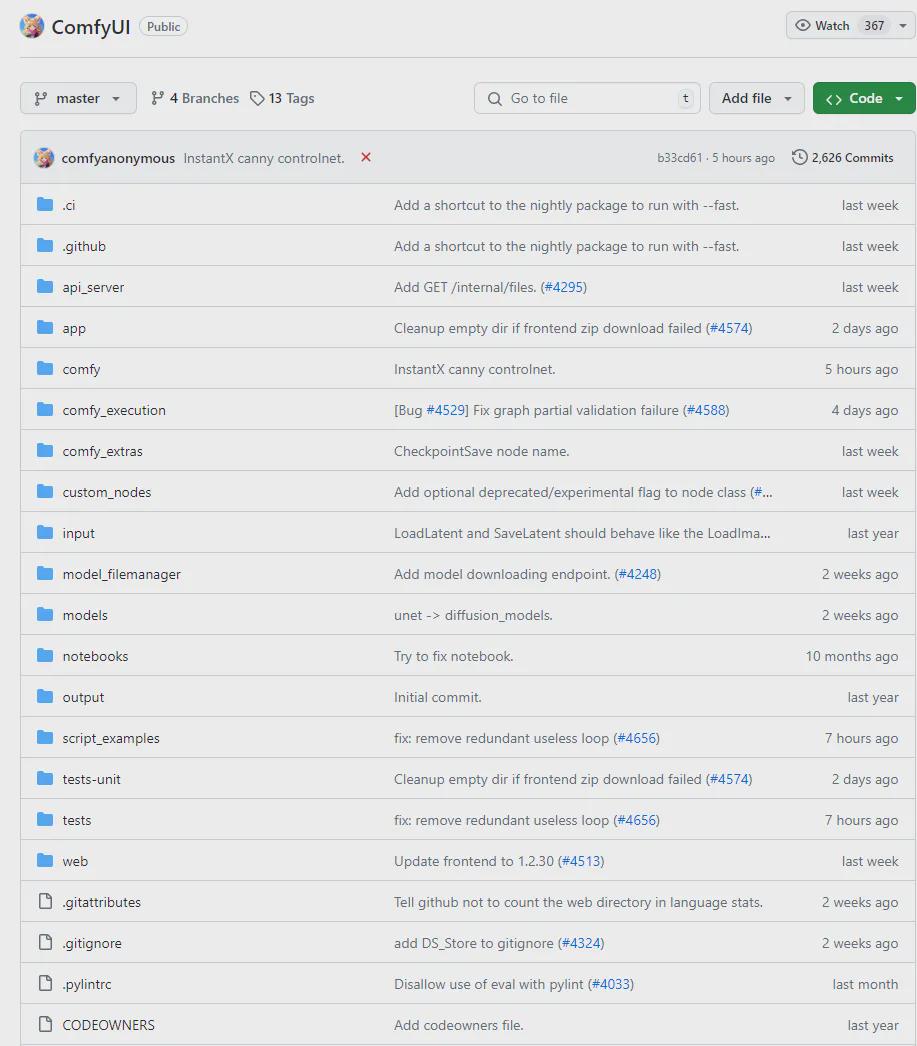
Below we focus on a few common directories.
custom_nodes: Installation directory of the plugin node
models: File storage paths for various large models, LORA models, VAE models, and ControlNet
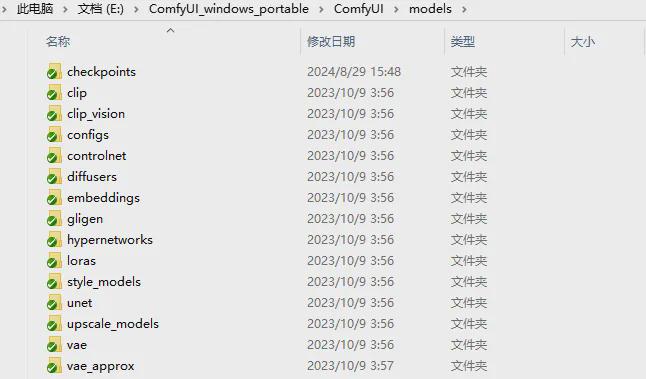
(2) update

update_comfyui.bat: Used to update ComfyUI. If the official website has the latest version of ComfyUI, you can double-click this script to update and upgrade.
update_comfyui_and_python_dependencies.bat: To update ComfyUI with python dependencies, note that this command should only be run if there is a problem with python dependencies.
(3)README_VERY_IMPORTANT.txt
Very important instructions for use. I copied the content into Youdao Translation (removing some spaces and blank lines). You can check it out.
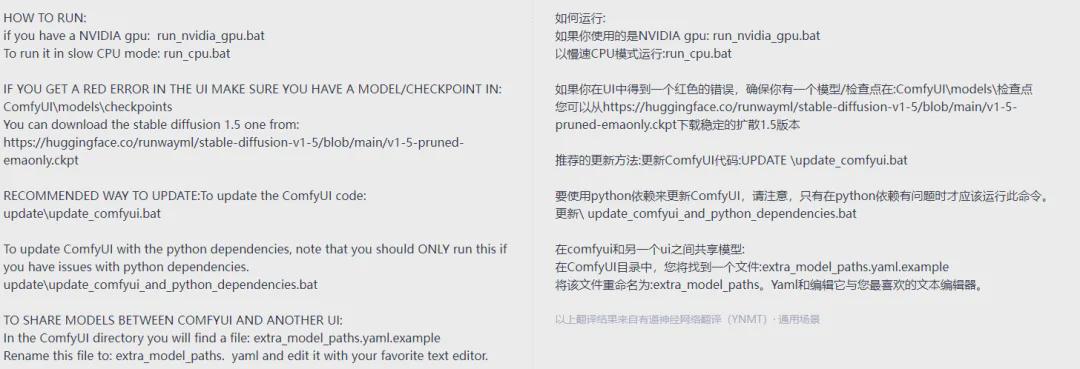
3. Sharing Models with SD WebUI
Friends who are used to using SD Web UI may have downloaded a lot of models. The directories of these models are inconsistent with the directories where ComfyUI models are stored. ComfyUI officials have also considered this problem and provided a solution to enable ComfyUI to share SD Web UI models.
Go to the \ComfyUI_windows_portable\ComfyUI directory and find the extra_model_paths.yaml.example file.
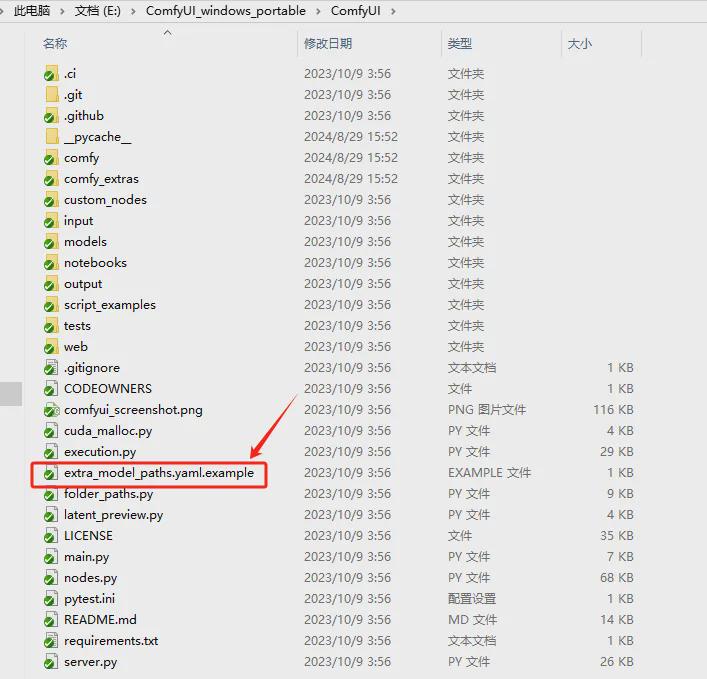
Rename the file, remove the .example suffix, change the file name to extra_model_paths.yaml, and then open it with a text editing tool.
The initial file content is this
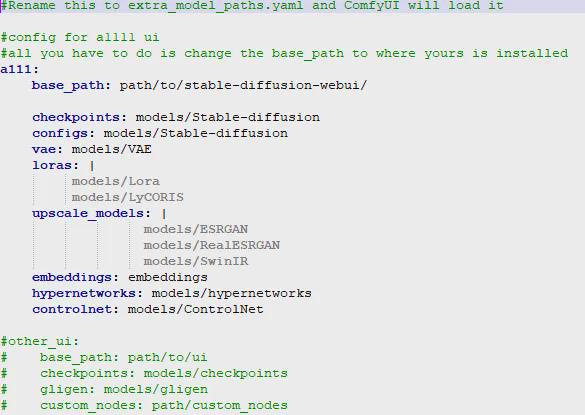
Then replace the value of the base_path field with the path where we installed SD WebUI locally.
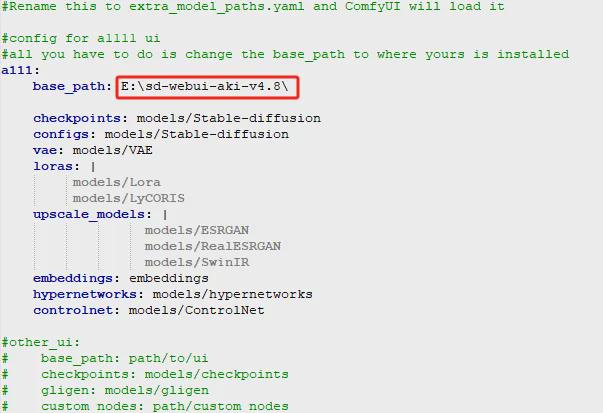
Then restart ComfyUI and it will be fine.
4. ComfyUI Chinese plug-in installation
The ComfyUI above is installed in English by default. Many friends are still accustomed to using the Chinese version. Here we need to install a Chinese plug-in.
- Chinese plugin address: https://github.com/AIGODLIKE/AIGODLIKE-ComfyUI-Translation
The installation of the plug-in address will be explained later. Here we only need to download it directly from the website through the above address.
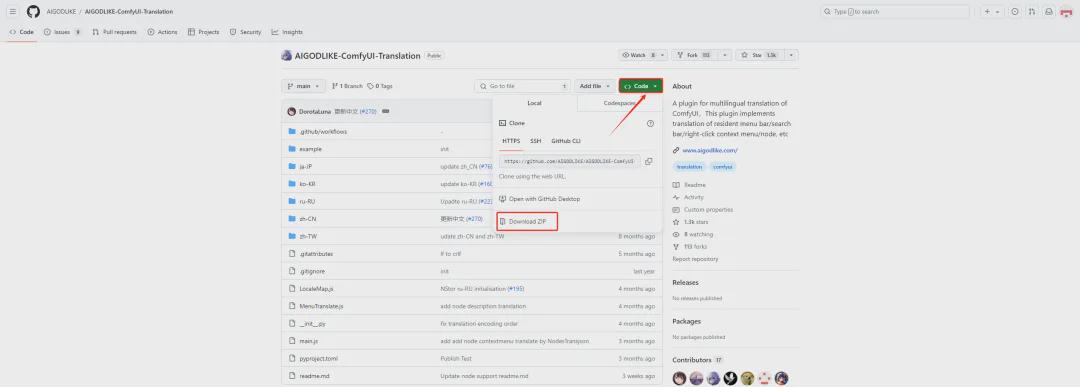
Unzip the downloaded file and put it in the \ComfyUI_windows_portable\ComfyUI\custom_nodes directory.

Restart ComfyUI. You can see that the ComfyUI interface automatically changes to Chinese.
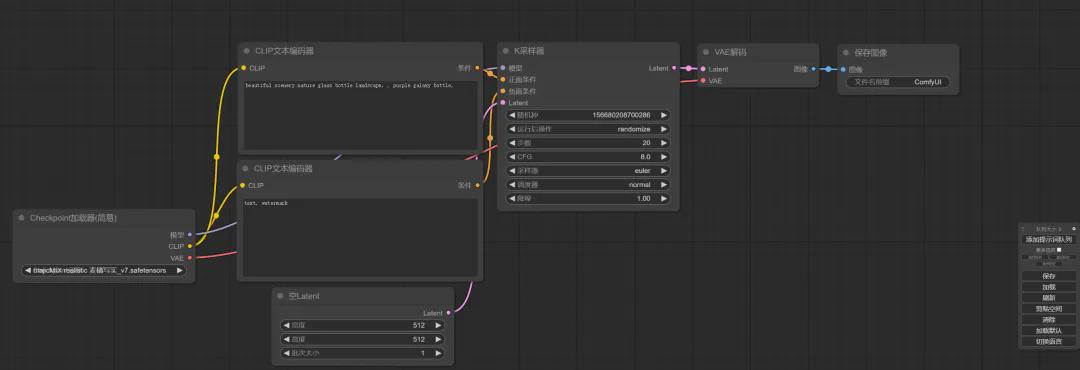
If it does not become Chinese, you can click the "Settings" button to open the operation interface and set the field AGLTranslation-language to Chinese.

In this way, the ComfyUI operating interface has been localized in Chinese.
Okay, that’s all for today’s sharing. I hope that what I shared today will be helpful to you.