You are still waitingKelingofAI VideoApply?

While you are waiting, read this article first.Open SourceBeLivePortrait!
This article will teach you how to use LivePortrait.No local setup required, and it’s free!
Long article warning 🚨🚨
First, let’s learn about LivePortrait
LivePortrait is simply"Expression Migration"That is, provide a picture and a reference video, and through LivePortrait's AI calculation, you can replicate the facial expressions and movements of the reference video onto the picture exactly.
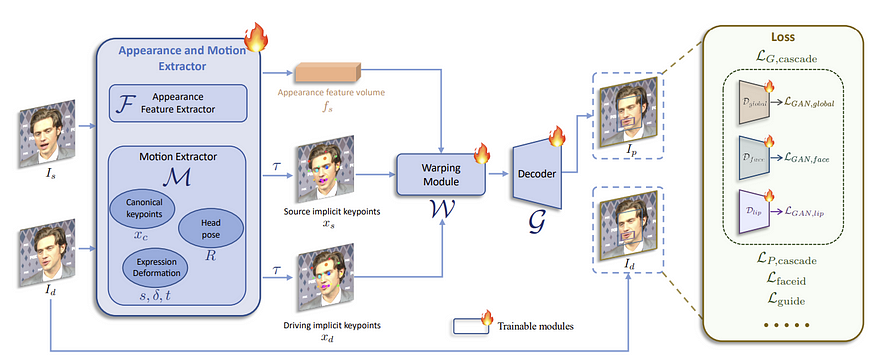
Image from LivePortrait white paper
I won't go into too much detail about the complicated theoretical knowledge here.Breaking Through the Information Gap has always been based on the main operating concepts of "actual combat", "practical" and "dry goods".
Next, I will introduce two methods of using LivePortrait online, and you can choose according to your needs.
Method 1
Huggingface
Since the outbreak of AI, Huggingface has been a leading product in the open source community. Everyone should know about it, so I won’t introduce it in detail here.
Huggingface online experience link:
https://huggingface.co/spaces/KwaiVGI/LivePortrait
Select Huggingfaceadvantage:
- Clear interface
- Easy to operate
- Runs quickly, no need to wait too long to get results
- Has image editing function
Huggingfaceshortcoming:
- As an online trial experience,Cannot generate long videosI'm trying it out now.mostOnlyGenerate ≤ 9 secondsVideo.
- Video without sound
But it’s enough as a trial experience!
Huggingface LivePortrait Tutorial
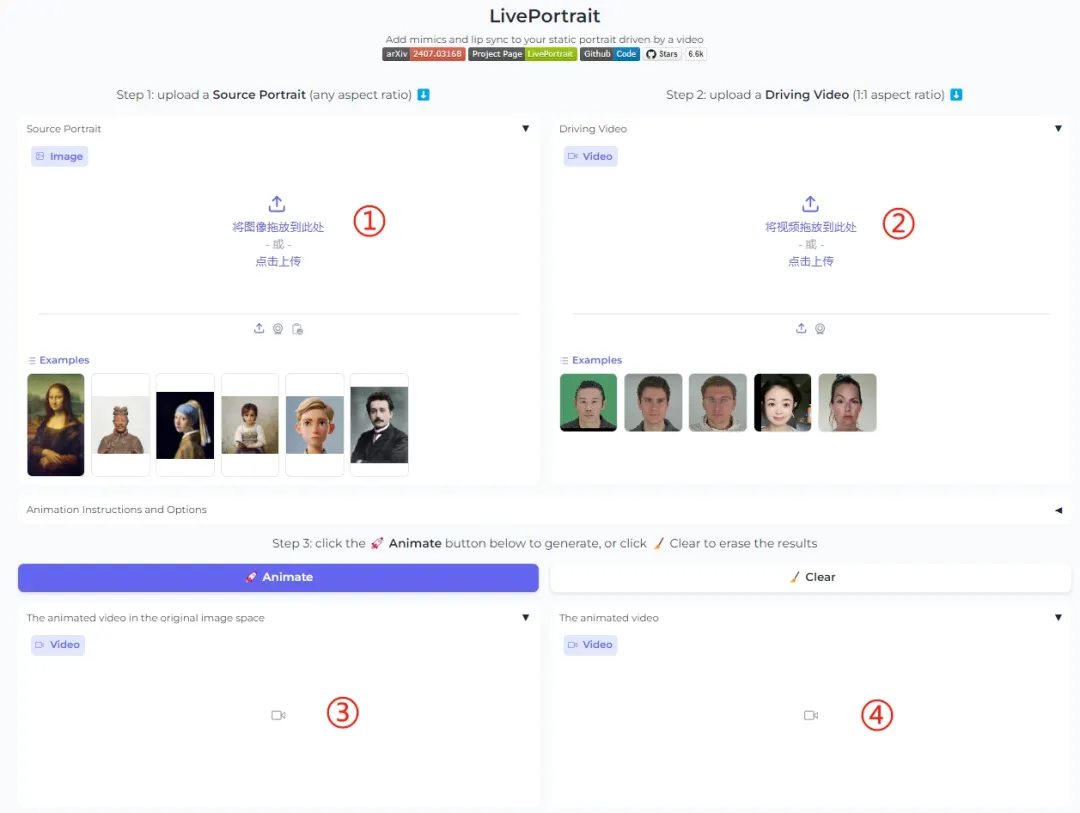
Huggingface LivePortrait interface
- exist ① Upload the file you want to createpicture, no limit on the image ratio, 1:1, 16:9, 3:4, etc. are all OK! LivePortrait only recognizes and edits faces.
- exist ② Upload the facial movements you wantvideoThe problem is that, as I mentioned earlier, Huggingface's LivePortrait can only produce videos of up to 9 seconds, so if your reference video is longer, you may have to make a compromise and cut out a 9-second video and upload it.
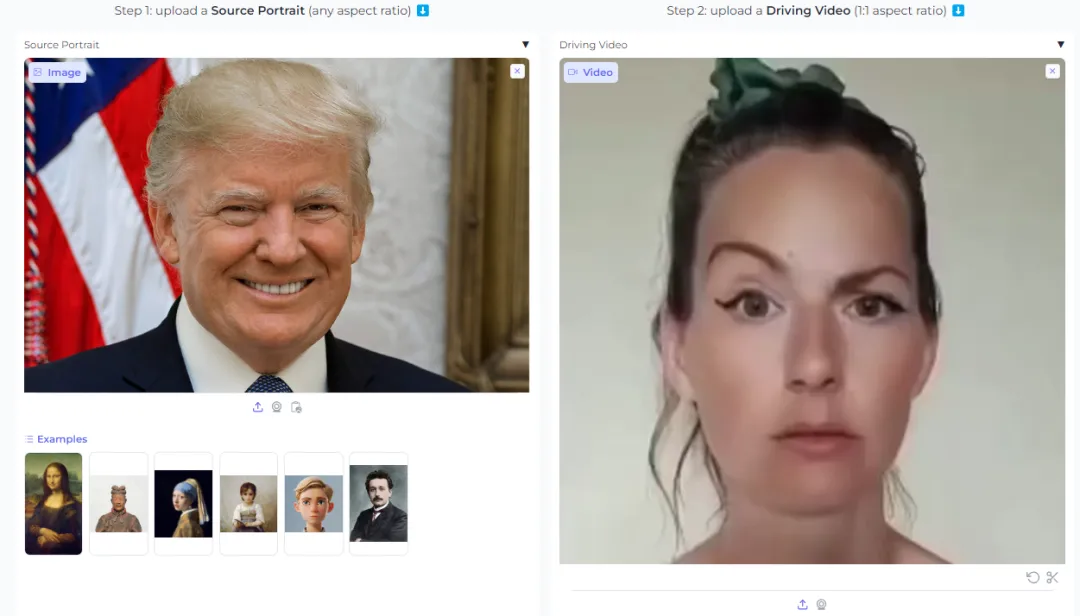
Uploaded①and②After that, you can click the [🚀Animate] button and wait for the production
exist ③ You will see the single image video that has been created.

exist ④ The official has thoughtfully made a comparison video for you.

If you scroll down, you will find another module.Retargeting
Retargeting is a tool for editing facial expressions in images individually
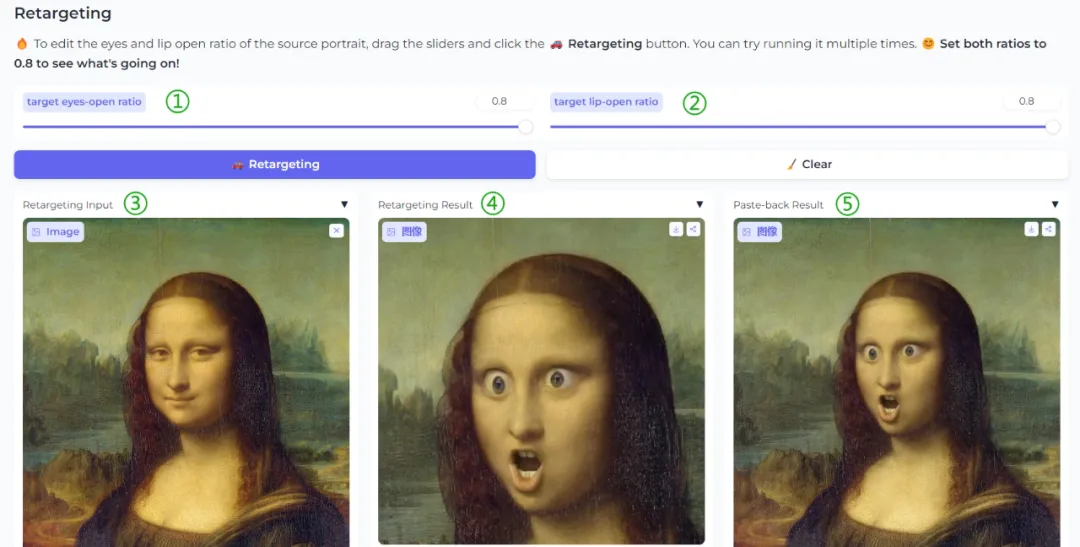
exist ① You can adjust the degree of eye opening from 0 to 0.8. 0.8 means eyes are fully open, and 0 means eyes are closed.
exist ② You can adjust the mouth opening range at 0-0.8.
exist ③ Upload the picture you want to adjust, and there is no limit on the picture ratio
exist ④ At this point, the processing result of a single face can be obtained
exist ⑤ The overall effect of the image after processing can be obtained
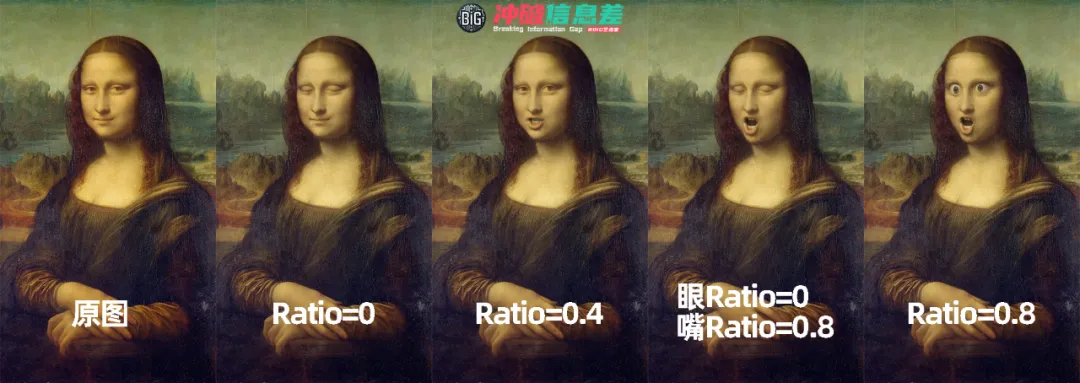
You can take a look at the comparison under different Ratios. The adjustment of parameters for eyes and mouth is very obvious, and it is very playable.
Method 2
Google Colab
This overseas expert directly put the code on Github into Google Colab, which is also an online operation.
I had never used Google Colab before, and after searching in vain, I went to Reddit and had a close conversation with a master (shamelessly asking for advice) and learned how to use LivePortrait on this Colab
Google Colab online experience link:
https://t.co/Kn10Aqxm7R
Select Google Colabadvantage:
- Videos can be made and referencedEqual durationVideos
- The generated video directly quotes the referenceVideo and Audio
Google Colabshortcoming:
- Slightly more complicated to operate
- The free version may be limited by Google GPU (if so, just come back the next day)
Google Colab LivePortrait Tutorial
You need to prepare a Google account before using Google Colab
1. Setup
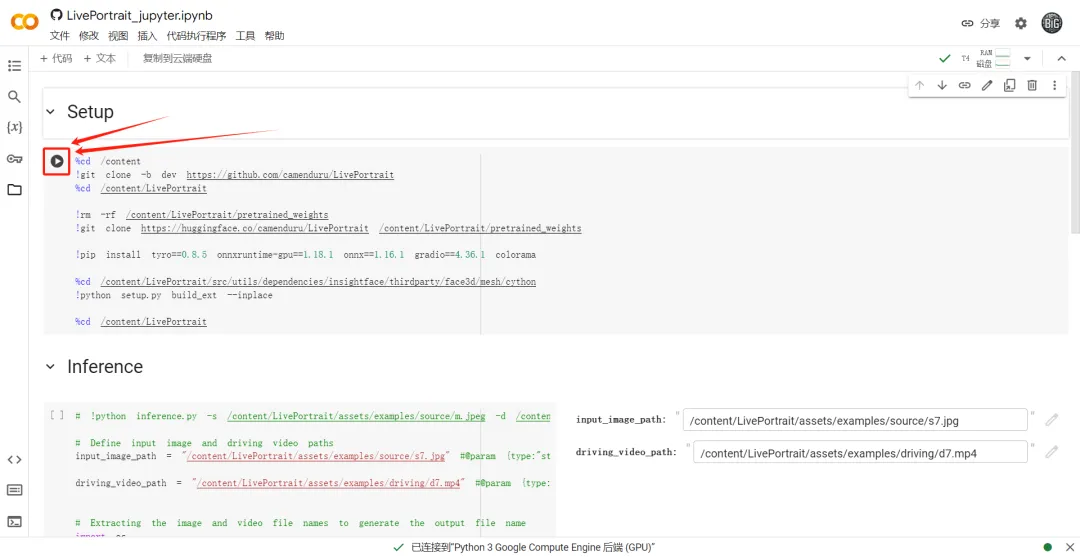
Don’t be afraid when you first enter the Colab page. It’s actually not complicated at all.
Directly click the [Run Button] marked in the red box above, and the following prompt will appear

Click [Run Anyway] and Colab will automatically run the code. You don’t need to worry about what happens and you don’t need to do anything. It will be displayed after it finishes running, as shown in the figure below.
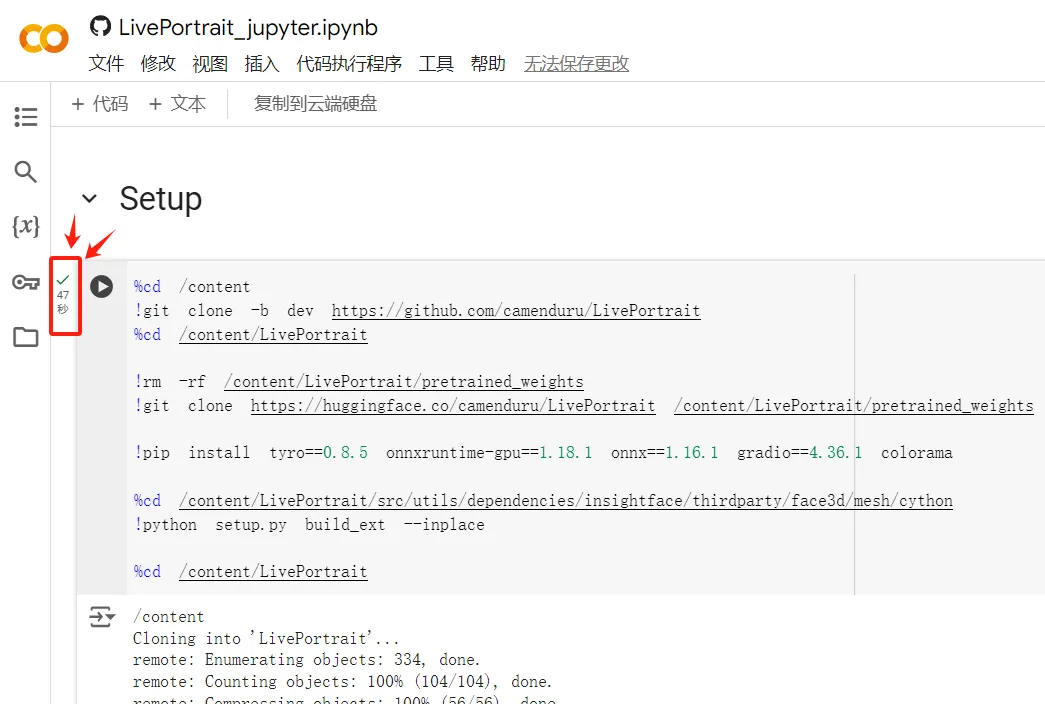
It will display "47 seconds" to complete. As long as your internet speed is normal, the first step of Setup will be completed within 1 minute.
2. Inference
The second step is how to upload pictures and videos, which is the most complicated part (actually not complicated, just be patient)
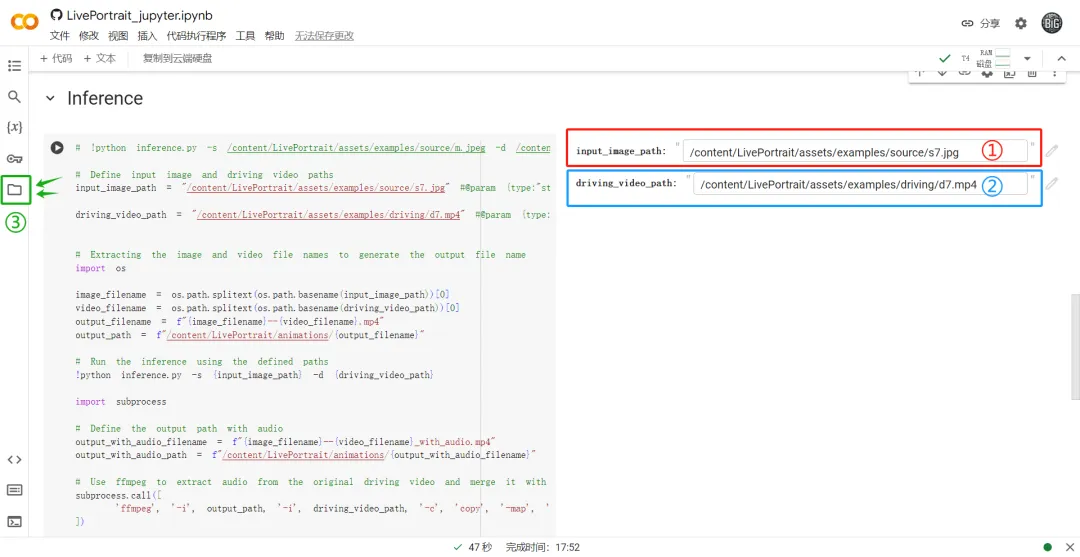
When we use Colab, because it is running online, we need to upload pictures and videos to Colab. Let's take a look at the overall operation interface:
exist ① Paste the image path
exist ② Paste the path of the reference action video
exist ③ You can upload files, pictures and videos at any size, with no limit on the ratio.
So how should the file be uploaded? Where should it be uploaded to? Please see the picture below👇
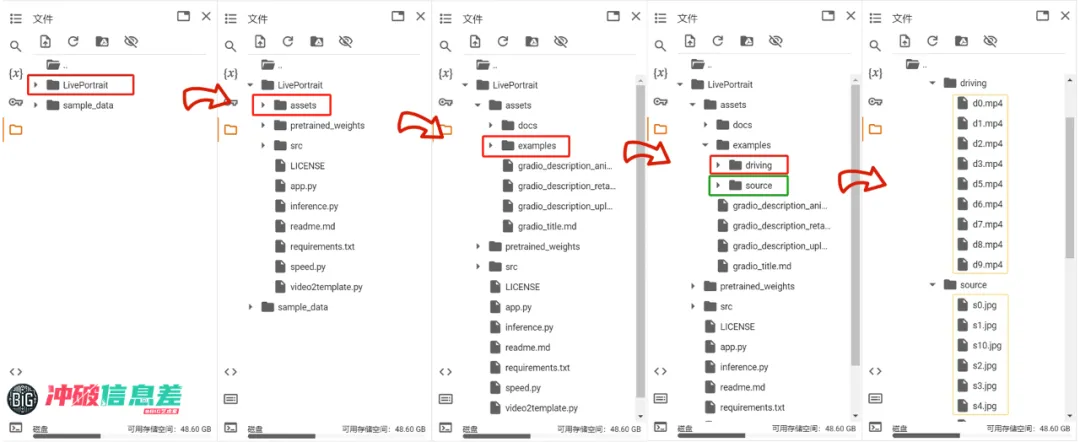
After clicking [Folder], search according to the following path
content--LivePortrait--assets--examples
You will see two folders【driving】and【source】
【driving】Folder, used to placevideo
[source] folder, used to placepicture
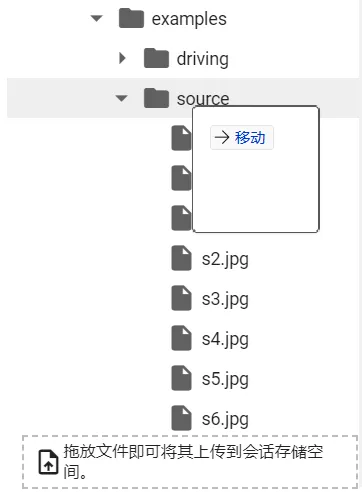
Direct drag and dropYou can upload files, which is very convenient.
After uploading the video/picture, we needcopyMaterialpath
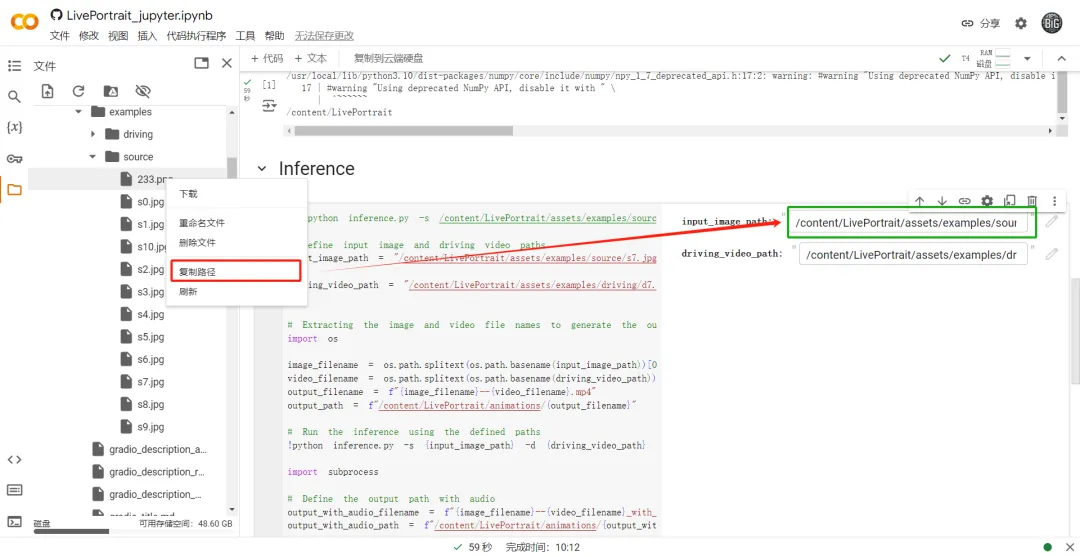
Select the material directly, then right-click and click【Copy path】, paste the material path into the corresponding box.
The master has put a lot of materials provided by the official Github in these two folders, and everyone can play with them directly.
After placing the material path, click the [Run button] corresponding to Inference and wait for AI calculation.
The running time of the Inference step is calculated based on the length of the video you provide. The longer the reference video is, the longer it will run.
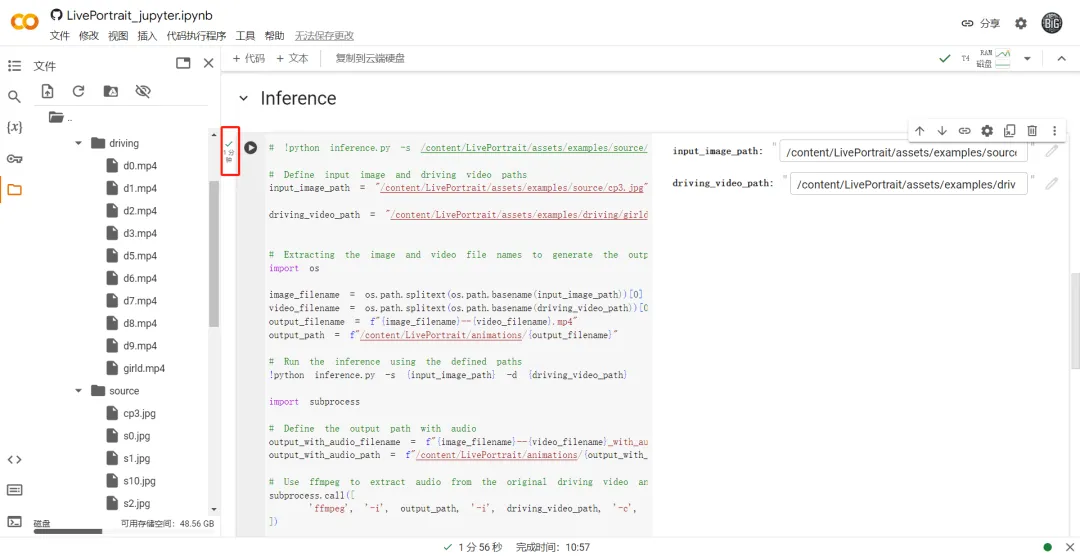
The reference video above is 11 seconds long and has a running time of 1 minute, which is acceptable.
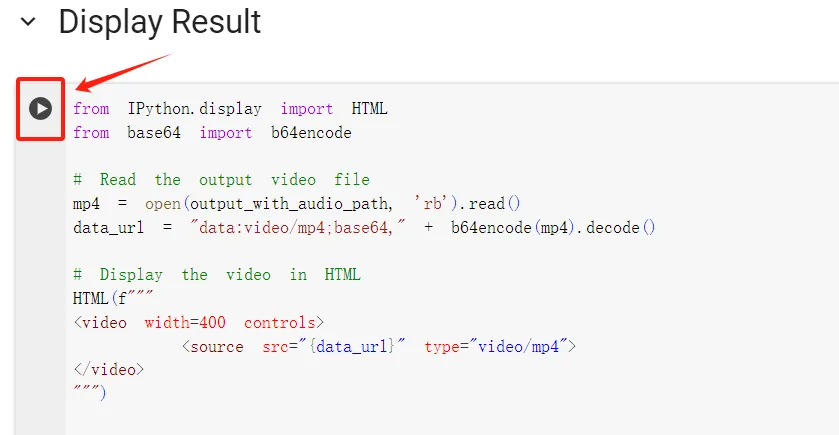
3. Display Result
After the second step is completed, no video will be displayed. You need to click the [Run button] in the third step Display Result.
According to my tests, a 30-second reference video usually takes about 2 to 4 minutes to run. The usage of the cloud GPU and your own network speed at the time will also affect the running time.
I selected the same reference video (30 seconds) in Colab. Colab was able to generate the entire 30 seconds (with background sound), while Huggingface could only generate up to 9 seconds (without background sound).
Regarding the disadvantage mentioned above that "the free version may be limited by Google GPU", I personally tried it for more than a week and only encountered GPU limitations once, so you don’t need to worry too much, Colab is still very stable.
Key Tips
Currently, the online LivePortrait only supports human faces, which means that if you upload a portrait of an anthropomorphic animal, an error will be reported.
If you want to deploy LivePortrait locally yourself, you can go to the official Github homepage
Official Github homepage link:
https://github.com/KwaiVGI/LivePortrait
The above are two methods that allow you to use the LivePortrait feature of Keling AI video without waiting for Keling's review. My suggestion is to use the two together (they are both free anyway)