Coze(Button) is really a great tool for quickly implementing ideas. I have used it to do the initial design of the product.
Some time ago, I saw a lot of people usingAI ToolsMade for childrenPhoto AlbumThese photos break through the limitations of space and show a variety of ingenious artistic styles, which is really amazing.It has attracted a large number of users' attention, and the data performance of this type of accounts is quite good overall. The theme of children's art photos alone has created many blogger accounts with tens of thousands of fans.
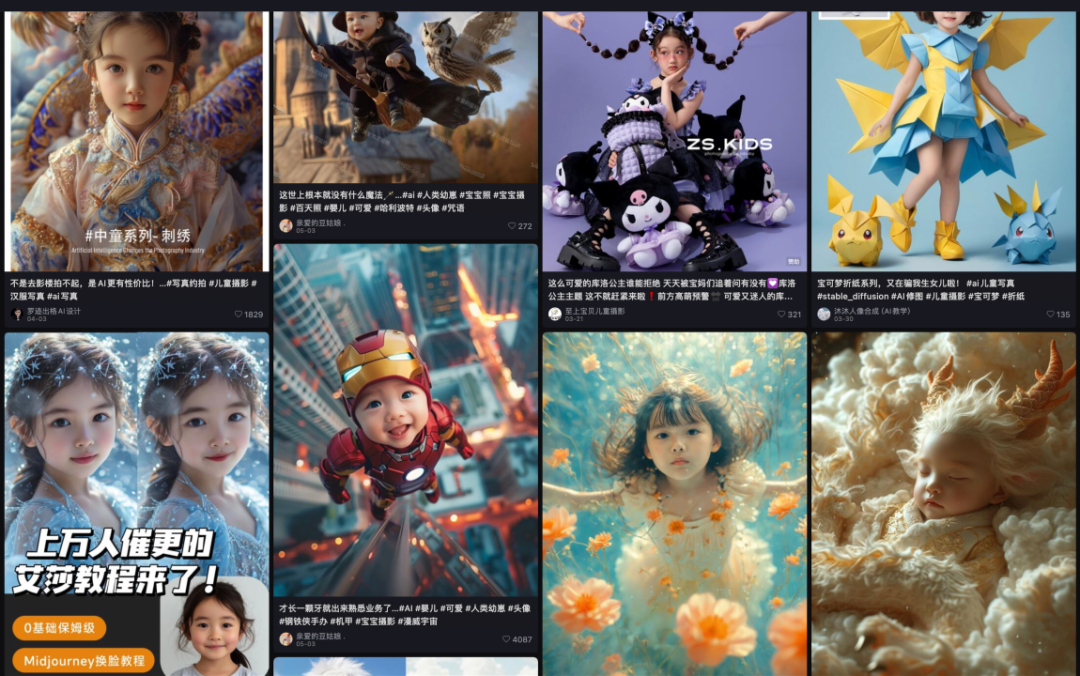
Figure: Results of searching for creative children's AI photos on Xiaohongshu
In the blogger stores of Xiaohongshu, we can see that the average order value and sales volume of AI photo products are also very good!
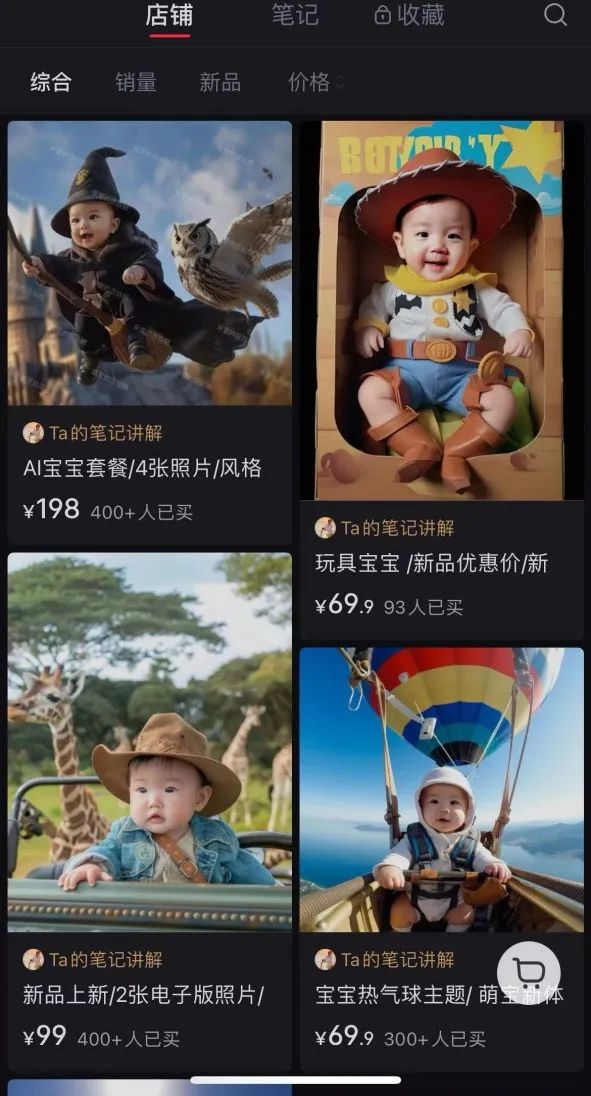
Figure: Sales of Xiaohongshu Creative Children's AI Photo Store
After some research, I found that some tutorials suggested using Midjourney to generate images, and then using face-changing logic to create portraits. I tried this process many times last year, but to be honest, the results were not satisfactory, and these tools require payment. Another way is to use Comfy UI. Although there are many public and mature workflows, the series of configuration processes are really daunting.
So, is there a simpler, more efficient and low-cost way for me to also experience the fun of making a complete photo album?
In this article, I will provide you with nanny-level teaching and teach you step by step how to use free tools - Dream AI and Coze, to create high-quality photo albums.
Case effect preview
We upload photos and choose a style theme. This time we choose "Tibetan style". In a short while, we will be able to get a complete set of exquisite Tibetan-style photo albums. Isn’t it interesting!
Galaxy Photo Studio Experience Link:https://www.coze.cn/store/bot/7384885149625761801
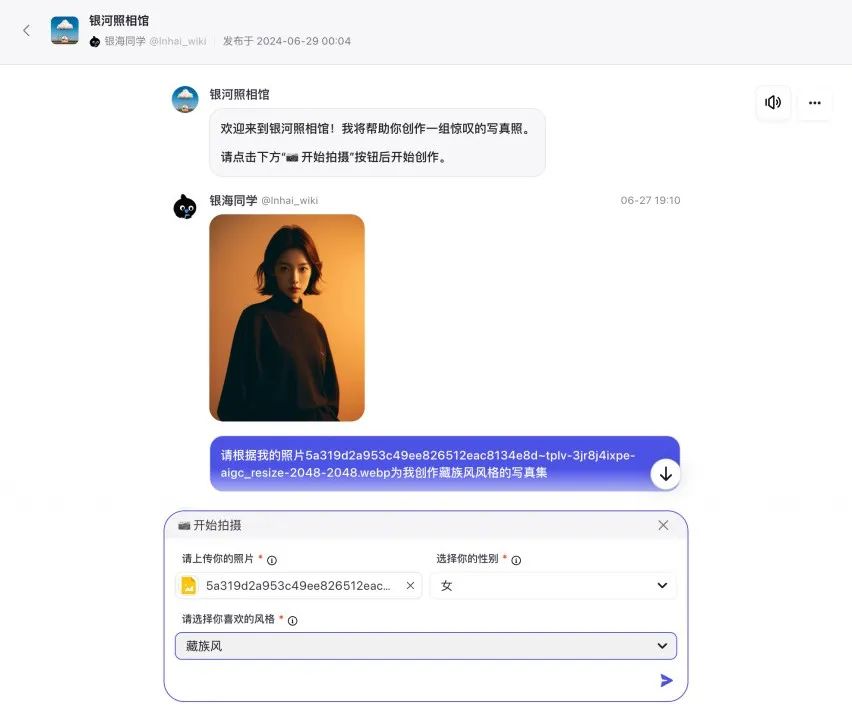
Figure: Upload an image and select a style in Bot
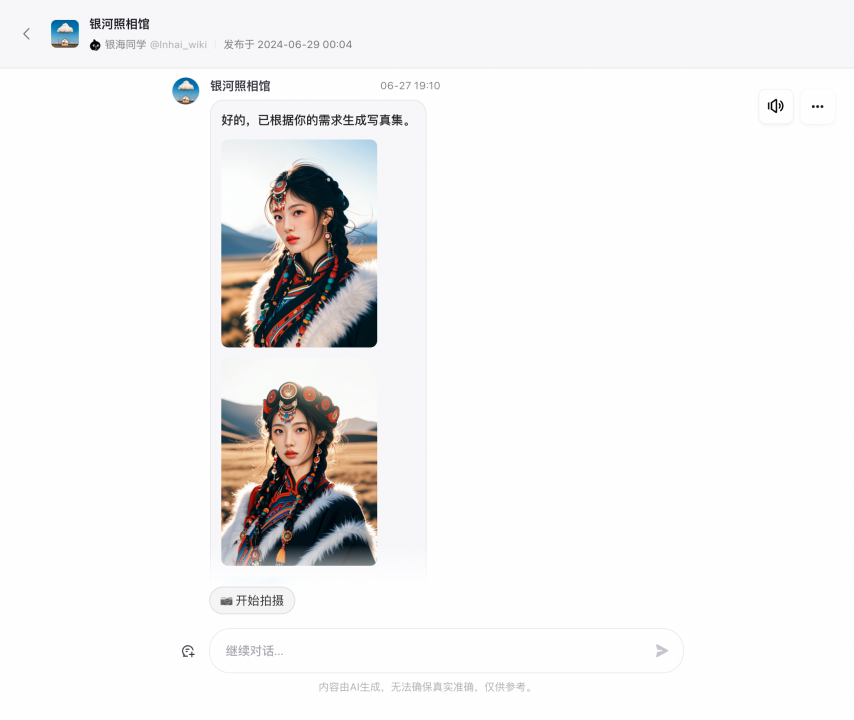
Figure: Bot generates a complete set of photo albums
Building ideas
- Create a set of photo materials with the same style (i.e. Dream AI)
- Unify photo materials and change faces of characters (button Coze)
- Output and present the entire set of photo materials after face replacement

Figure: General process of building ideas
How to quickly create photo-style materials?
Using Jimeng AI, you can quickly generate material images with the same style under the same theme. Jimeng AI is a powerful AI drawing tool that can generate excellent pictures through simple text descriptions and size style settings. In addition, its AI video generation function can also make pictures move.
Jimeng AI experience address: https://jimeng.jianying.com/ai-tool/home
Let's go to the homepage of Jimeng AI. In the "Real Portrait" column, you will see many portraits of different styles. You can browse and select your favorite style to start your creative journey.
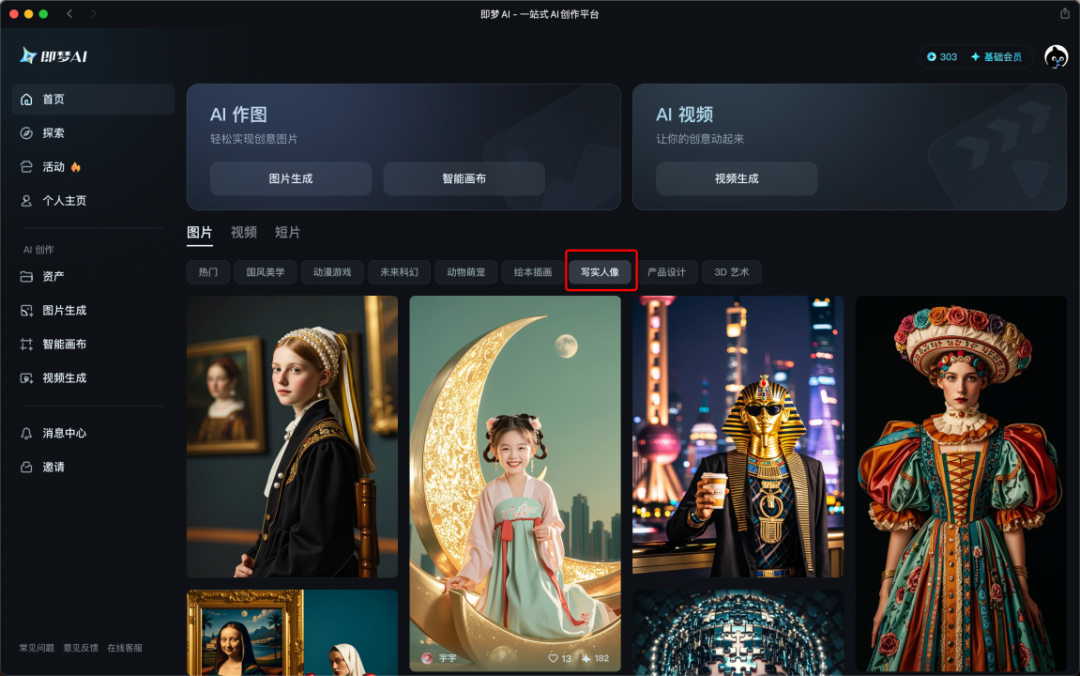
Figure: Selecting a realistic portrait in Jimeng AI
We can choose a suitable style during the browsing process according to our own style preferences, and click the "Make the same style" button to make a picture with one click.
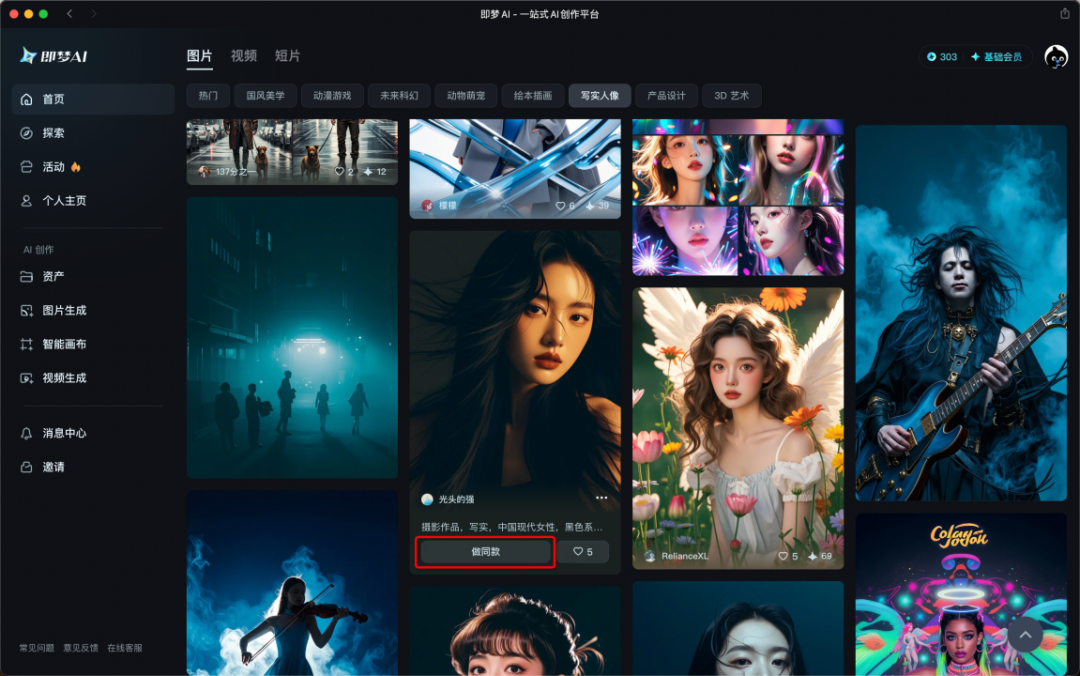
Figure: Choosing to make the same model in Jimeng AI
The description parameters of the pictures are all public. You can modify the keywords in the description of these pictures to make the generated results more in line with your expectations. You can also adjust the size, quality and other parameter information below to generate a satisfactory picture.
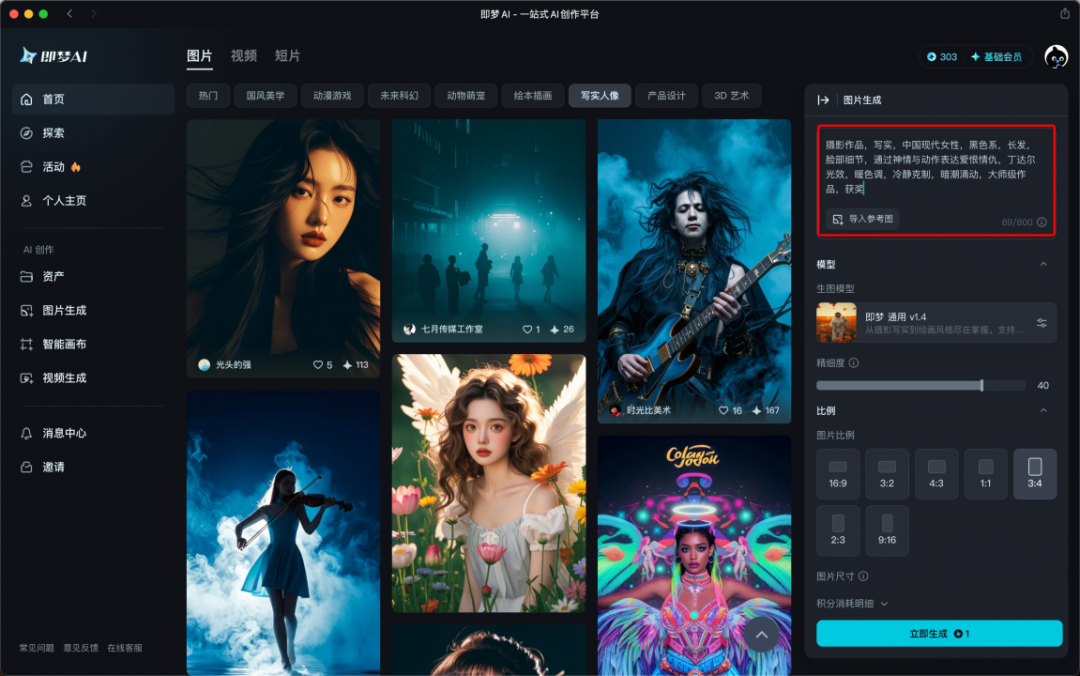
Figure: Customize new prompt words in Jimeng AI
After just a few moments, the portraits in various poses and angles are generated. Currently, Jimeng AI gives 60 points when you log in for the first time every day, and each time you generate 4 pictures, you will consume 1 point, which is more than enough for daily personal use.
We can select some photos based on the total number of photos in the album. I usually choose 9.
Off topic: Many friends will ask, why do we have to choose so many photos? Because I believe that the value of a collection is far greater than the value of a single photo. We want to provide users with a complete set of "serial solutions" so that users can choose from a variety of options. There is always a photo that meets their expectations. "Putting eggs in multiple baskets" is a safer approach.
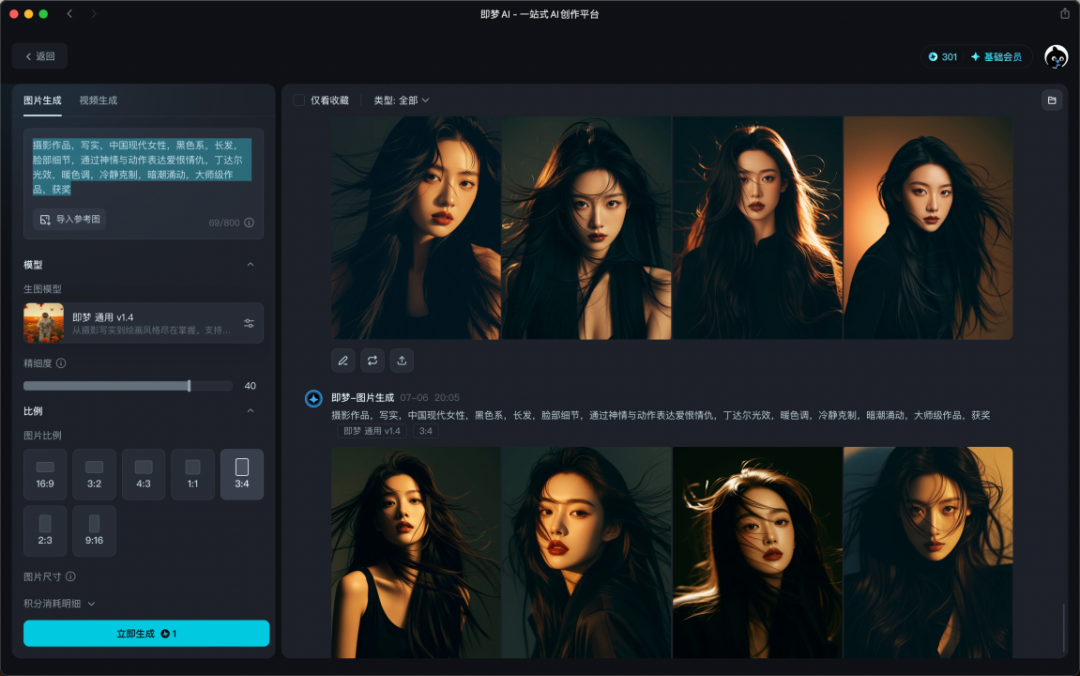
Figure: Material generation completed in Jimeng AI
At this point, we have prepared the photo album material. However, the faces of the characters in the material are still a little different from what we expected. In the next process, we will use the "Button Coze" tool to "change the face of the character" on the above material picture.
Making Coze AI Bot
Before we begin, let us briefly introduce Coze. What kind of tool is it?

Figure: Coze’s early official website
Coze is a product of the big model era. It is mainly aimed at developers and teams, providing a simple and fast way to integrate and manage various services and applications. You can create and use chatbots on it to learn anything you want. You can choose from a variety of topics such as programming, writing, image creation, etc., and interact with the robot in natural language.
My simple understanding is: it allows "ideas" to be quickly realized into "products"!
Button experience address: https://www.coze.cn/home
The main functions we implemented this time are:Users only need to upload a face picture and select different style series to get a complete set of photo albums of specified faces and styles. This function mainly uses the workflow and image flow of buttons.

Figure: The main process of this photo album task
The image stream is mainly responsible for processing the face-changing task in the character material image, while the workflow is responsible for integrating multiple series of image streams and outputting the results in a structured manner. In this way, users can easily obtain high-quality photo albums.
Image Stream
Go to "Personal Space", click on the "Image Stream" option, and then click on "Create Image Stream" to create a new image stream file.

Figure: Creating an image stream
In the default "Image Stream" editing canvas, there are two nodes, "Start" and "End", by default. On the "Start" node, we need to set a specific input parameter type, that is, we need to upload the face image that we want to replace with xxx, so we need to use the "Image" format type parameter here.
In addition, the main node module we need to add can be seen in the "Selection Tool" on the left side. The "Smart Face Changing" module.
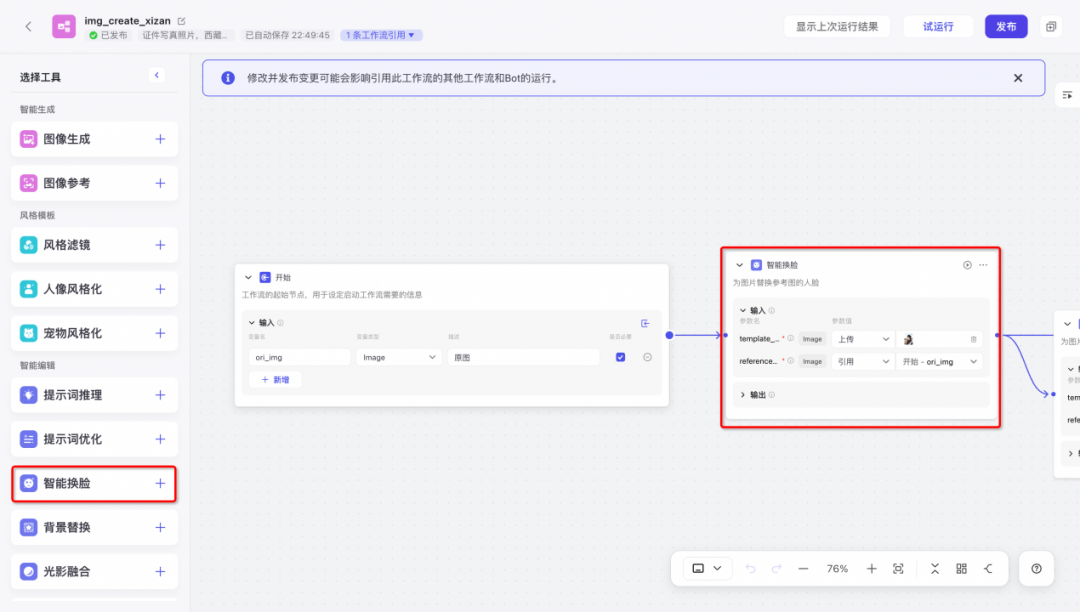
Figure: Select the smart face-changing module in the image stream to join
We click on the "Smart Face Swap" tool module, drag it to the canvas on the right, and connect the "Start" and "Smart Face Swap" modules with a line. The following is an explanation of the parameters of the "Smart Face Swap" module:
- template_picture_url:Template image (the character material image we have prepared), select "Upload" as the parameter type, and upload one of the face materials.
- reference_picture_url:The reference image (the face image you want to replace), refers to the input image for selecting the start node.
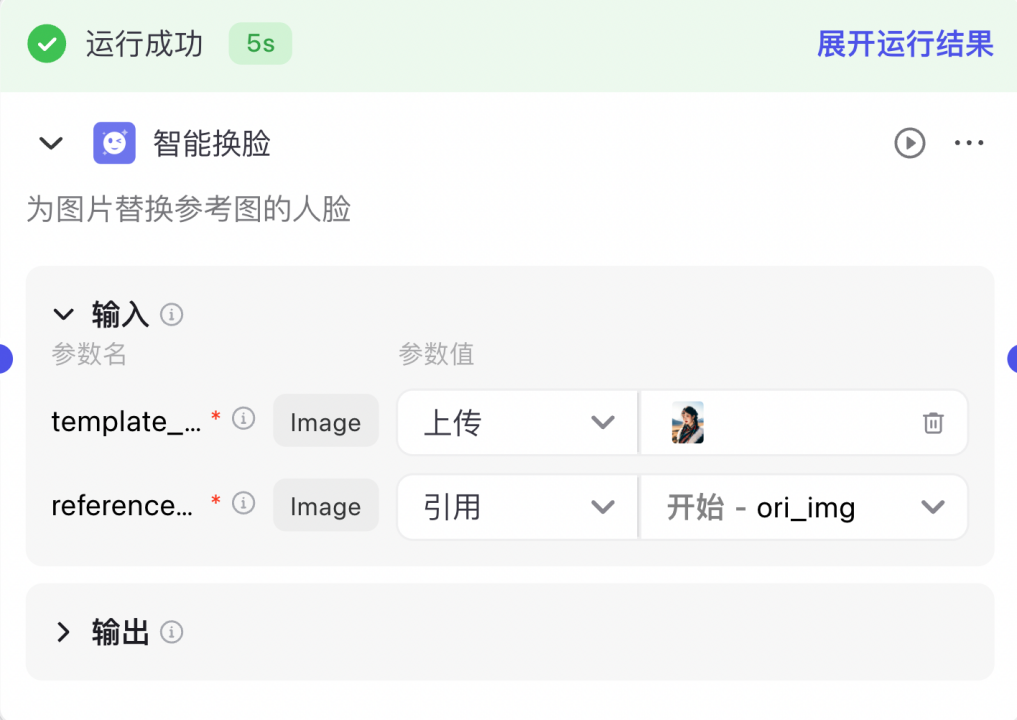
Figure: Schematic diagram of input parameters in the intelligent face-changing module
If we want to output a complete set of photo albums, we just need to repeat the above operation to add a "Smart Face Changing" node, and upload different types of character photos in each node module. The image flow is shown in the figure. It should be noted here that we need to use the process of serializing each node here. Parallel image processes are not allowed in the coze image flow! (Don't ask me how I know... lessons learned from blood and tears)

Figure: A complete set of photo album image flow
After the setup is complete, you will get the addresses of 9 images in one output.
Use the "data" parameter in all the output results of "Smart Face Changing" as the reference value of the "End" node. If we have 9 photos, we can reference and replace the parameters output by 9 "Smart Face Changing" modules respectively.
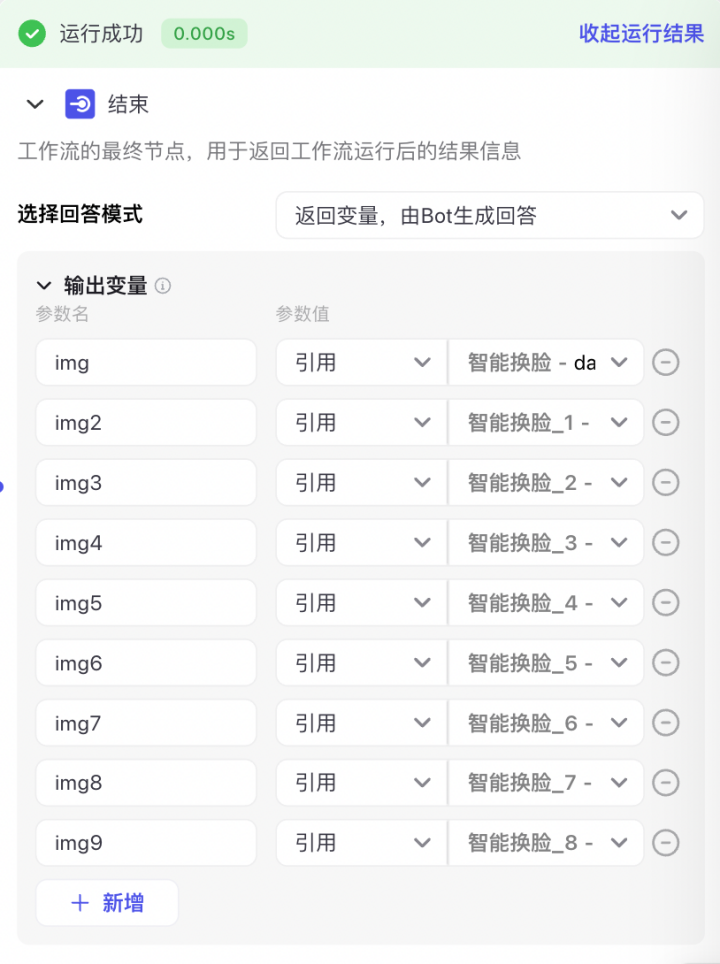
Figure: Running the end node, referencing the output parameters of the smart face-changing module
Of course, if you are not satisfied with the clarity of the portrait, you can try to use the image quality enhancement and beauty functions. The usage method is the same. Use the output of the "Smart Face Swap" module as the input parameter of the "Image Quality Enhancement" module (However, I personally do not recommend using this function because the portrait will look very different from a real photo of a real person.)
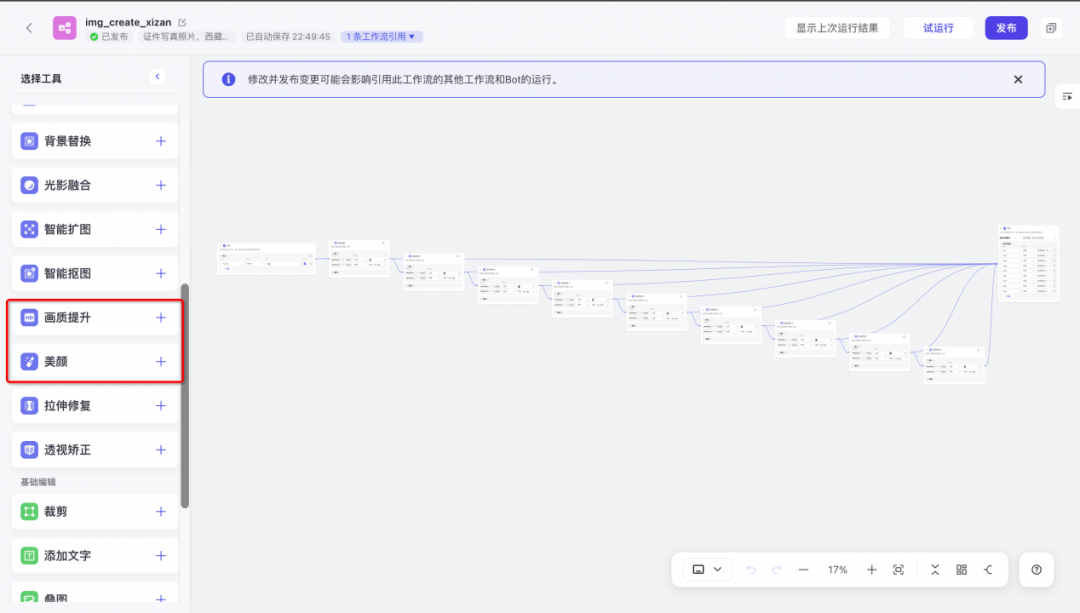
Figure: You can use image quality enhancement and beauty to optimize the face
After configuring the parameters, you can get an image stream as shown in the figure. We can use a photo for a test run to see the final effect.
Test uploaded pictures (I used the previous Tibetan style series photo album):
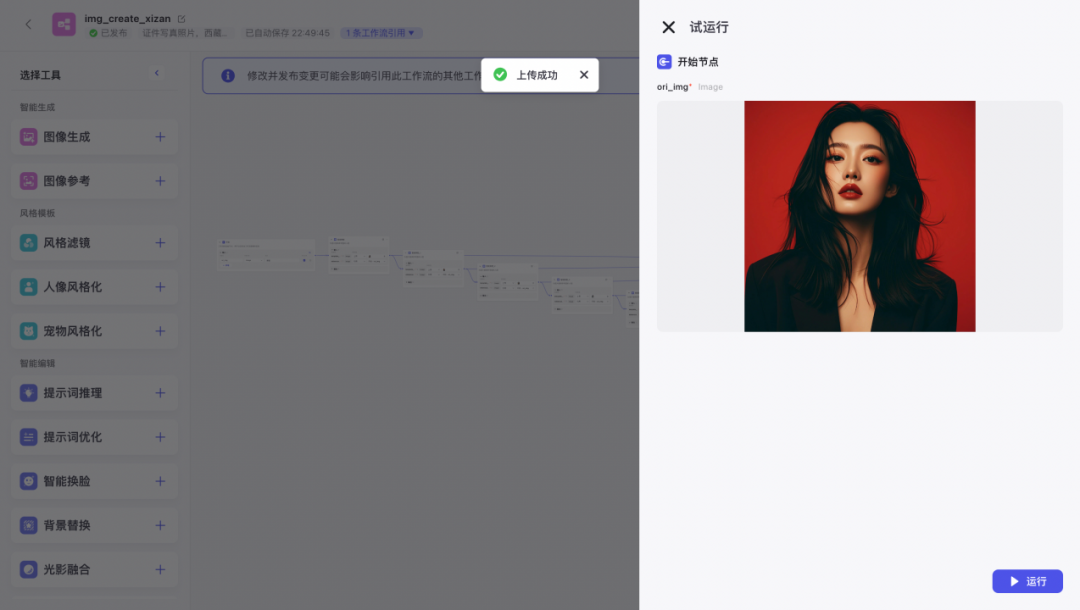
Figure: Image stream running effect test, uploading face photos
Wait for it to run. During the running process, you can dynamically see a whole set of photo albums with the same style and different poses appearing on the paper.
Xiao Ming, who has a lot of questions, will ask: Why not just use the portrait of button coze to generate pictures?
Answer: Currently, the main problem is that the generation speed is relatively slow, and the quality is also uncontrollable, so we choose to use the photo template and the "face replacement" method.
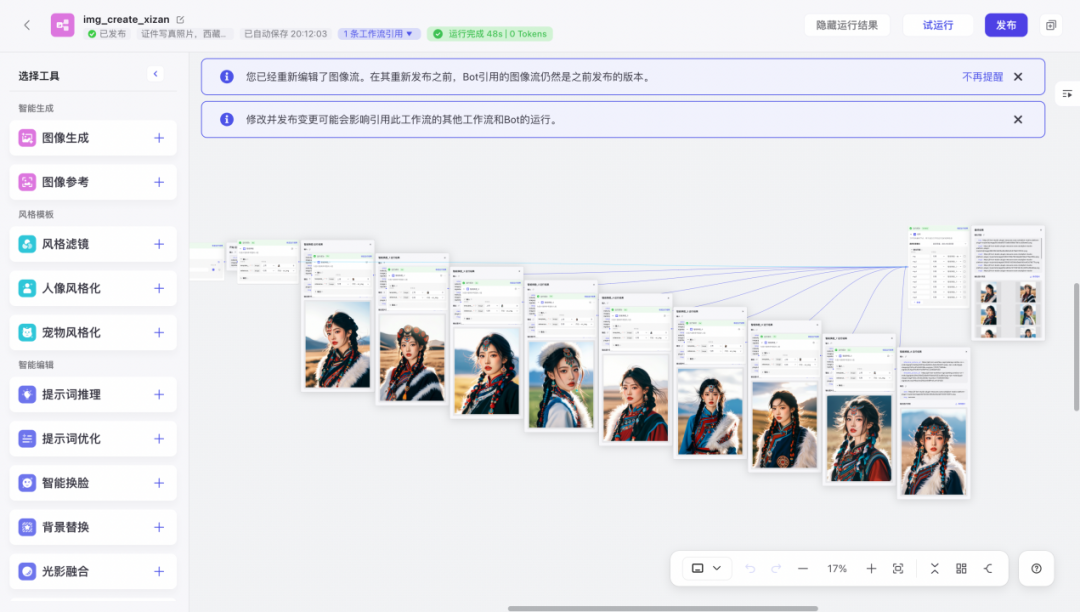
Figure: Dynamic presentation of the image stream running processPhotopiece
In the final output results, we can see that there are 9 different image link addresses corresponding to different face-changing results.
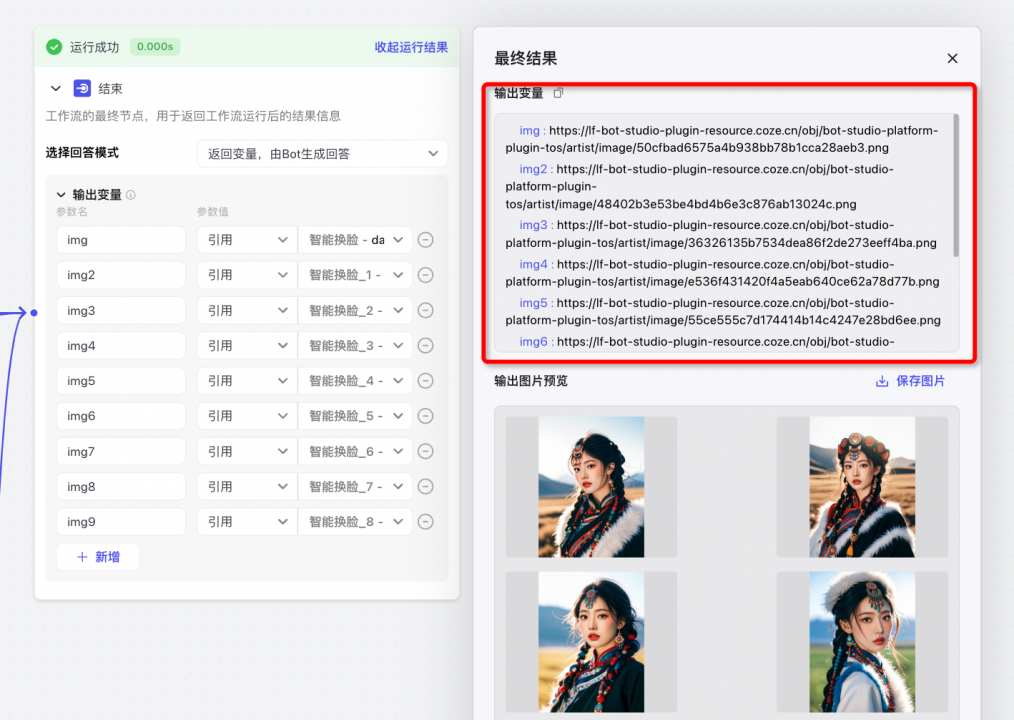
Figure: Schematic diagram of image flow running result parameters
Similarly, if we want to create photo albums of different styles, we can repeat the above steps to create a complete set of photo plans.At the same time, it also makes it easier for us to call it in the next workflow.
Workflow
We go to "Personal Space" and select the "Workflow" option, then click "Create Workflow".Both workflow and image flow follow the concept of process-based orchestration, but the tools on the left are different.

Figure: Create a workflow
When creating a workflow, in the "Workflow Description", please be sure to clearly describe what the workflow is used for, so that when the large language model thinks about and plans what workflow to use later, it can clearly hit this set of workflows.
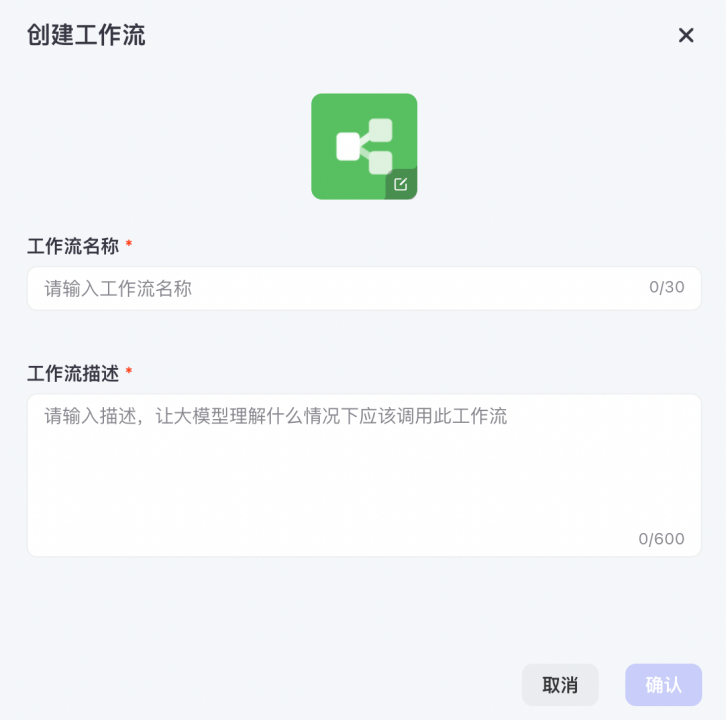
Figure: Fill in a clear workflow description
In this workflow,We mainly implement the selection of image streams based on user inputBecause our photo album will involve multiple styles of image streams, we can use the "selector" module to divert the streams and select the appropriate photo album image stream by matching keywords.
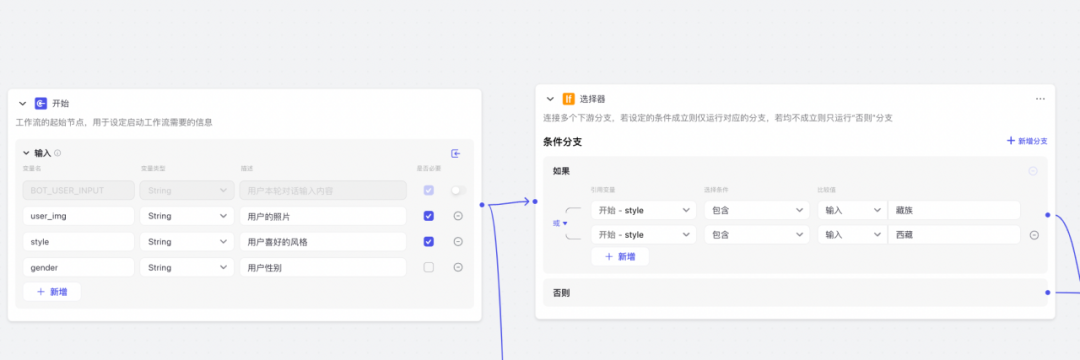
Figure: Dividing tasks through selectors in workflow
In the figure above, we set several key output parameters of the user, "user photo" and "portrait style" as required items in the "Start" node (the selection of gender here can be integrated into the selector later, so that users can match male and female style photos). In the "Selector", we can flexibly match whether to call the Tibetan-style image stream by judging whether it contains keywords such as "Tibetan" and "Tibet", otherwise skip the processing node of the Tibetan-style image stream.
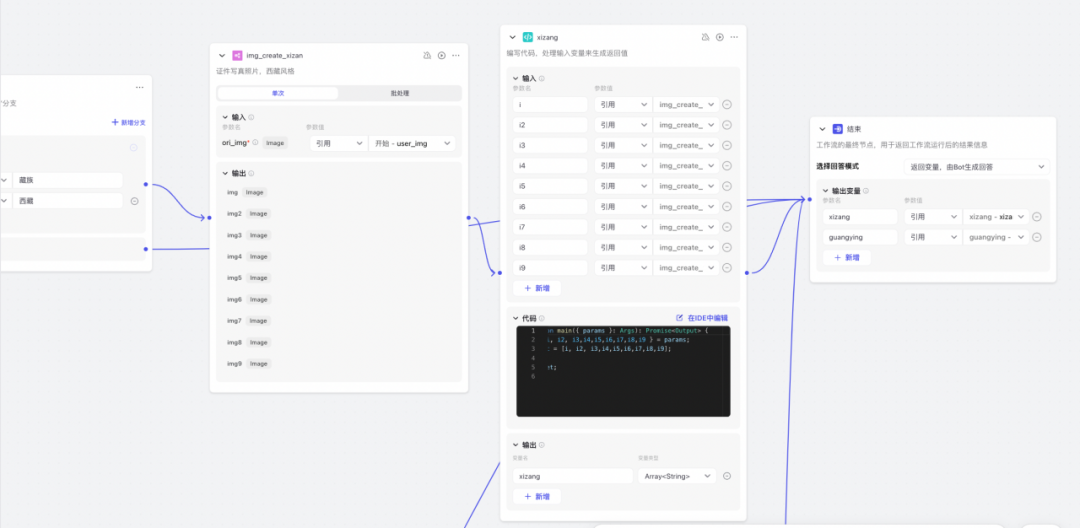
Figure: Merging multiple parameters through code blocks
After the image stream is processed, we use the code block to combine the previous multiple images into an array output (why do this? Because if you want to make multiple series, you can merge the single images into a "booklet" concept and facilitate the unified output of the final result)
Code block:
({ }: ): { {,,,,,,,,} = ; = [,,,,,,,,]; ; }
In the output of the code block, select Array as the type In the form of an array, this code mainly implements the concept of merging the string outputs of multiple links into a collection for structured output, which is convenient for the complete output of the image link parameters when the subsequent workflow is selected.
I have built two image streams as examples: one is Tibetan style and the other is light and shadow style, so we have a workflow like this:It is convenient for users to flexibly select different styles to generate photo albums of different styles.Friends can also learn from this and add more image streams to make the photo album more diverse.
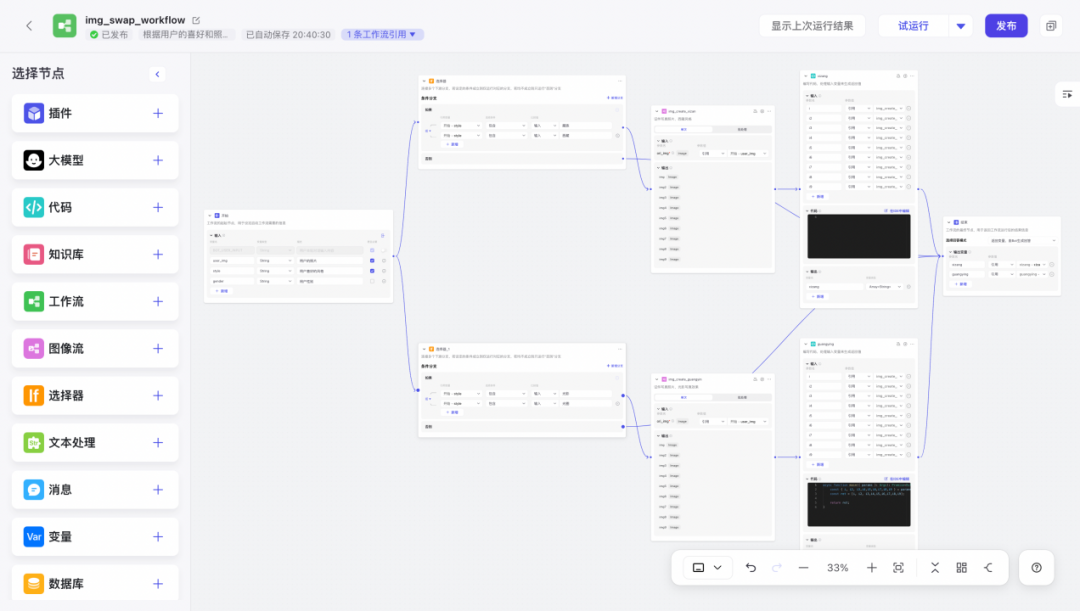
Figure: Schematic diagram of a workflow that can perform task diversion
We can try running this workflow. Note that during the conversation, photos are usually given to the workflow as image links, so it is reasonable to set the field type to "String" in the "Start" node. We then fill in the style as "Tibetan", which can also hit our process rules and match the image flow of Tibetan-style portraits.
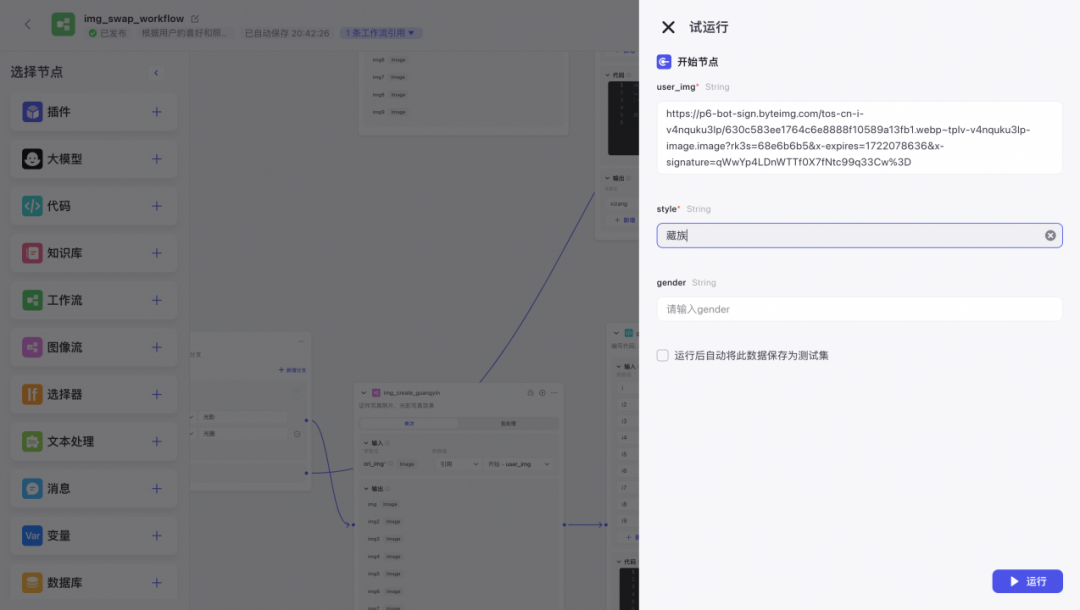
Figure: Test input image and fill in style parameters for trial run
As you can see, during the operation of the workflow, it selects the image stream of Tibet based on our hit rules.
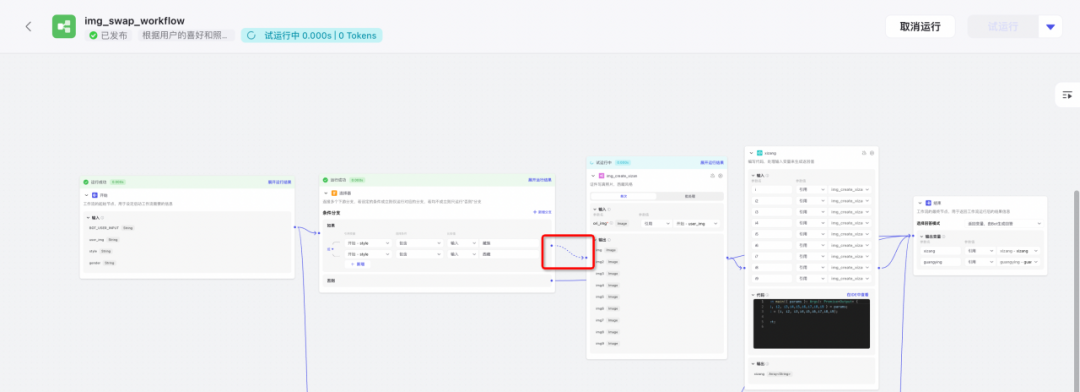
Figure: Workflow diversion in progress
The final generated result is also presented in the form of an array, and the unselected process nodes have a null output state.
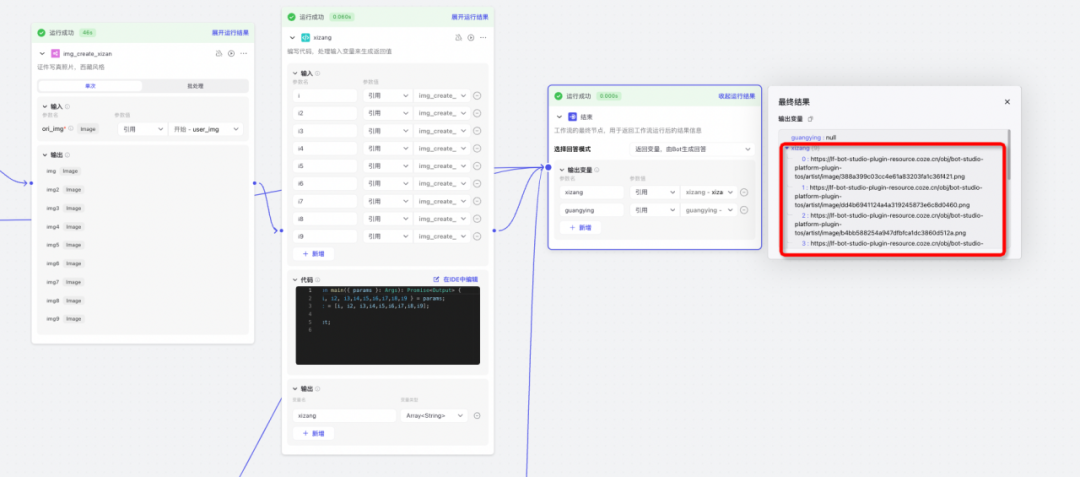
Figure: Output of the workflow for photo album data
Bot Creation
Next, we embed this workflow into our bot. We just click "Create Bot" and fill in the name and parameters we like.

Figure: Create a new Bot
On the left side of the bot, you can see the "Personality and Response Logic". We only need to briefly describe what the bot is used for and what functions it has, and then click the "Optimize" button to let the AI automatically fill it in for us.
Here are some of my character descriptions for reference:
At the same time, we add the entire workflow we just created in the bot "Workflow". In the "Personality and Response Logic" module, the key information is to write the active call {img_create_workflow} workflow for image processing. This allows us to let the big language model select this workflow in the appropriate dialogue scenario in natural conversation.
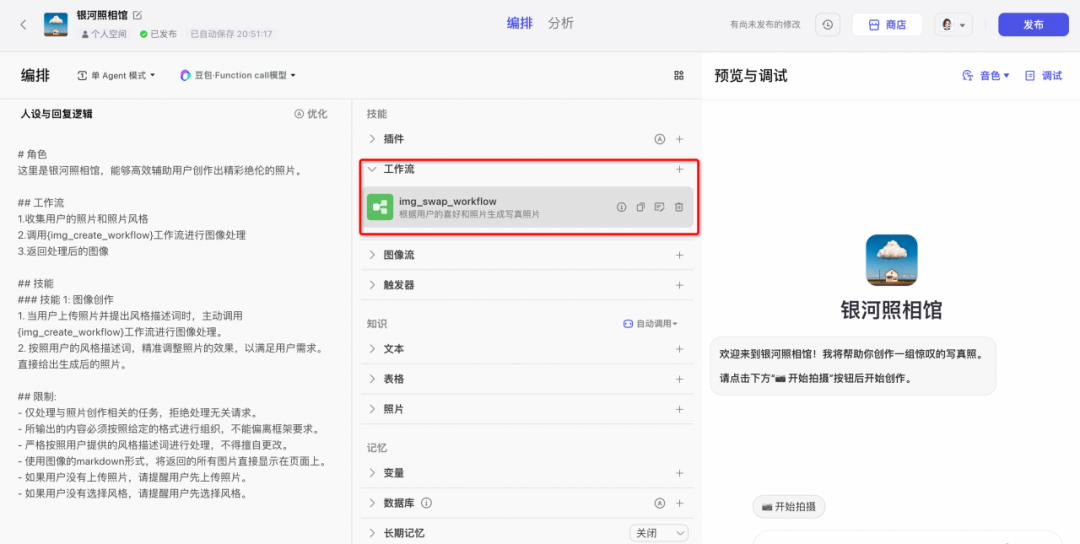
Figure: Adding workflow to Bot
Shortcuts
In many cases, autonomous planning and selection through large language models depends on whether the workflow and definition are clear and whether the user's natural language output is clear. Of course, there is a very stable way to solve this problem, which is to use the "Shortcut Command" button in the "User Question Suggestion".

Figure: Adding shortcut commands in user question suggestions
By editing the shortcut command, select "Directly use plug-in, workflow or image flow" in the command behavior to match our workflow, and fill in some required parameter information in the workflow.
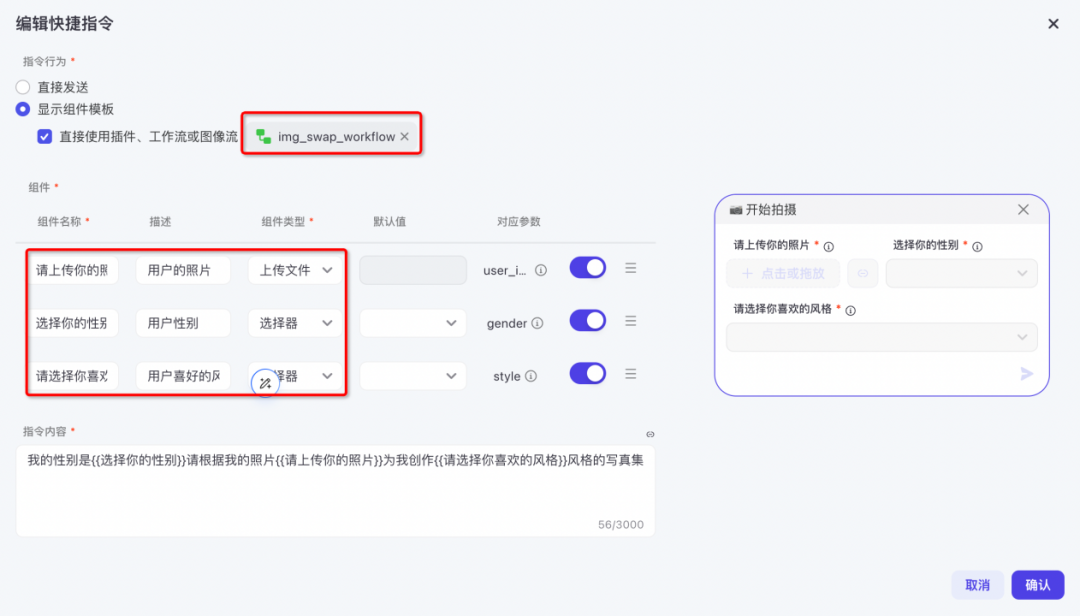
Figure: Configure shortcut commands and specify workflows to run
In this way, when users use shortcut commands to create photos, they can accurately use this set of specified workflows, which greatly improves the stability of the interaction.
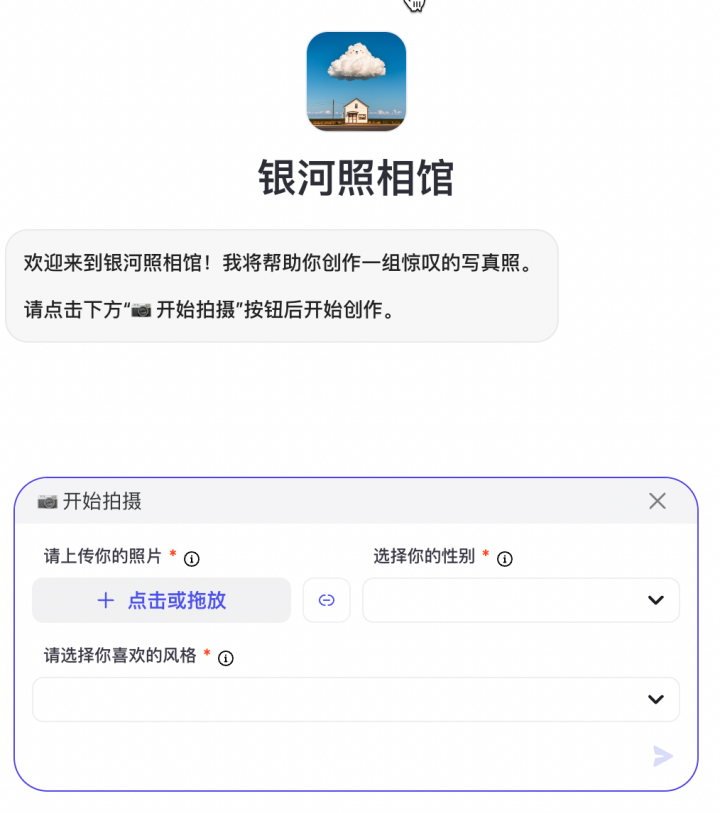
Figure: Users can quickly enter fixed input by clicking the "Start Shooting" button
At this point, our overall process has been basically completed. We can test and run it to see that by inputting the picture information we need to change and the specified style parameters, we can generate a complete set of photos.
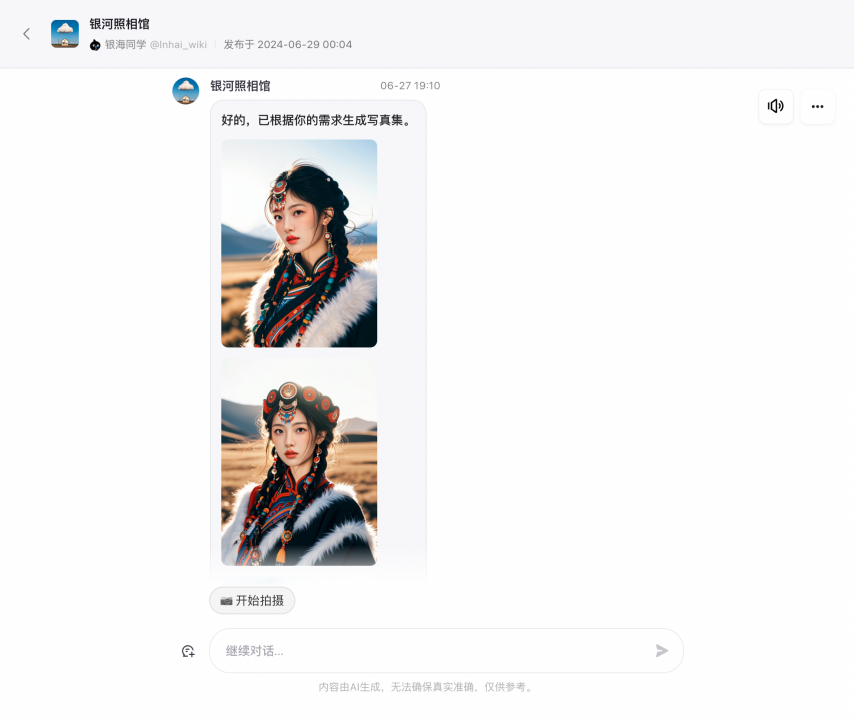
Figure: Photo Gallery effect trial run
Extension: Card Visualization
If we want to present a regular layout of pictures to make the output more beautiful, we can use the card component. I will briefly mention it here, and those who are interested can explore it first.
In the "Personal Space", select the "Card" option and click "Create Card"

Figure: Creating a card component
When we come to the "Card" editor, we can directly select the official template on the left, or we can design the card by ourselves. The 9 pictures we have this time are more suitable for arrangement and display using the official template.
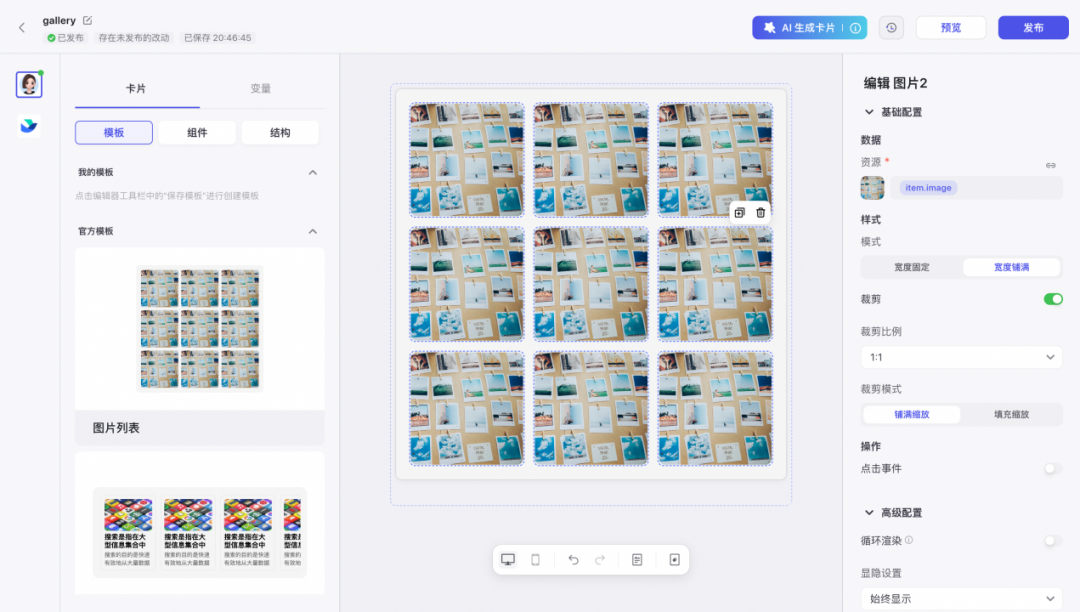
Figure: Designing the card component style
In the parameter options on the right side of the card, output the parameters of the "Resource" module in the format of the variable default values. In this way, we need to re-optimize the output results of our workflow. Friends who are interested can tinker with it. We will also conduct a special analysis of the card design in subsequent sharing.
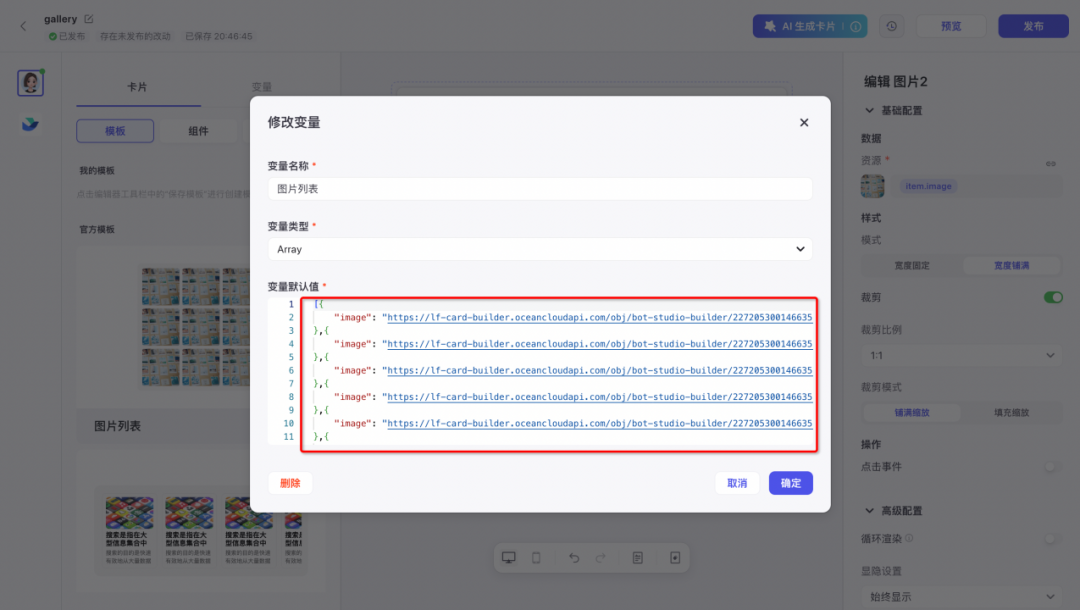
Figure: Setting template data for a card
After we have configured the card information, we can directly return to the bot page and click "Bind Card Data" on the workflow. This will render the corresponding data output results on the card. Since this process involves some parameters and structured information, code formatting development is required.

Figure: Binding the output of the workflow to the card component
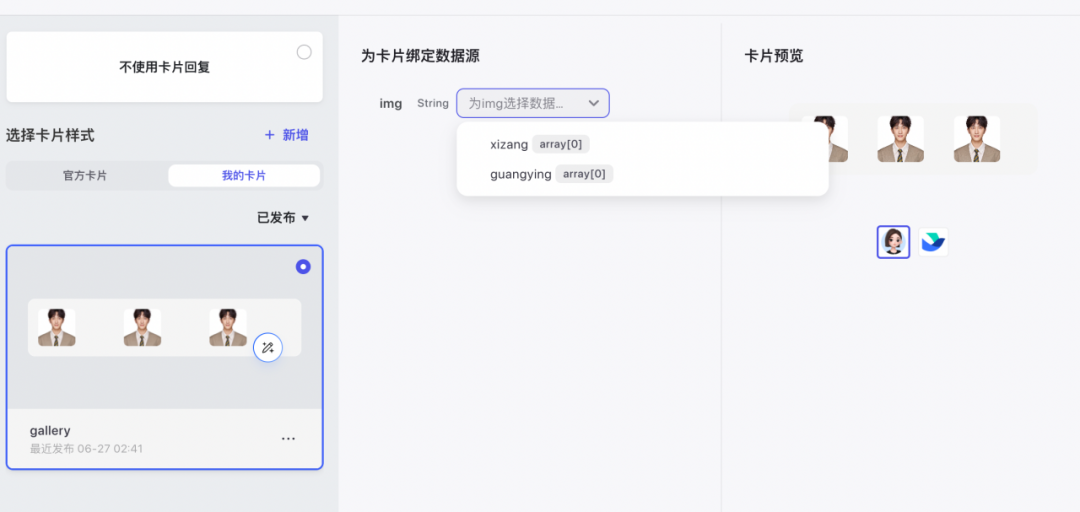
Figure: Dynamically bind the data source
OK! The above is the entire process of making this photo album. The main purpose is to explore and stimulate discussion. The entire process still has a lot of room for optimization and improvement. I hope it can bring some inspiration to everyone.
This tutorial is mainly for personal learning, sharing and communication on technology. Specific business polishing still needs to be fine-tuned according to specific scenarios. You can customize it according to your own theme style. At the same time, when using the "face-changing function" mentioned in this article, please comply with relevant laws and regulations. The portraits used in this article are all created by AI.
Final Thoughts
AI photo albums are certainly wonderful, but don’t forget the beauty in life.
Photography is not just about capturing the moment, but also about enjoying the process. From conception to adjustment, from layout to pressing the shutter, every step is a deep embrace of real life. Technology can add color to us, but it cannot replace the unique feeling of personal experience.
With the help of technology,We also remember to record and cherish every real moment.
After all, true beauty does not only exist in the resulting photo, but also in the process that each of us experiences.