Recently, I spent a week debugging and solving problems encountered during the installation process, and finally completed the startup of stable-diffusion-webui and successfully generated pictures.
I'll make a note here and share it with everyone, hoping it can help you avoid some pitfalls.
Next, let's learn stable-difffusion-webui together.
Preliminary preparation
Hardware
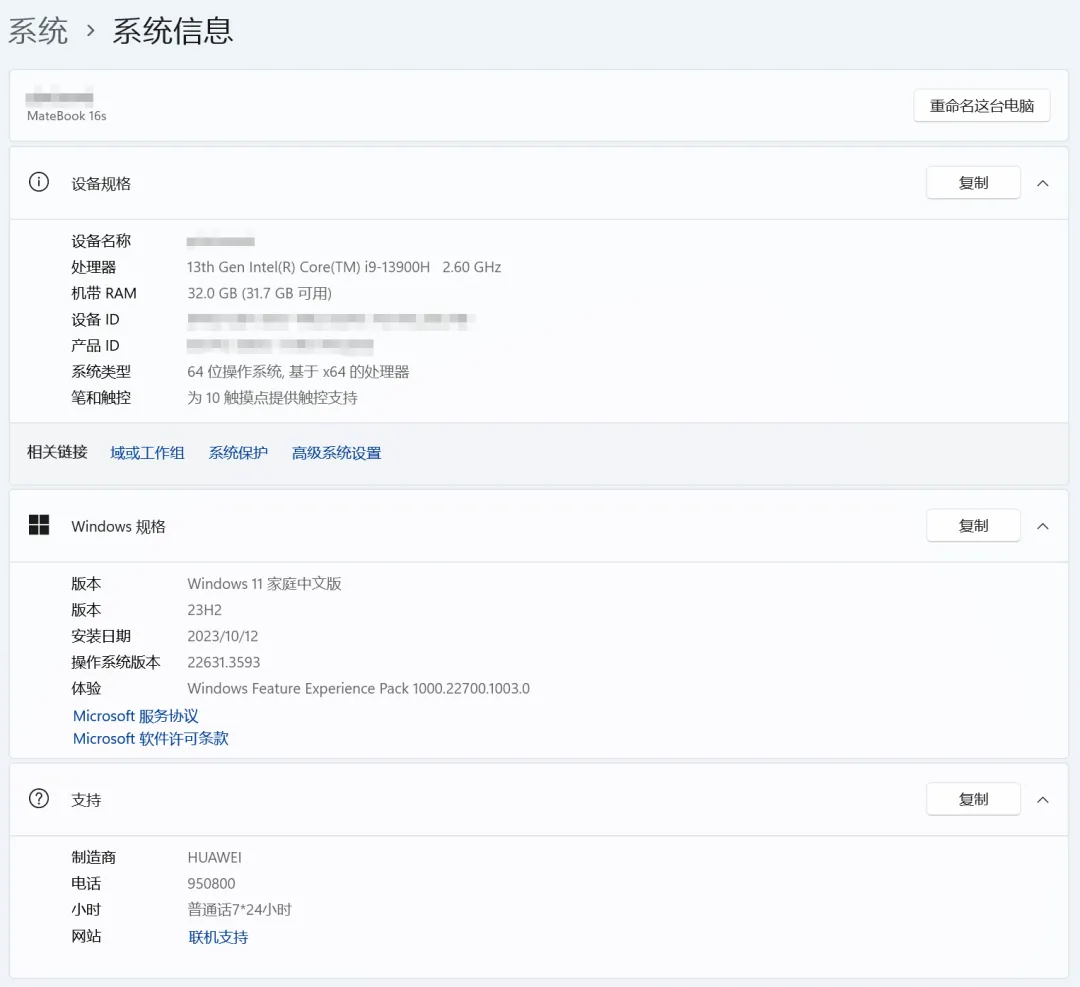
Huawei Matebook 16s
Processor 13th Gen Intel(R) Core(TM) i9-13900H 2.60 GHz
Onboard RAM 32.0 GB (31.7 GB available)
System Type 64-bit operating system, x64-based processor
Pen and Touch provides touch support for 10 touch points
Version Windows 11 Home Chinese Edition
Version 23H2
Installation date 2023/10/12
OS version 22631.3593
Experience Windows Feature Experience Pack 1000.22700.1003.0
Procedure
- Install Python.
- Install Git.
- Install Rust.
- Clone stable-diffusion-webui to your local computer.
- Download the stable-diffusion model.
- Run stable-diffusion-webui.
Precautions
The computer is equipped with Intel(R) Iris(R) Xe Graphics, so the selected stable-diffusion-webui needs to use the version that supports Intel graphics, that is, the OpenVINO version.
OpenVINO download link:https://github.com/openvinotoolkit/stable-diffusion-webui
Python version: Python 3.10.11
PS: Regarding the Python version, I first downloaded Python 3.12.3, but when I installed the dependency package, it said it was not supported and I needed to download Python 3.8.x. Then I downloaded and installed 3.8.x, but when I installed the dependency package, it said it was not supported again. Finally, I downloaded Python 3.10.11 to install the necessary dependency packages.
Install Python
References[AI Learning] Nanny-level tutorial, step-by-step on how to install Python on your computer (Windows users), and complete the Python installation.
PS: You need to pay attention to the Python version. Download the latest 3.12.3 version. When installing the dependent package, it will prompt that it is not supported. It is recommended to choose version 3.10.x.
Install Git
References[AI Learning] Nanny-level tutorial, step-by-step on how to install Git on your computer (Windows users), complete the Git installation.
Git is installed to make it easier to clone stable-diffusion-webui to your local computer.
Install Rust
References[AI Learning] Nanny-level tutorial! Teach you step by step how to download and install Rust? (AI helps solve problems), and you are done with the Rust installation.
Rust is installed to resolve an error when building the tokenizers package.
Clone the CPU version of stable-diffusion-webui
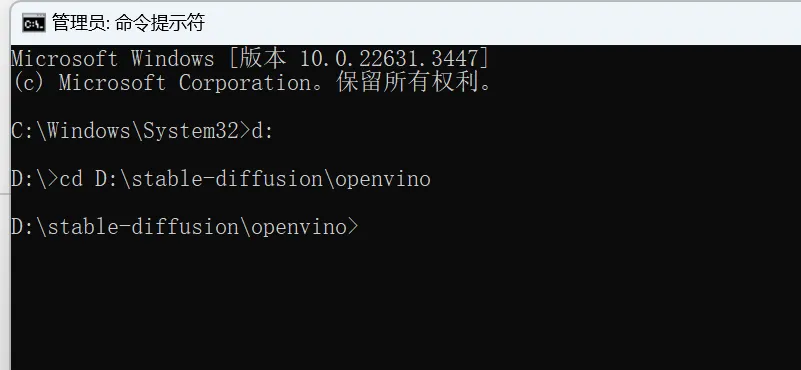
Go to the stable-diffusion folder in the D drive of the local computer and create a new folder openvino.
Run the command prompt window as an administrator and enter the openvino folder path.
Enter the command line as follows:
Use Git to clone the https://github.com/openvinotoolkit/stable-diffusion-webui.git project.
Enter the command line:
git clone https://github.com/openvinotoolkit/stable-diffusion-webui.git
The project was cloned successfully, and the openvino folder had an additional stable-diffusion-webui folder project.
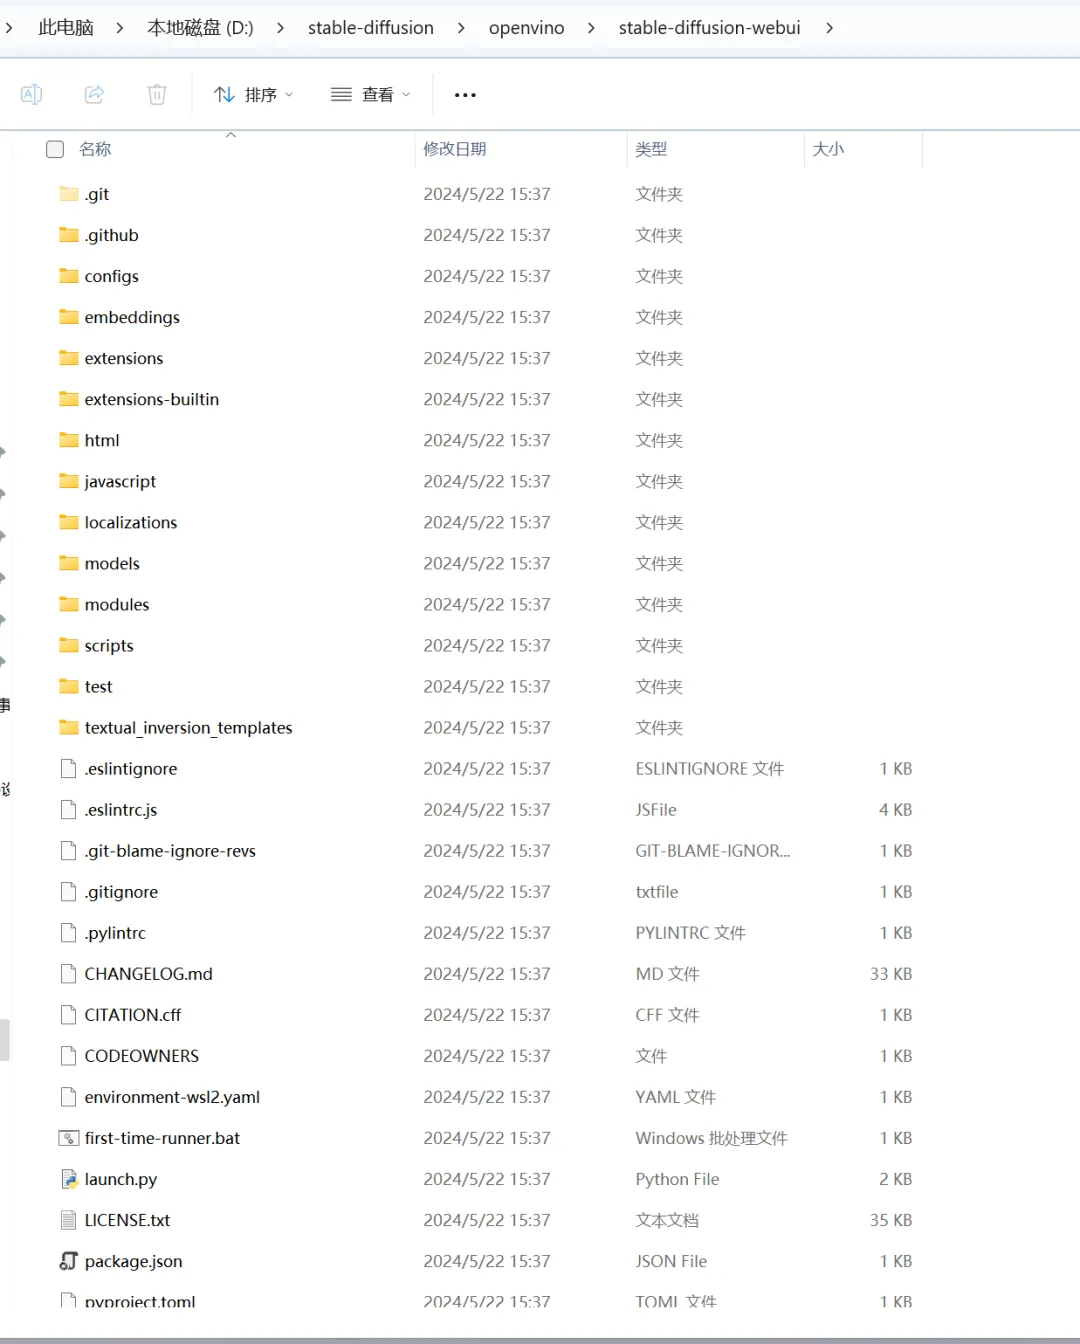
At this point, the stable-diffusion-webui project cloning of the CPU version is completed.
downloadStable DiffusionModel
Enter https://huggingface.co/runwayml/stable-diffusion-v1-5/blob/main/v1-5-pruned-emaonly.safetensors in the browser and press Enter to enter the stable diffusion model download page. Click the [download] text in the red box to download the model.
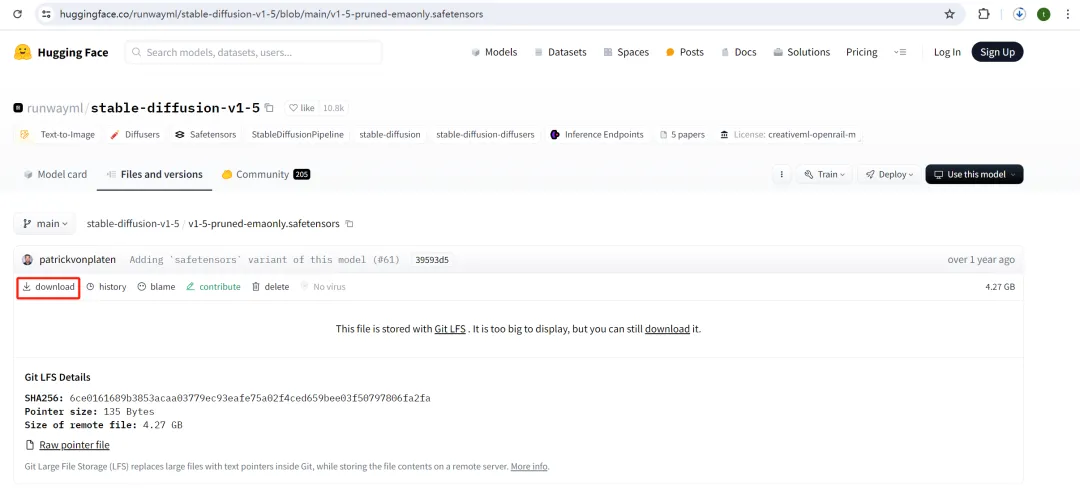
Downloading. With 4G, the download may take some time.
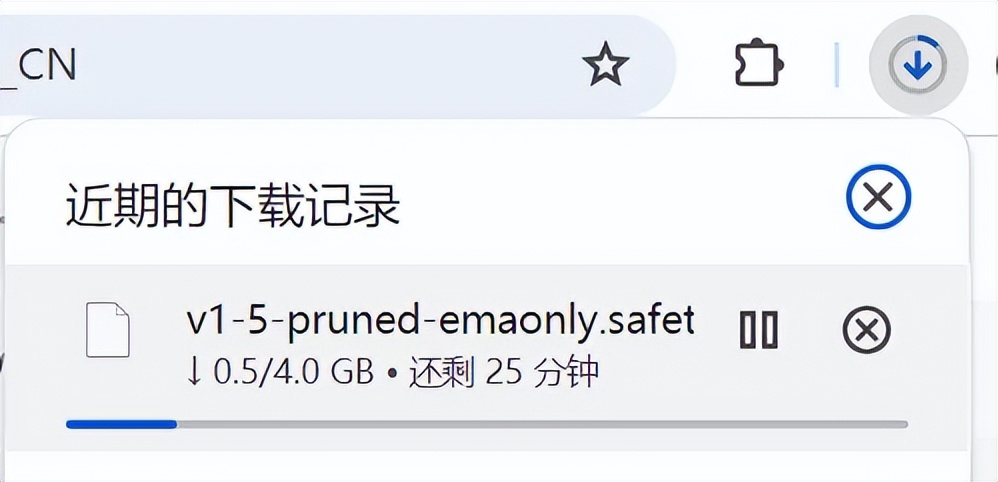
After downloading the model, copy and paste it into the models/Stable-diffusion folder of the current project.
D:\stable-diffusion\openvino\stable-diffusion-webui\models\Stable-diffusion
PS: If you need to enable a new model later, just put it in this path.
More models can be downloaded from the following two websites:
https://civitai.com/
https://www.liblib.art/
Create a Python Virtual Environment
Run the command prompt as an administrator to enter the command prompt window.
Enter the D drive and enter the command line: D:
Enter the stable-diffusion-webui folder and enter the command line: cd D:\stable-diffusion\openvino\stable-diffusion-webui
Create a virtual environment named sd and enter the command line: python -m venv sd
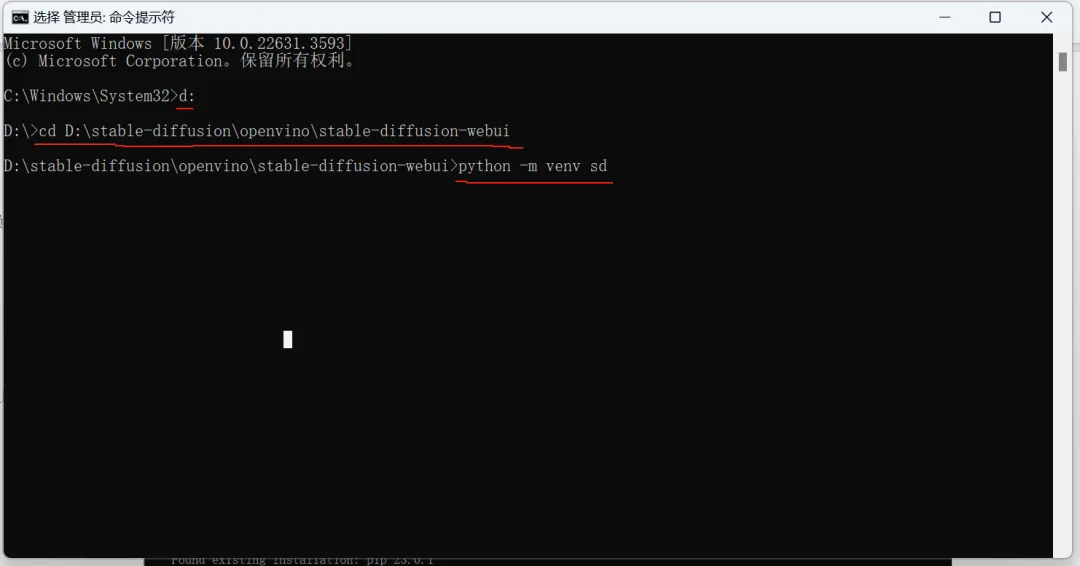
Activate Python Virtual Environment
Run the command prompt as an administrator to enter the command prompt window.
Enter the D drive and enter the command line: D:
Go to the folder D:\stable-diffusion\openvino\stable-diffusion-webui\venv\Scripts and enter the command line: cd D:\stable-diffusion\openvino\stable-diffusion-webui\venv\Scripts.
After entering the folder, enter the command line: activate to activate the environment.
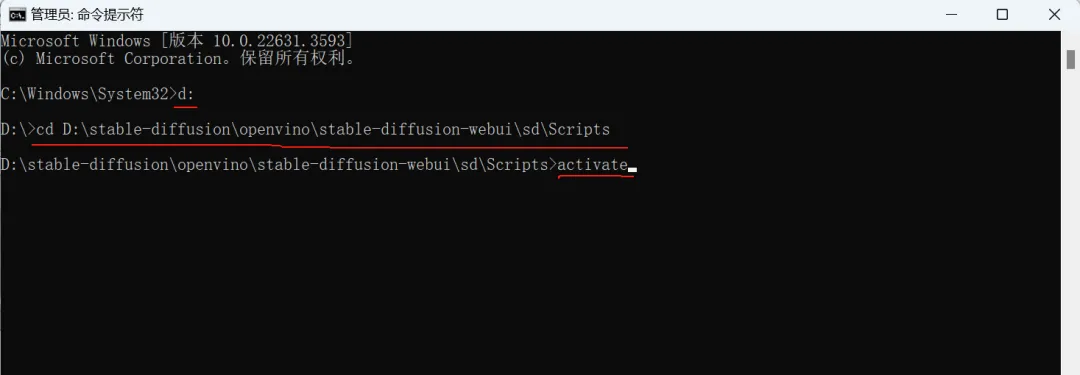
Enter the sd virtual environment.
At this point, we have successfully activated the sd virtual environment. Next, we can start stable-diffusion-webui here.
Start stable-diffusion-webui
Upgrade pip version
In the sd virtual environment, before installing dependent packages, upgrade pip to the latest version to avoid subsequent installation failures due to pip versions.
Command line: python.exe -m pip install --upgrade pip
Start stable-diffusion-webui
When you start stable-diffusion-webui for the first time, the missing dependency packages will be automatically downloaded and installed.
Enter (sd) D:\stable-diffusion\openvino\stable-diffusion-webui> and enter the start project command line: py launch.py --skip-torch-cuda-test --precision full --no-half
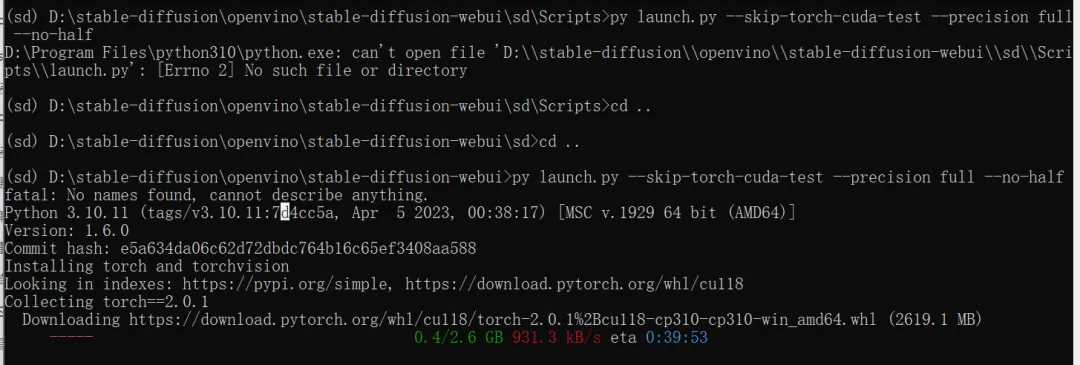
PS: Since my computer does not have an NVIDIA graphics card, I need to add "skip PyTorch CUDA test, use full precision, disable half precision" when running launch.py. The command line is as follows: py launch.py --skip-torch-cuda-test --precision full --no-half
It takes a long time to download and install the dependency packages for the first startup. The network speed of Guotou is about 1M/S, and it takes about 1 hour and 20 minutes.
(sd) D:\stable-diffusion\openvino\stable-diffusion-webui\sd\Scripts>python.exe -m pip install --upgrade pip
Requirement already satisfied: pip in d:\stable-diffusion\openvino\stable-diffusion-webui\sd\lib\site-packages (23.0.1)
Collecting pip
Downloading pip-24.0-py3-none-any.whl (2.1 MB)
---------------------------------------- 2.1/2.1 MB 940.0 kB/s eta 0:00:00
Installing collected packages: pip
Attempting uninstall: pip
Found existing installation: pip 23.0.1
Uninstalling pip-23.0.1:
Successfully uninstalled pip-23.0.1
Successfully installed pip-24.0
(sd) D:\stable-diffusion\openvino\stable-diffusion-webui\sd\Scripts>py launch.py --skip-torch-cuda-test --precision full --no-half
D:\Program Files\python310\python.exe: can't open file 'D:\\stable-diffusion\\openvino\\stable-diffusion-webui\\sd\\Scripts\\launch.py': [Errno 2] No such file or directory
(sd) D:\stable-diffusion\openvino\stable-diffusion-webui\sd\Scripts>cd ..
(sd) D:\stable-diffusion\openvino\stable-diffusion-webui\sd>cd ..
(sd) D:\stable-diffusion\openvino\stable-diffusion-webui>py launch.py --skip-torch-cuda-test --precision full --no-half
fatal: No names found, cannot describe anything.
Python 3.10.11 (tags/v3.10.11:7d4cc5a, Apr 5 2023, 00:38:17) [MSC v.1929 64 bit (AMD64)]
Version: 1.6.0
Commit hash: e5a634da06c62d72dbdc764b16c65ef3408aa588
Installing torch and torchvision
Looking in indexes: https://pypi.org/simple, https://download.pytorch.org/whl/cu118
Collecting torch==2.0.1
Downloading https://download.pytorch.org/whl/cu118/torch-2.0.1%2Bcu118-cp310-cp310-win_amd64.whl (2619.1 MB)
---------------------------------------- 2.6/2.6 GB 581.4 kB/s eta 0:00:00
Collecting torchvision==0.15.2
Downloading https://download.pytorch.org/whl/cu118/torchvision-0.15.2%2Bcu118-cp310-cp310-win_amd64.whl (4.9 MB)
---------------------------------------- 4.9/4.9 MB 792.0 kB/s eta 0:00:00
Collecting filelock (from torch==2.0.1)
Downloading filelock-3.14.0-py3-none-any.whl.metadata (2.8 kB)
Collecting typing-extensions (from torch==2.0.1)
Downloading typing_extensions-4.11.0-py3-none-any.whl.metadata (3.0 kB)
Collecting sympy (from torch==2.0.1)
Downloading https://download.pytorch.org/whl/sympy-1.12-py3-none-any.whl (5.7 MB)
---------------------------------------- 5.7/5.7 MB 531.7 kB/s eta 0:00:00
Collecting networkx (from torch==2.0.1)
Downloading networkx-3.3-py3-none-any.whl.metadata (5.1 kB)
Collecting jinja2 (from torch==2.0.1)
Downloading jinja2-3.1.4-py3-none-any.whl.metadata (2.6 kB)
Collecting numpy (from torchvision==0.15.2)
Downloading numpy-1.26.4-cp310-cp310-win_amd64.whl.metadata (61 kB)
---------------------------------------- 61.0/61.0 kB 1.6 MB/s eta 0:00:00
Collecting requests (from torchvision==0.15.2)
Downloading requests-2.32.2-py3-none-any.whl.metadata (4.6 kB)
Collecting pillow!=8.3.*,>=5.3.0 (from torchvision==0.15.2)
Downloading pillow-10.3.0-cp310-cp310-win_amd64.whl.metadata (9.4 kB)
Collecting MarkupSafe>=2.0 (from jinja2->torch==2.0.1)
Downloading https://download.pytorch.org/whl/MarkupSafe-2.1.5-cp310-cp310-win_amd64.whl (17 kB)
Collecting charset-normalizer<4,>=2 (from requests->torchvision==0.15.2)
Downloading charset_normalizer-3.3.2-cp310-cp310-win_amd64.whl.metadata (34 kB)
Collecting idna<4,>=2.5 (from requests->torchvision==0.15.2)
Downloading idna-3.7-py3-none-any.whl.metadata (9.9 kB)
Collecting urllib3<3,>=1.21.1 (from requests->torchvision==0.15.2)
Downloading urllib3-2.2.1-py3-none-any.whl.metadata (6.4 kB)
Collecting certifi>=2017.4.17 (from requests->torchvision==0.15.2)
Downloading certifi-2024.2.2-py3-none-any.whl.metadata (2.2 kB)
Collecting mpmath>=0.19 (from sympy->torch==2.0.1)
Downloading https://download.pytorch.org/whl/mpmath-1.3.0-py3-none-any.whl (536 kB)
---------------------------------------- 536.2/536.2 kB 560.7 kB/s eta 0:00:00
Downloading pillow-10.3.0-cp310-cp310-win_amd64.whl (2.5 MB)
---------------------------------------- 2.5/2.5 MB 938.3 kB/s eta 0:00:00
Downloading filelock-3.14.0-py3-none-any.whl (12 kB)
Downloading jinja2-3.1.4-py3-none-any.whl (133 kB)
---------------------------------------- 133.3/133.3 kB 984.2 kB/s eta 0:00:00
Downloading networkx-3.3-py3-none-any.whl (1.7 MB)
---------------------------------------- 1.7/1.7 MB 820.2 kB/s eta 0:00:00
Downloading numpy-1.26.4-cp310-cp310-win_amd64.whl (15.8 MB)
---------------------------------------- 15.8/15.8 MB 904.1 kB/s eta 0:00:00
Downloading requests-2.32.2-py3-none-any.whl (63 kB)
---------------------------------------- 63.9/63.9 kB 383.3 kB/s eta 0:00:00
Downloading typing_extensions-4.11.0-py3-none-any.whl (34 kB)
Downloading certifi-2024.2.2-py3-none-any.whl (163 kB)
---------------------------------------- 163.8/163.8 kB 1.1 MB/s eta 0:00:00
Downloading charset_normalizer-3.3.2-cp310-cp310-win_amd64.whl (100 kB)
---------------------------------------- 100.3/100.3 kB 1.2 MB/s eta 0:00:00
Downloading idna-3.7-py3-none-any.whl (66 kB)
---------------------------------------- 66.8/66.8 kB 898.3 kB/s eta 0:00:00
Downloading urllib3-2.2.1-py3-none-any.whl (121 kB)
---------------------------------------- 121.1/121.1 kB 786.0 kB/s eta 0:00:00
Installing collected packages: mpmath, urllib3, typing-extensions, sympy, pillow, numpy, networkx, MarkupSafe, idna, filelock, charset-normalizer, certifi, requests, jinja2, torch, torchvision
Successfully installed MarkupSafe-2.1.5 certifi-2024.2.2 charset-normalizer-3.3.2 filelock-3.14.0 idna-3.7 jinja2-3.1.4 mpmath-1.3.0 networkx-3.3 numpy-1.26.4 pillow-10.3.0 requests-2.32.2 sympy-1.12 torch-2.0.1+cu118 torchvision-0.15.2+cu118 typing-extensions-4.11.0 urllib3-2.2.1
Installing clip
Installing open_clip
Installing requirements for CodeFormer
Installing requirements
Launching Web UI with arguments: --skip-torch-cuda-test --precision full --no-half
no module 'xformers'. Processing without...
No module 'xformers'. Proceeding without it.
Warning: caught exception 'Found no NVIDIA driver on your system. Please check that you have an NVIDIA GPU and installed a driver from http://www.nvidia.com/Download/index.aspx', memory monitor disabled
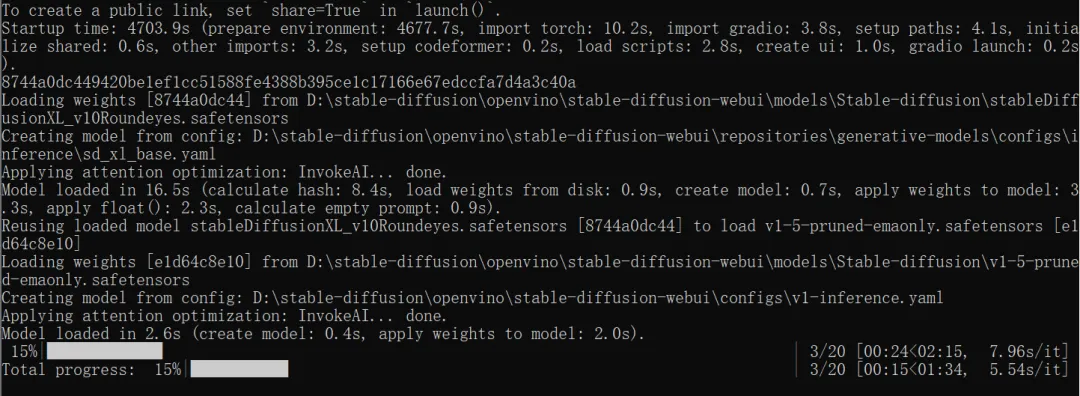
Calculating sha256 for D:\stable-diffusion\openvino\stable-diffusion-webui\models\Stable-diffusion\stableDiffusionXL_v10Roundeyes.safetensors: Running on local URL: http://127.0.0.1:7860
To create a public link, set `share=True` in `launch()`.
Startup time: 4703.9s (prepare environment: 4677.7s, import torch: 10.2s, import gradio: 3.8s, setup paths: 4.1s, initialize shared: 0.6s, other imports: 3.2s, setup codeformer: 0.2s, load scripts: 2.8s, create ui: 1.0s, gradio launch: 0.2s).
8744a0dc449420be1ef1cc51588fe4388b395ce1c17166e67edccfa7d4a3c40a
Loading weights [8744a0dc44] from D:\stable-diffusion\openvino\stable-diffusion-webui\models\Stable-diffusion\stableDiffusionXL_v10Roundeyes.safetensors
Creating model from config: D:\stable-diffusion\openvino\stable-diffusion-webui\repositories\generative-models\configs\inference\sd_xl_base.yaml
Applying attention optimization: InvokeAI... done.
Model loaded in 16.5s (calculate hash: 8.4s, load weights from disk: 0.9s, create model: 0.7s, apply weights to model: 3.3s, apply float(): 2.3s, calculate empty prompt: 0.9s).
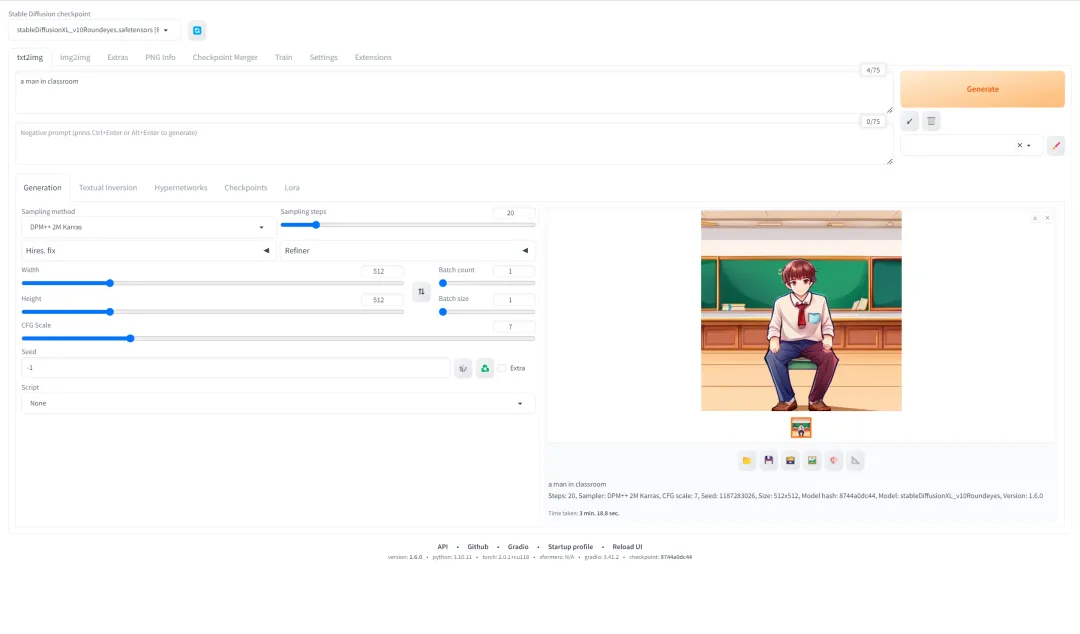
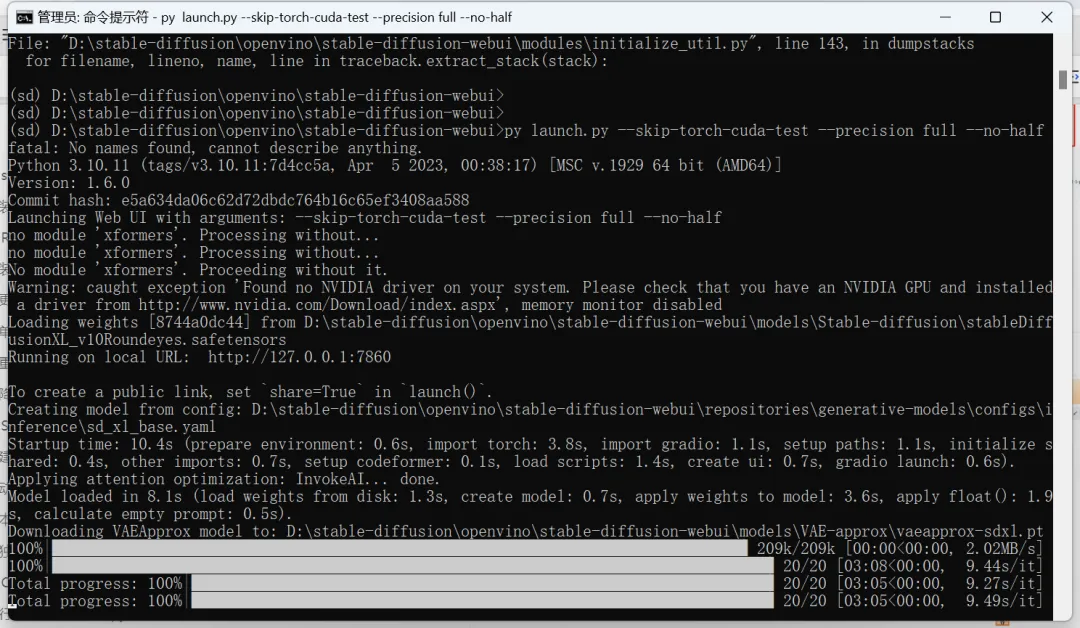
Successfully opened stable-diffusion-webui.
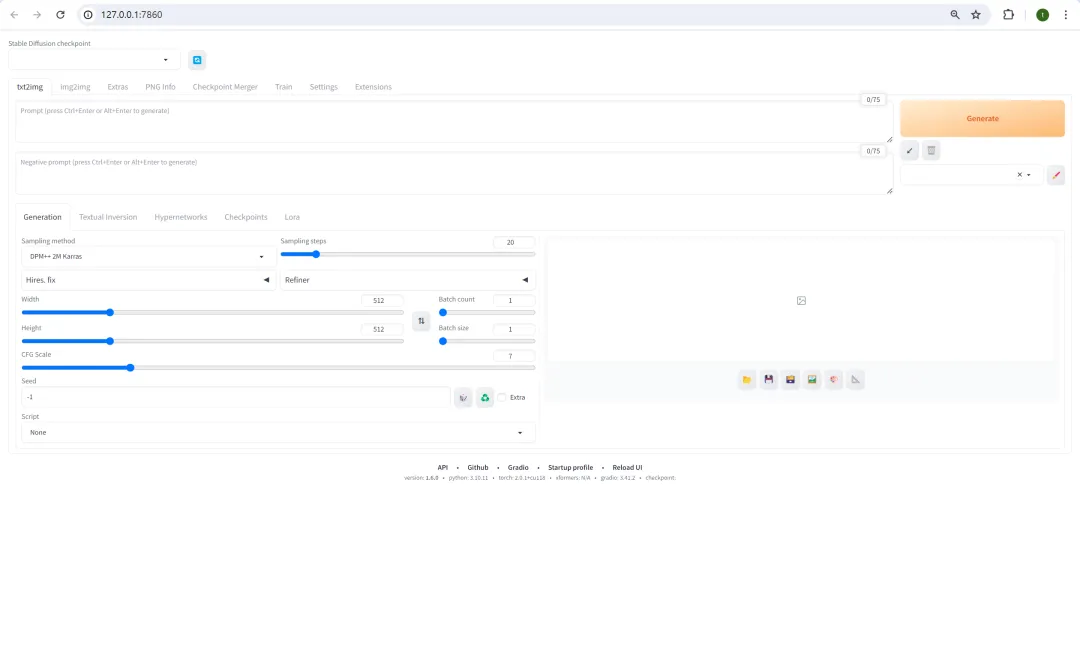
Try to generate a graph.
Prompt word: a dog smile.
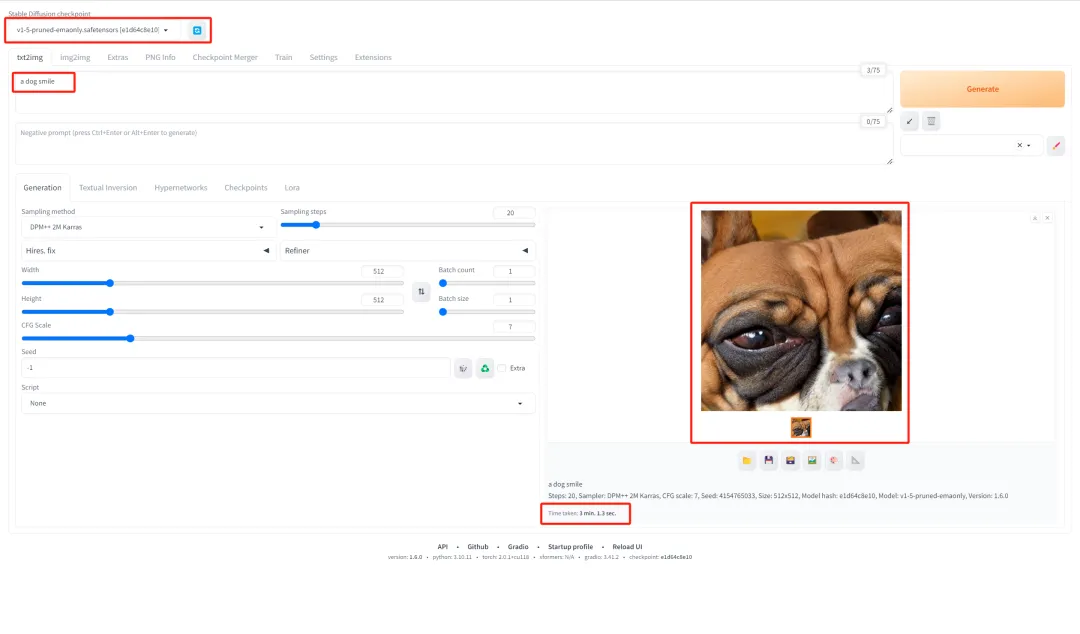
Switching models can also generate images normally.
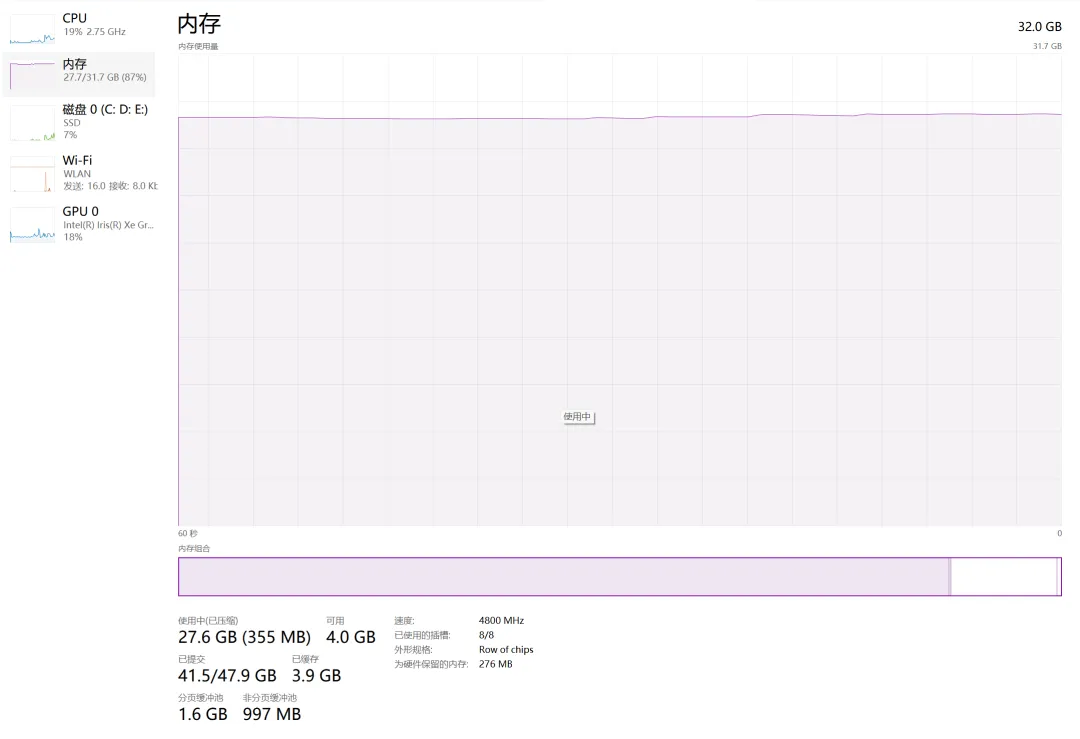
But the memory was suddenly increased to 27.7G, which was almost used up.
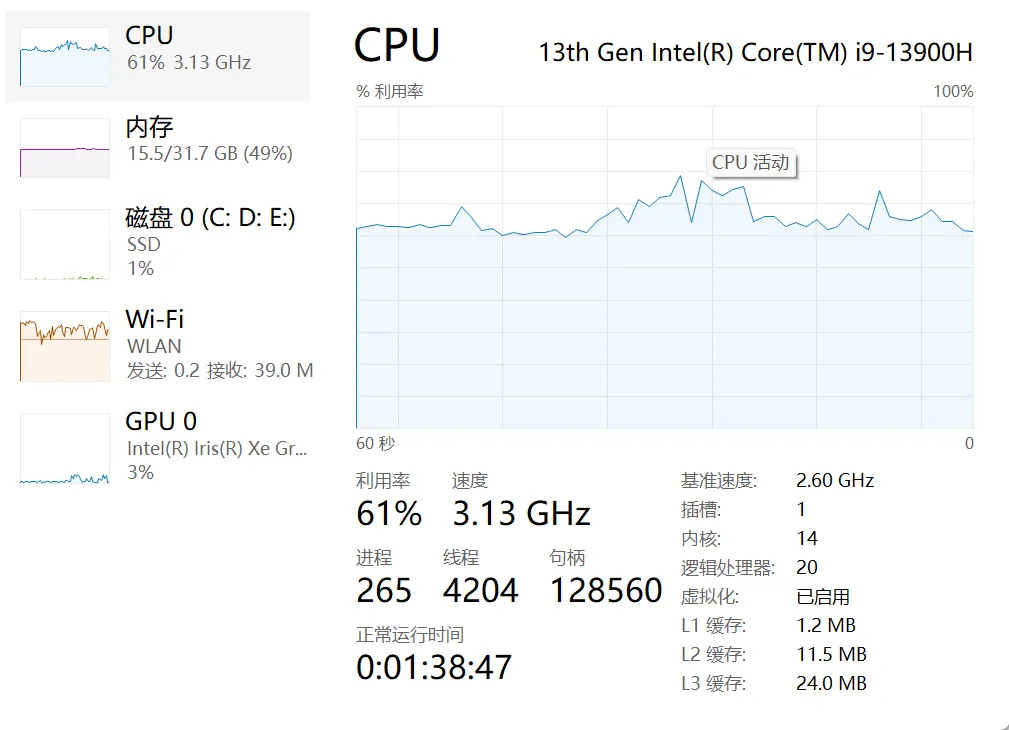
CPU: 13th Gen Intel(R) Core(TM) i9-13900H, much higher performance.
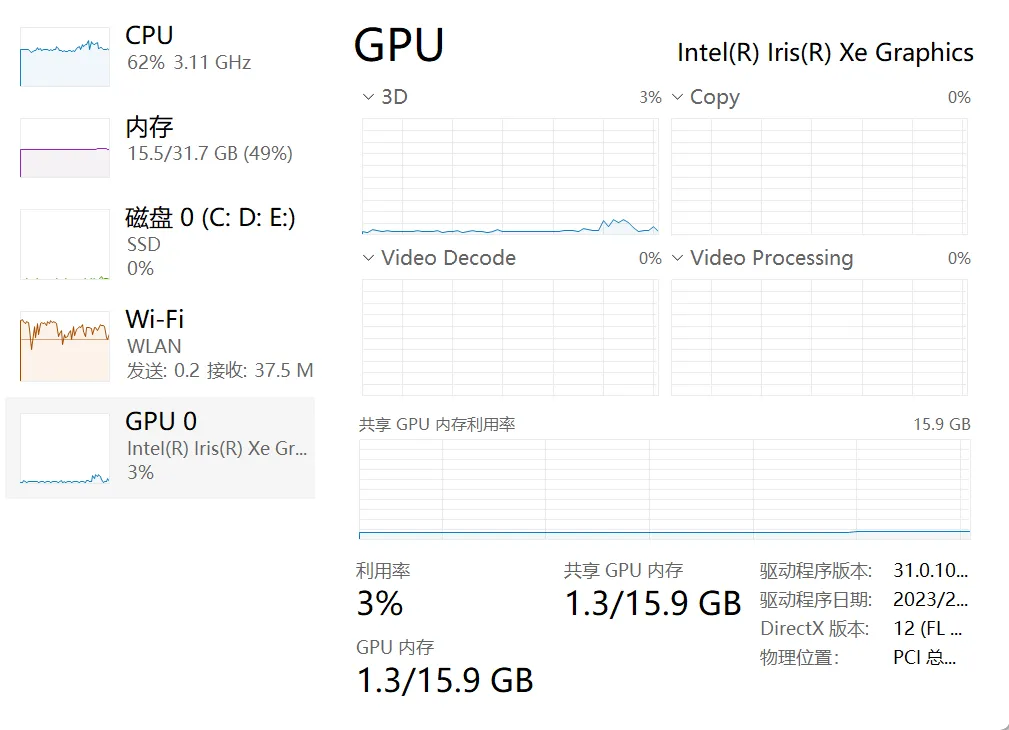
GPU: Intel(R) Iris(R) Xe Graphics, not used.
At this point, we have completed the installation and operation of stable-diffusion-webui and successfully drawn pictures on the local computer.
However, due to limited hardware conditions and the lack of NVIDIA graphics cards, Vincent Image still takes a long time to run, and this computer still has difficulty running Vincent Image.