Hello everyone, this is the Stable diffusion for beginners seriesVincent FigureTutorial explanation, in the previous post.We successfully installed the Stable diffusion software, and today, we're going to dive into Stable diffusion's text-generated image feature so that you can generate satisfying images as well!

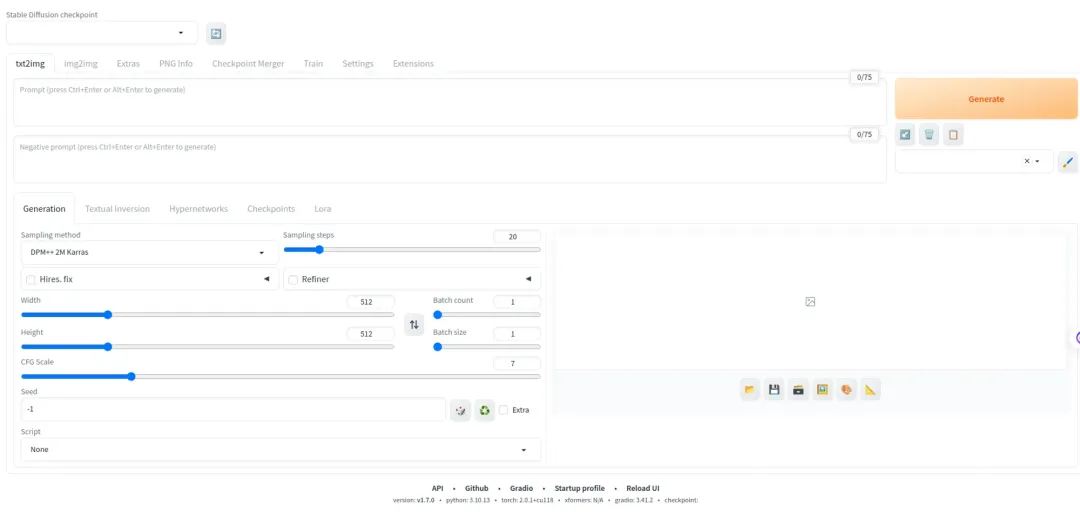
As shown above, this is Stable diffusion's VinceMap interface, and this interface can be divided into five areas overall:
- Model area: where models are adjusted/changed
- Prompt area: a place to write prompts
- Parameter Adjustment Area: where model parameters are adjusted
- Plug-in area: various plug-ins for SD
- The image area: this is where the generated images are displayed.
1. Model area
The first area is our model area, this area can choose different models, the model determines the style of our drawings, for example, if your big model is a quadratic model, then your final drawings will tend to be quadratic in effect; if it is a real system model, the final drawings will be more like real people.
Anything-v5-PrtRE models, like the one that comes with Akiha Daiko's integration pack, are secondary models; for example, if you type in the prompt word 1girl, odds are that you'll end up with a photo of a secondary girl.

But SD's models are far more complex than the above mentioned, not only are there multiple model suffixes, but there are also several fine-tuned models such as VAE and Lora, but don't worry about that, this I'll go into a detailed explanation in the next section.
2. Cue word area
The second area is our cue word area, that is, the place where we write cue words. Cue words are no less important in a literate diagram than the models mentioned above, and accurate and effective cue words are the key to a good diagram.
There are two types of cues, forward cues and reverse cues; forward cues are what you want the SD to show, and reverse cues are what you don't want the SD to show (for example).
If you're using stable-diffusion-webui, you'll be a bit clueless about the prompts, as you'll need to find them online yourself!
But if you use the Autumn Leaves Integration Pack, this problem is well solved because it has pre-integrated and categorized a lot of our commonly used cue words (which is why I recommend it for newbie hacks)

There are also complex uses for the cue word, such as controlling the weight of the cue word through English brackets (), etc. Don't worry about this, I'll also explain it in a separate article later on.
3. Parameter adjustment area
The third area is our parameter adjustment area, the concept of this piece is relatively difficult to understand, it is recommended to try a few more times yourself
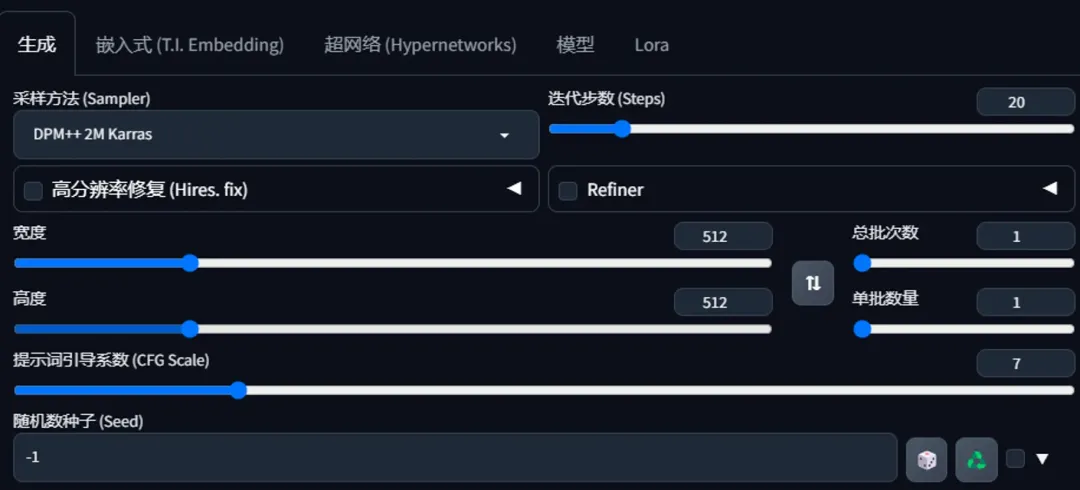
3.1 Sampling methods
To understand how sampling works, it is first necessary to understand one of the mapping principles of Stable diffusion, which is divided into two steps:
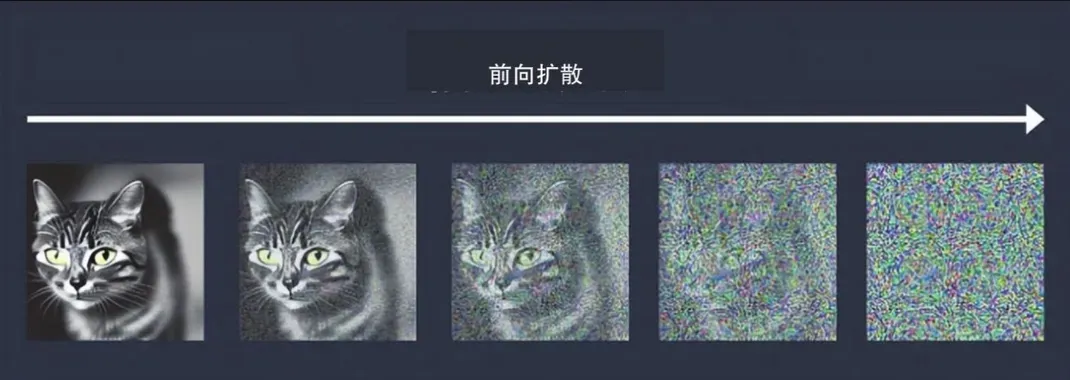
The first step is forward diffusion, in this step, Stable diffusion will gradually add noise to an image, and finally completely into a similar completely black and white noise image, as shown below (as if a drop of ink on the water, and then gradually diffuse the process).
The second step can be understood as the reverse diffusion, in this step, Stable diffusion will denoise the image several times, that is, gradually cut down the noise on the image, and ultimately become a clear, text-based description of the generated image, as follows
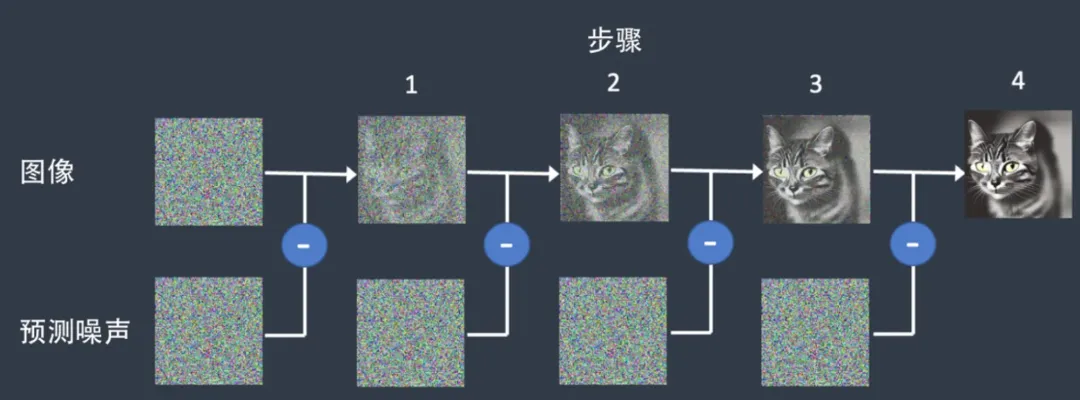
The denoising process in the second step above is called sampling, and the method used in this process is also called the sampling method (which can also be loosely understood as the SD drawing technique).
To be honest sampling methods are quite confusing because there are so many of them, and for newbies often don't know which one to choose better! By reading some books and online articles, I roughly categorize them into the following categories:
- 1.Old-fashioned ordinary differential sampling: Euler, Henu, LMS, this kind of sampling method is characterized by simple, fast, the effect is also OK, basically 20-30 steps can generate a better image
- 2, ancestral sampling (ancestral sampler): such as Euler a, DPM2 a, DPM + + 2S a, etc., this kind of sampling general name will have a "letter a". Ancestral sampling belongs to random sampling, the intention is to produce a variety of results through a small number of steps, but the disadvantage is that the image will not converge, that is, with the increase of steps, the image does not tend to stabilize, but rather variable, so if you want to get a stable, reproducible image, try to avoid the use of ancestral sampling!
- 3, Karras sampling: such as LMS Karras, DPM2 Karras, etc., this sampling method in the beginning of the picture noise will be more, but less noise in the later stages, which helps to improve the quality of the image, so it is recommended that steps at least more than 15 steps!
- 4, has been out of date sampling: such as DDIM and PLMS, the online saying is that these two sampling methods have been out of date, simply try, the effect is really not very good, the generated picture feels strange!
- 5, DPM sampling: a cursory look, the DPM family has the most sampling methods, ranging from DPM, DPM2, DPM++, DPM++ 2M, etc. DPM is a diffusion probabilistic model solver, DPM2 is similar to DPM, but it is second-order, with higher accuracy but a little slower; DPM++ is an improvement on DPM, faster, and can achieve the same results with fewer steps to achieve the same results; DPM++ 2M results are similar to Euler but with a good balance of speed and quality; DPM fast is a faster version of DPM that is faster but sacrifices some of the quality; and DPM++ SDE uses stochastic differential equations (SDEs) to solve the diffusion process so it is non-convergent as are the ancestor sampling methods.
- 6, UniPC sampling: 2023 release of the new sampling method, is currently the fastest and latest sampling method, can be in less steps within the generation of high-quality images
After reading so much, you may still be confused, here are some sampling methods that I use:
- If you want to generate simple and common images, and the requirements for the effect are not very high, then you can try the old-fashioned constant differential sampling
- For novelty and good quality, try DPM++ 2M Karras and UniPC.
- For those who want good quality, but don't care if the images converge, try DPM++ SDE Karras
If you want to see a comparison of image generation under different sampling methods, take a look at theThis article[1]:
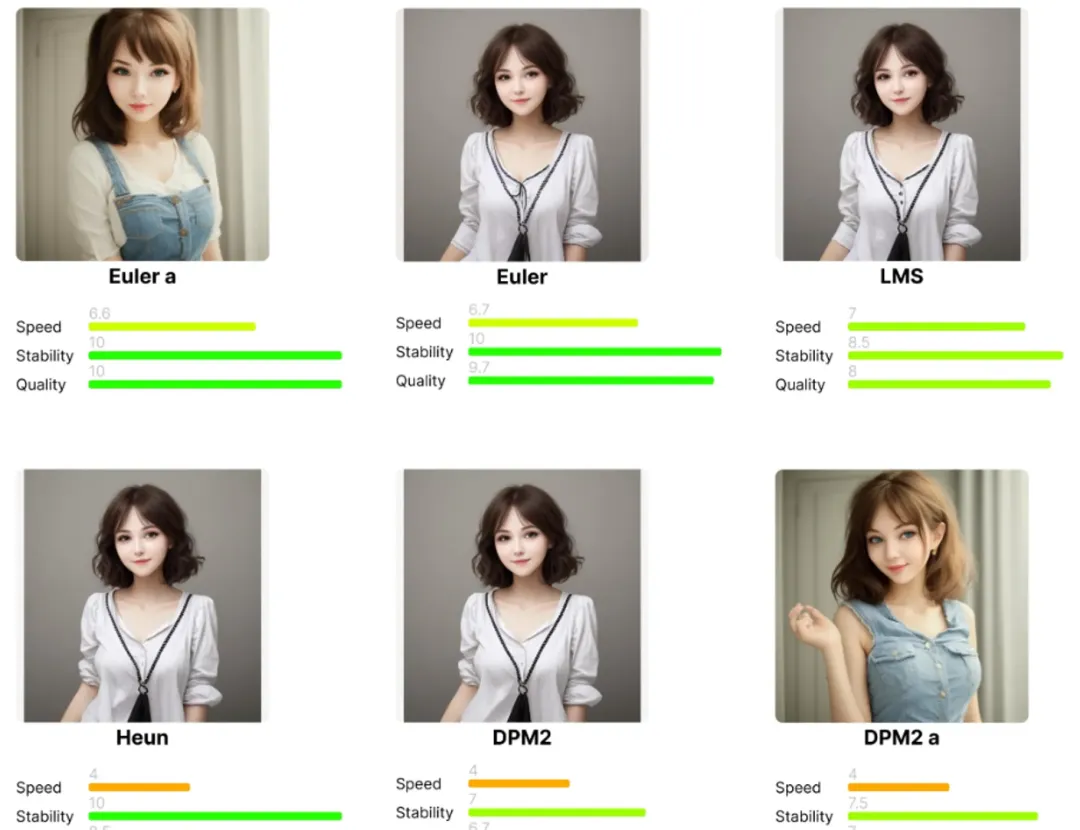
Note: Only partial comparisons are given here, the full comparison article is available at
3.2 Iteration steps
The number of iteration steps is relatively simple to understand and refers to how many diffusion calculations are performed when generating the image, i.e. the number of times the image noise is removed above. The more iteration steps, the longer it takes.
However, the number of iteration steps is not as high as it should be, and is actually closely related to the sampling method mentioned above. For example, if you want to get a stable image, but choose the sampling method of ancestor sampling, then too many steps are not very useful. At present, the number of iterative steps is generally in the 20-40 can be, too few steps may be due to the noise is not completely removed, so the resulting picture has a lot of noise, it may look fuzzy; and too much is a waste of time and resources.
3.3 High-resolution restoration
High Resolution Repair simply means that the generated image is enlarged to a higher resolution of high-definition pictures, like we use SD to generate pictures, the size of the picture is generally in the 512-1024, the clarity of such a size of the picture is not quite enough, so you need to improve the clarity of the picture through the high-resolution repair function.

3.4 Image Refiner
The role of refining is to polish the picture more beautiful, with our usual understanding of the picture refining is a meaning. refiner has two parameters, the first parameter is to select the refining of the large model, the second parameter is to select the refining of the timing, such as the following figure iteration step 20, switching the timing of 0.5, from the first 20 * 0.5 = 10 steps to start refining.

3.5 Facial Repair
If your SD isn't the Autumn Leaves Integration Pack, you might also see a Face Repair next to the High Resolution Repair, which is actually present in the Autumn Leaves Integration Pack, just in a different location and moved to the Post Processing Tab.
The reason why there is a face repair is because the picture itself is small in size, so if you draw a person, there are not many pixels left for the face, so the AI can't draw it very well, and then you can use the face repair to "refine" the face.

3.6 Total number of batches/number of individual batches
- The total batch count is how many times the image generation task is executed in total, the default value is 1 and the maximum value is 100.
- The number of single batches, i.e. how many images are generated per job, defaults to 1 and maxes out at 8.
If you need to batch generate 4 pictures, set the "total number of batches of 4, the number of single batches of 1" and set the "total number of batches of 1, the number of single batches of 4" effect is the same, but the latter will be faster, but also the latter need to be supported by a larger video memory. If the memory is small friends, it is recommended that the number of single batch set to 1, by adjusting the total number of batches to a number of pictures, equivalent to the time for memory.
Another small detail is that using the total number of batches/number of individual batches, the number of iteration steps for the latter image is 1 added to the previous image, which ensures that there is a change in the image, while the change is not too large.
3.7 Cue word guidance coefficients (CFG Scale)
This parameter determines the influence of the cue word on the composition; if this value is larger, the AI will follow the cue word more strictly; if this value is smaller, the AI will tend to freehand.
For example, my cue words are as follows: 1girl,red hair,tuxedo,high_heels
When the value of the bootstrap coefficient is 20, the generated image is as follows:

But when the value of the bootstrap coefficient was 3.5, it was generated more than a few times and this picture appeared (violating the setting of the previous 1 girl)

But this is not just so absolute, I also tried in the case of guidance factor is larger, more generated several times also appeared in the case of multiple people, so this is a probability of high and low issues, generally I will set it to 7-12 this range, this time the picture effect is better, both creative and can be around our prompt word.
3.8 Random number seeds
This thing is like a line drawing in painting, if you use the random number from the last image, then the odds are that the image generated this time won't deviate much from the last image. If the random number seed is set to -1, it means random generation.
This is generally used to repeat the generation of a particular image, because even if you use the same cue word, sampling method and iteration step, if the random number is a big difference, the difference in the generated image will be very big, and if this time then use the same random number, you will be able to generate the image the next time theMaximize reductions(There's no way to guarantee 1001 TP3T, it's still random)
As an example, for that beautiful picture above, I controlled the same cue words, sampling method, number of iteration steps, and random number, and the final picture came out as follows:

Fourth, the plug-in area and out of the map area
Plug-in area of this piece for white people is more complex, the function of the inside is not used for the time being, and so there is a corresponding real-world cases and then speak separately.
About the output area, in fact, it is relatively simple, SD each time the image generated will be saved, you can click on the image output directory to view, the other several in fact, there are corresponding to the Chinese instructions, such as sending the image to the map to generate the map tab, to summarize are some of the shortcuts to enhance efficiency.
Above is the content of this, more focused on the five regions inside the parameter adjustment area, because this area for white people with greater use, but there is a certain degree of complexity, if you think the content of this to help you, but also please more points of praise, in the look of support!