
After checking it out, the effect is still good.
Tutorial
1. Install the Inpaint Anything image detection and segmentation plugin
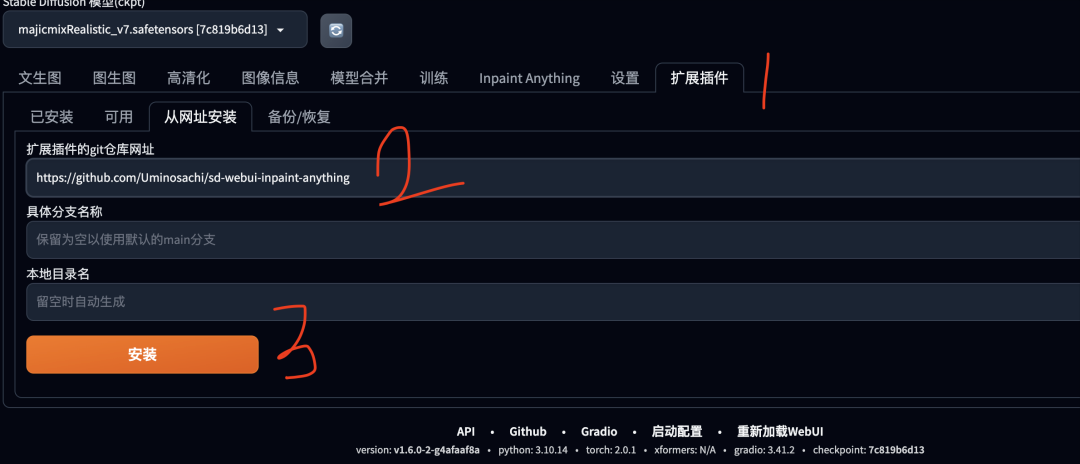

https://github.com/Uminosachi/sd-webui-inpaint-anything
2. Download the Inpaint Anything model
exist Stable Diffusion Click the "Inpaint Anything" tab in the ribbon, and select the corresponding model to download in the "Segment Anything Model" column. SAM provides three models. For models with high video memory, download sam_vit_h, which has more accurate recognition. For models with video memory of about 8G, download sam_vit_l, and for models with video memory below 8G, download sam_vit_b. After selecting the corresponding model, click "Download Model", and the downloaded model will be stored in the models folder in the Inpaint Anything plug-in directory.
![[AI Painting] Stable Diffusion case for beginners, AI face and clothes changing tutorial](https://www.1ai.net/wp-content/uploads/2024/05/get-228.jpg "get-228")
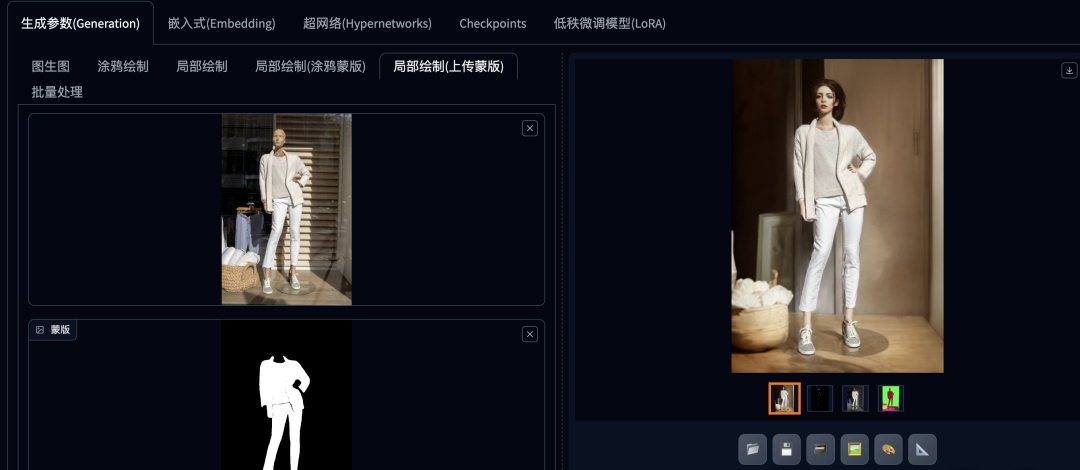
3. Use Inpaint Anything to generate a specified area mask
![[AI Painting] Stable Diffusion case for beginners, AI face and clothes changing tutorial](https://www.1ai.net/wp-content/uploads/2024/05/get-229.jpg "get-229")
- Drag and drop the mannequin image into the upload image area on the left.
- Click Run Segment Anything.
- In the image segmentation area on the right, adjust the brush size, click the area of the image to be segmented, and press S to enter full screen mode. For example, in this example, there are many image elements in this image after recognition. Our goal is to keep the clothes and replace the model and background. Therefore, we can click the clothing area as the mask content area, and then in the image redrawing function, select the mask mode to redraw the non-masked content.
- After making your selection, click "Create Mask" and the mask will appear in the selected mask image area.
![[AI Painting] Stable Diffusion case for beginners, AI face and clothes changing tutorial](https://www.1ai.net/wp-content/uploads/2024/05/get-231.jpg "get-231")
- Trim Mask to Sketch button: Click this button to exclude the sketched area from the mask. In the Mask Only tab on the left, click Get Mask to create a mask map.
- Click "Send to Raw Image Redraw" to send the mask to the Raw Image Upload Redraw Mask mode.
4. Set the Stable Diffusion model and the image redrawing parameters
Download mr model file
https://civitai.com/models/43331/majicmix-realistic
![[AI Painting] Stable Diffusion case for beginners, AI face and clothes changing tutorial](https://www.1ai.net/wp-content/uploads/2024/05/get-230.jpg "get-230")
Model and redraw parameter settings
- First select the Stable Diffusion model. If you want to generate a real person, select the real person model. For example, in this example we select a majicMIX realistic real person model.
- In the redraw mode of the upload redraw mask tab, select "Redraw non-mask content". It should be noted that the white part of the mask image is the mask, and the black part is not the mask, so here you should choose to redraw the black non-mask content and keep the white mask clothing.
- Select "Fill" for the mask area content processing and "Entire Image" for the redraw area.
- The sampling method and iteration steps are set according to the situation. Here, the sampling method is set to DPM++ SDE Karras, the iteration step is 30, and face repair is checked.
- The redraw size should be in the same proportion as the original image in terms of width and height. Do not set it too large. Here it is set to 800 and 1200.
- The prompt word guidance coefficient and redrawing amplitude are set according to the situation, and are set to 10 and 0.75 here.
![[AI Painting] Stable Diffusion case for beginners, AI face and clothes changing tutorial](https://www.1ai.net/wp-content/uploads/2024/05/get-232.jpg "get-232")
5. ControlNet parameter settings
controlNet model download
https://huggingface.co/lllyasviel/ControlNet-v1-1/tree/main
Set the parameters of controlNet. The first ControlNet is set to openpose to extract the character's pose. The second ControlNet is set to inpaint only to repaint only the part. The third ControlNet is set to Seg semantic segmentation to extract the background content and composition.
![[AI Painting] Stable Diffusion case for beginners, AI face and clothes changing tutorial](https://www.1ai.net/wp-content/uploads/2024/05/get-233.jpg "get-233")
![[AI Painting] Stable Diffusion case for beginners, AI face and clothes changing tutorial](https://www.1ai.net/wp-content/uploads/2024/05/get-234.jpg "get-234")
![[AI Painting] Stable Diffusion case for beginners, AI face and clothes changing tutorial](https://www.1ai.net/wp-content/uploads/2024/05/get-235.jpg "get-235")
6. Prompt word setting
a girl xxxxxxxxxxxxx
xxxxxxxxxxxxxxxxxx
xxxxxxxxxxxxxxxxxx
7. Generate images and perform post-processing
- Click "Generate" image, and you can set the number of images generated each time in "Total batches" and "Number of single batches".
- Select an overall satisfactory picture. If you need to fine-tune the content of the picture, you can fix the number of seeds and adjust the prompt words to regenerate it.
- Click "Send to Post-Processing" and select the image magnification and super-resolution model to enhance image resolution and details.
- You can also import the image into Photoshop for further post-processing.
![[AI Painting] Stable Diffusion case for beginners, AI face and clothes changing tutorial](https://www.1ai.net/wp-content/uploads/2024/05/get-236.jpg "get-236")
Following this process, you can adjust the prompt words and parameters for training based on your own situation.
